
Do you have a website built using Drupal that you’d like to transfer to self-hosted WordPress? While Drupal is a great content management system, maybe you wish to try something new.
You will have more options when it comes to free themes and plugins, and WordPress is generally easier for beginners to use than Drupal. Follow this step-by-step guide to migrate your site from Drupal to WordPress quickly and easily.
IMPORTANT: Migrating your site from one CMS to another IS NOT simply a matter of moving over the content. It is essentially building a brand new website from scratch.
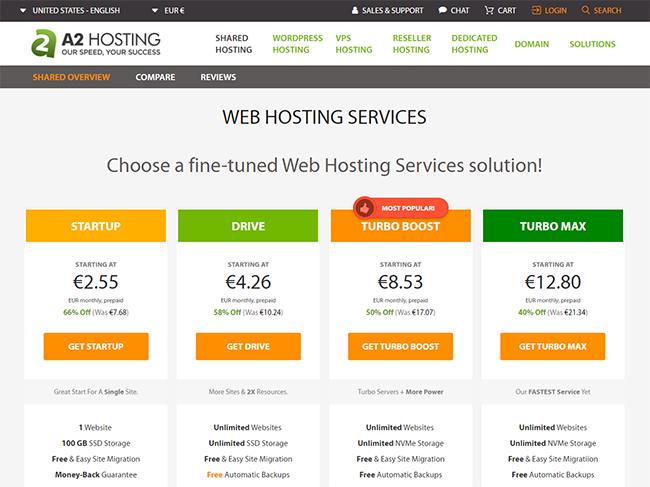
If you’re looking for quality shared hosting for your WordPress website, we highly recommend A2 Hosting. They offer unlimited SSD space, free automatic site backups, hosting optimized for speed and 24/7/365 guru technical support.
Pre-migration steps
Prior to moving any of your content, you’ll need to take care of a few things. Let’s get started, shall we?
Web hosting
Since your current site was built with Drupal, you already have a hosting account. It may be a good idea to switch to a host which offers specialized WordPress hosting.
If your current host sucks, then you should definitely move somewhere else. Using a quality web host is crucial for your site’s performance so you SHOULD NOT choose the cheapest web hosting company you can find.
Update: I used to be a raving SiteGround fan, but they suck now so AVOID THEM! While I’ve personally never used A2 Hosting, they are highly recommended and regarded as a solid choice for shared hosting.
Setting up a temporary domain

As soon as you figure out what host you’re going to use, you can set up a temporary domain. You will use it as a place to install WordPress and move your content from Drupal.
If you’re unsure how to create a temporary domain, reach out to your host and ask them to help you. Mr. Google will surely know as well, so you can search for “set up temporary domain + your host name.”
Once all your content has been migrated, you can point your URL at the permanent domain (yoursuperdupersite.com).
Creating a list of your current URLs
I don’t know if the URLs on your Drupal site were SEO-friendly, but if not, now is a good time to improve them. Keep them short and descriptive – they should accurately explain what the post or page is about (e.g. www.mprstudio.com/joomla-wordpress-migration/).
Just in case you want to update your permalinks later in WordPress, make a list of your current Drupal site’s URLs.
If you’d rather not do this manually and your site has a sitemap, you can copy and paste all the page and post URLs from there.
There are also some tools you can use to easily grab all the URLs of a given site, including Screaming Frog SEO Spider.
Please note: If your site didn’t generate a good amount of traffic or have a bunch of backlinks pointing to it, don’t even worry about setting up redirects. Instead, focus on improving your WordPress site and the rest will fall into place.
Installing self-hosted WordPress

With your temporary domain, you are now ready to install and set up WordPress. As soon as you complete the migration, you can move your website from the temporary domain to the permanent one (I’ll provide a link to a great resource).
Drupal to WordPress migration
With WordPress installed, you’re ready to proceed with the migration. In this tutorial, I am using the free version of FG Drupal to WordPress, but there is a premium version available as well.
The premium version of the plugin lets you move custom post types, post fields and taxonomies to WordPress.
See the differences between the free and paid versions here.
Step #1: Installing the FG Drupal to WordPress plugin
Head over to Plugins > Add New in your WordPress dashboard, and search for FG Drupal to WordPress. Click the Install Now button and once it’s done, Activate.
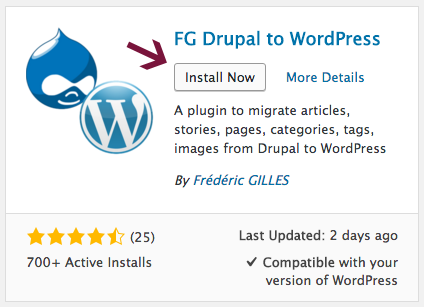
This plugin is super helpful, and should make moving your content very easy.
Please note: Whenever plugins (or online tools) are used to automate site migrations, problems can occur. There is a chance that you’ll have to move some of your content manually or even fix a couple things after the migration.
Step #2: Getting your Drupal database details
After installing and activating the plugin, you’ll need to grab your Drupal database parameters, which you will use to import your site data into WordPress.
You’ll need the following details:
- Hostname
- Database name
- Username
- Password
- Drupal Table Prefix
In order to get this information, you will need to go into your settings.php file using an FTP client (it can be found at this path usually found here: drupal/sites/default/settings.php). I personally use and recommend FileZilla, but there are many others to choose from.
Follow these steps to get your database parameters:
- Download and install the FTP client of your choice.
- Go to your site’s default directory.
- Open the settings.php file.
- Copy the hostname, database name, username, password and Drupal table prefix.
- Paste in a text file and save for later.
Step #3: Importing Drupal content to WordPress
Transferring your site from Drupal to WordPress is very similar to the process for migrating from Joomla to WordPress, which I covered in a previous post.
You are now ready to start moving your site content over.
In your WordPress dashboard, click on Tools > Import in the left sidebar.

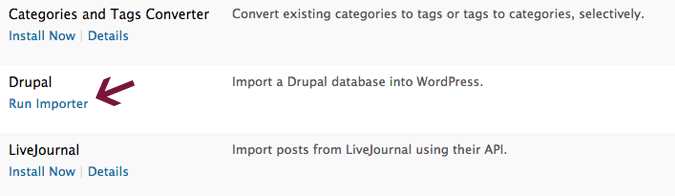
There are a variety of import tools included with WordPress by default, but not for Drupal. Since we installed the FG Drupal to WordPress plugin in Step #1, it’s in the table now.
Find Drupal in the table and click on Run Importer below it.
This will take you to a page where you can set all options for the migration of your data.
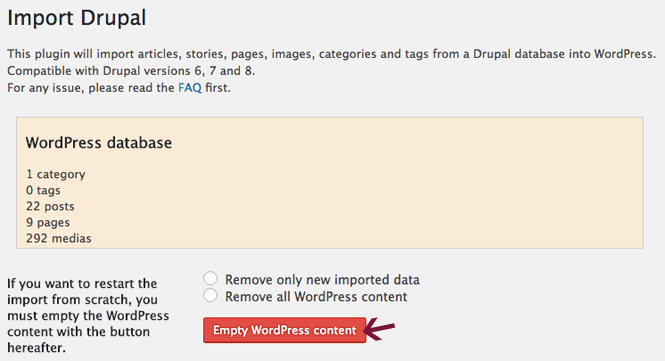
Near the top, you’ll see a button which says Empty WordPress content. If you created pages, posts, attachments, menus, categories, tags, custom posts or taxonomies, users and comments, clicking on the button will delete them.
You can add different themes to your site after you complete the migration process, but just use the default WordPress theme for now.
It’s best to have a completely blank installation for the migration. If for some odd reason you already added content to your site, back it up before you click on the Empty WordPress content button.
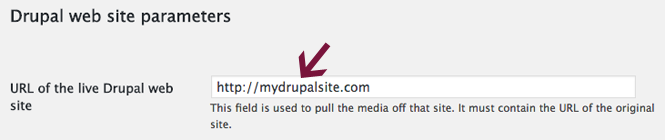
In the Drupal web site parameters section, enter the URL of your live Drupal website. This will be used to grab any media items from your current site.
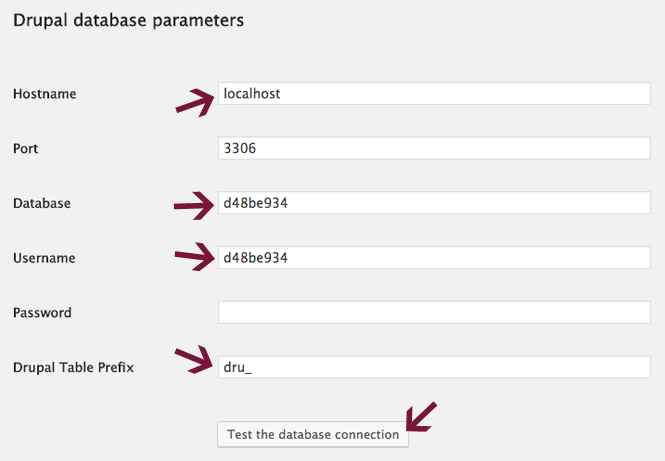
Under the Drupal database parameters section, you will need to paste the information about your old database that you copied from your settings.php file.
Again, you’ll need the following details:
- Hostname
- Database name
- Username
- Password
- Drupal Table Prefix
Once you’ve entered the details, you can click on Test the database connection to ensure it’s working.
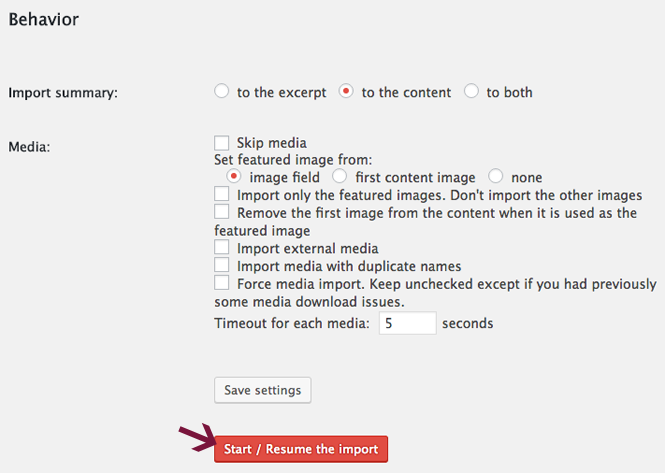
Now, let’s move on to the Behavior section. Here, you should specify the items you’d like to import in addition to your Drupal posts and pages.
Import summary
Here you can specify where you’d like to import your post summaries. You can likely leave the default setting “to the content.”
You are presented with a wide array of options regarding the import of media items. If you’d like, you can even choose to skip the media import completely, which will speed up the migration process.
Option 1: Manual
If you’re looking to fully optimize your web images, I recommend manually downloading everything from your Drupal site.
Simply save your media items by dragging them to a folder on your computer. You can also use Save Images As by right clicking on PC or control clicking on Apple.
With all the images on your computer, you can then size them to fit your new theme, give them descriptive filenames (e.g. properly-named-file.png) and make sure they’re ready for the web.
Option 2: Automated
Is your Drupal site huge, with a bunch of pages and posts? If so, you likely won’t want to manually save and insert your images. In this case, you can import all your media items during migration.
Pro Tip: Whichever method you use, I recommend using an image optimization plugin to reduce your image file sizes.
I personally use EWWW Image Optimizer, but have heard good things about Imagify Image Optimizer as well. Imagify lets you optimize 25mb of images every month for free, and offers paid plans as well.
Once you’ve configured everything properly, you can click the Start / Resume the import button and start the migration.
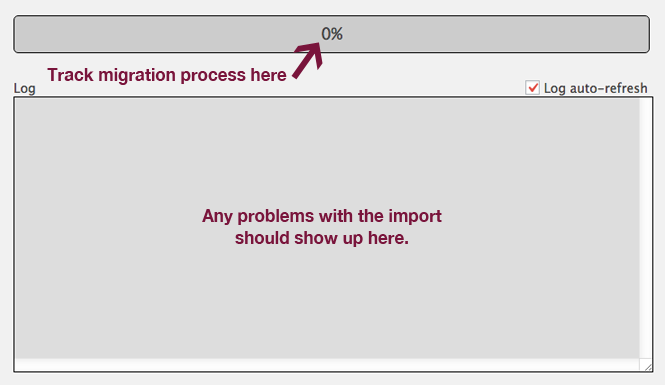
The bar at the bottom of the page lets you can track the migration progress, and any problems with the import will show up in the log box.
Tip: You may want to leave most items unchecked so you have more control over everything.
In many cases, I’ve found it better to do a lot of the migration tasks manually once I choose a theme. Each site is different, and you’ll want to adjust things to fit your site’s layout.
Once the plugin does its thing, you’re done with the migration. Yay!!!
Are you happy? I bet you are… but hold your horsies, you still have some work to do.
Post-migration steps
Now that your content has been moved to WordPress, you’re ready to move on to the post-migration steps.
Selecting a theme
You’ve successfully switched your site to a new CMS, and are now ready to choose a new theme. You won’t be able to use the same template you were using on Drupal unless you pay a developer to create a custom theme.
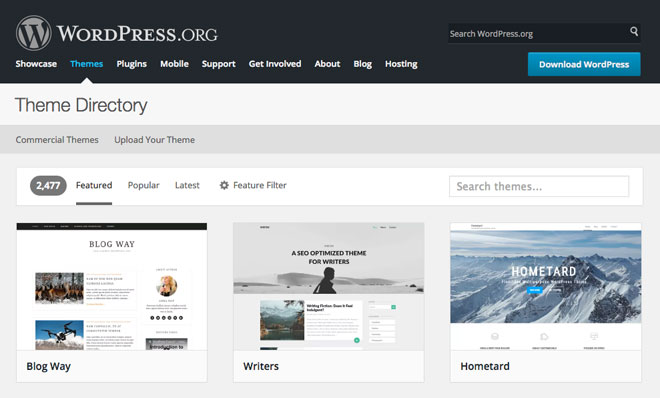
There are thousands of free themes available in the WordPress Theme Directory, as well as premium ones from various online marketplaces and solo vendors.
Look around, and you’ll surely find a theme which suits your website. When searching for a theme to use, make sure you choose one which was created with quality in mind.
There are a ton of poorly-coded, bloated themes which you want to avoid using at all costs.
The theme you choose will have a huge impact on your site’s overall performance, so make sure you select a good one.
Check reviews and ratings of any theme you plan to use, and you’ll have a good idea whether it’s worth installing or not.
Creating navigation menus
After moving your content you will need to recreate a few items, including any menus you were using.
It’s crucial that your site has a well-structured main menu so your visitors can easily navigate your site and find what they’re looking for.
WordPress makes it easy to create a new menu. Simply go to Appearance > Menus, enter a name for your new menu and click the Save Menu button. Then, add any pages, posts, custom links, and other items to it.
Once your new menu is created, you can specify where you’d like it to appear on your site. Themes use different names for the Main Menu, including Top Menu, Header Menu or something else entirely.
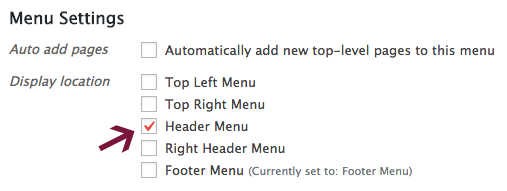
Choose where you want to display your menu by selecting the appropriate box in Menu Settings (see screenshot above) or in the Manage Locations tab (screenshot below).
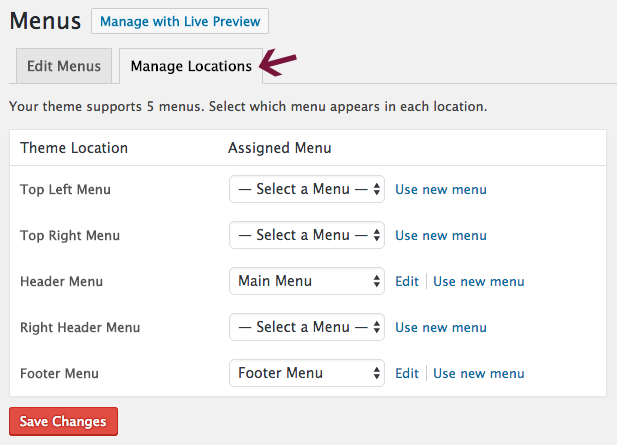
After you decide where to display your menu, don’t forget to click the Save Changes button. Now, take a look at your site to make sure your navigation menu is where you want it to be.
Every theme has different default menu locations, so play around with your menus until you get them just right.
Setting up contact forms
If you were using any contact forms on your Drupal site, you’ll need to recreate those as well. They make it easy for people to contact you, and you can even use them for newsletter signups or other calls to action (CTAs).
I use Contact Form 7 on all of my sites, and highly recommend it. You can easily configure autoresponders for your forms, and even connect your contact forms to MailChimp (and other email marketing platforms) with an additional plugin. This makes it easy to add subscribers to your email list.
For newsletter and other marketing CTAs, you can also create forms directly in your email marketing software (MailChimp, GetResponse, AWeber, Infusionsoft, etc.) and embed them on your site.
The following contact form plugins are also a good choice:
- WP Forms
- Gravity Forms
- Ninja Forms
- Contact Form by BestWebSoft
Once you make and add contact forms to your site, it’s a good idea to check that they’re working properly. Fill out all the forms with test information and make sure you receive completed submissions.
Adding widgets
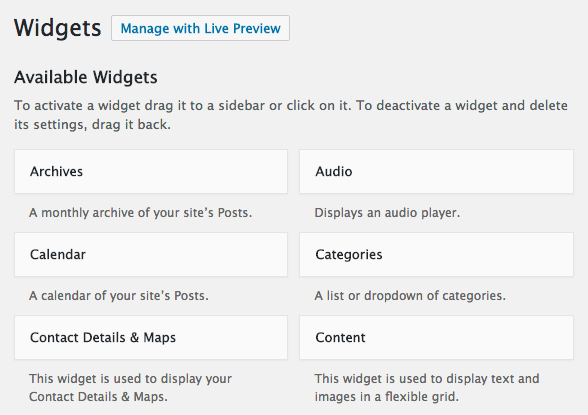
A widget is a content block that can be added in your site’s sidebar, footer and other areas.
You can easily add or remove widgets under Appearance > Widgets and in the Customize area as well (with most themes at least).
The following are some of the widgets you can add to your site:
Archives – adds a monthly archive of your site’s Posts.
Audio – shows an audio player.
Calendar – displays your site’s Posts visually in a calendar.
Categories – adds a list or dropdown of categories.
Contact Details & Maps – shows contact details and a map.
Content – adds text and/or images in a flexible grid.
Custom HTML – shows HTML code.
Custom Menu – adds a custom menu.
Image – displays an image.
Meta – adds Login, RSS and WordPress.org links.
Pages – shows a list of your website’s Pages.
Posts – displays your site Posts in a flexible grid.
Recent Comments – shows your site’s most recent comments.
Recent Posts – displays a list of your most recent Posts.
RSS – adds a list of entries from an RSS or Atom feed.
Search – displays a simple search form for your site.
Tag Cloud – shows your most used tags.
Text – used to display text or HTML.
Video – shows a video from your media library or a video hosting site (e.g. YouTube, Vimeo, etc.).
In addition to those mentioned above, certain themes have their own custom widgets as well.
Once you activate your chosen theme and know what functionality you want your site to have, you can add widgets that match your specific needs.
Adding image galleries
Did your Drupal site contain photo galleries? If so, you’ll need to create them now that you’ve moved.
WordPress supports galleries natively, but they are not user-friendly and don’t work too well.
Certain themes have added gallery functionality built-in, but you may want to use a plugin.
There are a variety of free gallery plugins, including NextGEN Gallery which I’ve used for a while on a bunch of sites.
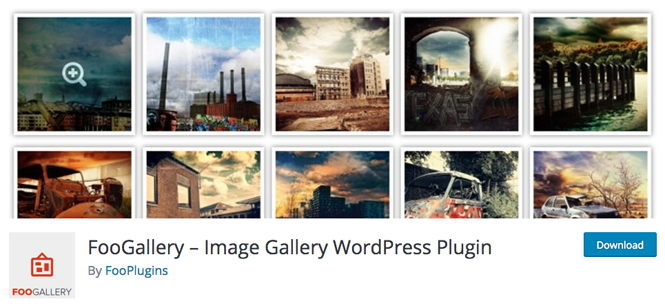
I recently tried out FooGallery and like it so far as well.
A few other gallery plugins worth checking out include the following:
- Envira Gallery
- WP Canvas
- The Portfolio Gallery
Installing must-have plugins
One thing that makes WordPress so awesome is the amount of plugins you can add to your site for all kinds of functionality.
When creating your WordPress site, you can install the following plugins right away:
Yoast SEO – Lets you configure your site for optimized on-page SEO.
Wordfence – Effectively protects your site from malicious activity.
W3 Total Cache – Helps speed up your site by caching dynamic pages to serve static ones.
BackWPup – Easily schedule partial and complete backups and store them in the cloud (I sync mine to DropBox).
If you’d like to learn more about these plugins and their incredible features, take a look at my 4 Must-Have Free WordPress Plugins post.
Word of advice: When you are adding plugins to your new site, don’t go crazy and add tons of them. Make sure you only install the ones you really need.
Before you install a plugin, read some reviews about it and look at when it was last updated. Ideally, you want to use plugins that are actively maintained.
Sometimes you need a plugin only temporarily (e.g. to perform a specific task like updating internal links or database tables). In these cases, you should install the plugin, perform the task and then promptly deactivate and delete the plugin. There’s no sense in keeping plugins that you’re not using.
Updating your permalink structure
You want your new site to be fully-optimized, so make sure you’re using a short and concise permalink structure.

It’s possible that you were already using good URLs on your old site. If you were, bravo… just keep using the same structure. If not, now is a great time to improve them.
Before you migrated your site, I told you to make a list of your Drupal site URLs. If you’re updating your permalinks and your site received a good amount of traffic, it’s a good idea to set up redirects to your new site URLs.
You can do this with the help of the Redirection plugin.
If your old site was awful and received very little traffic, don’t even spend time creating redirects. Instead, focus on attracting quality visitors to your new and improved WordPress site.
Making your site live
Now, you’ll have to move all of your content from your temporary domain (which you created to install WordPress for the migration) to your permanent domain.
If you changed web hosts, you’ll need to update your DNS settings with your domain name registrar. If you don’t know how to do this, just google “update DNS + name of your registrar” or reach out to tech support.
As soon as your site fully propagates, you’ll be able to create your live site.
Follow these steps:
- Update DNS if you switched web hosts.
- Make a backup of your development site.
- Export the MySQL database tables of your development site.
- Upload your development site.
- Make a new MySQL database, and make note of all details, including database name, username and password.
- Edit your wp.config file to reflect your new MySQL database details (add database name, username and password that you saved in step 5).
- Import your development MySQL database tables into your new database.
Redirecting old URLs (if needed)
With your old Drupal site URLs, you can now redirect them to their equivalent on your WordPress website.
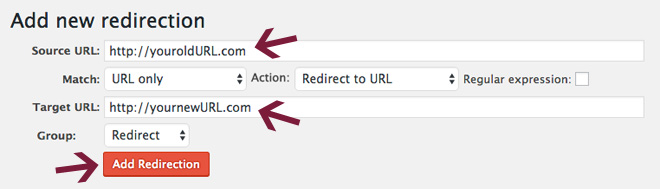
Download and activate the Redirection plugin, the follow these simple steps:
- Enter the old page/post URL in the Source URL area.
- Write the new page/post URL in the Target URL area.
- Click the Add Redirection button.
- Repeat as needed with all pages/posts you wish to redirect.
Checking and fixing your internal links
If you happened to update your permalink structure during the move from Drupal to WordPress, you’ll need to take a look at your site’s internal links.
Go through every page and post to edit any links to other content on your site.
Don’t feel like going through everything manually? The Broken Link Checker plugin will help you out. Install and activate it, then let it work its magic.
It will look for broken links in your site’s pages, posts, comments and other content.
When Broken Link Checker finds any broken links, it will display them in two places:
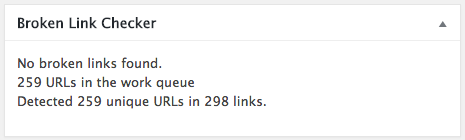
On your WordPress dashboard in a Broken Link Checker widget
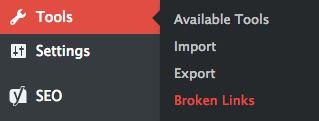
and also under Tools > Broken Links.
Broken links can be easily updated through its interface instead of having to navigate to the source to fix all of them.
You can keep this plugin even after you update all your links, but you’re better off uninstalling it and using an online tool such as Online Broken Link Checker instead.
If you insist on keeping the Broken Link Checker plugin, make sure you keep it deactivated most of the time. Only activate it periodically to check for broken links (once a month should be fine).
Making sure everything works
Once your WordPress site is up and running, you should make sure everything is working correctly.
With a site migration, there is always a chance that something went awry. Browse through all your pages and posts to make sure there are no problems.
Frequently Asked Questions
Will I have to re-design my website when I move from Drupal to self-hosted WordPress?
Should I set up redirects from my old Drupal posts and pages to their new WordPress equivalents?
What WordPress plugins do you recommend for my new website?
How about hosting? Which web host should I choose for my WordPress website?
Conclusion
Moving your website from one content management system (CMS) to another is quite the task, but well worth it. I hope that this step-by-step guide helped you accomplish your Drupal to WordPress migration easily and quickly.
Did I miss something? Do you care to add to this post? I aim to make all my tutorials as thorough as possible, so please let me know how it could be improved.
If you’re experiencing problems with your site migration, leave me a detailed comment below and I’ll try to help. No guarantee that I’ll solve your problem, but I’ll try to help out.
If you’re looking to move your site from other platforms to self-hosted WordPress, check out these other migration guides:
- Weebly to WordPress
- Squarespace to WordPress
- Wix to WordPress
- Joomla to WordPress
- Blogger to WordPress
- WordPress.com to self-hosted WordPress
- Medium to WordPress
- Tumblr to WordPress
If you found this post helpful, please share it and spread the word!
Want more like this? Sign up for my newsletter to receive helpful WordPress Tutorials, Tips and Tricks.


I have about 6 content types in Drupal. They moved over, but did not appear as pages, but each content type listed as a group of pages by content type name in the dashboard. Do i need to manual move these into the pages portion of wordpress?
Hi Hal, I believe so. You may need to do some manual work recreating those pages as the transfer process is not always perfect. Hope that helps!
Just working my way through these instructions and have a suggestion.
Would be good to include this info where you say: 3) Open the settings.php file.
Settings.php usually found here: drupal\sites\default\settings.php
Thank you, I have added that.
So I’m all done now. Can I safely delete the FG plugins now that my migration is complete?
Hey Leif,
Yes, you can delete the FG plugins now that you’re done with the migration from Drupal to WordPress.
Your tutorial seems complete and tells me that there are more steps than I have the time to take. And, too, the comments tell me that there may still be some pitfalls which, again, will take my time – especially if I have to do a restart.
Sooo… pls recommend a person or agency that can do this process FOR me… an entity that *has done many transfers successfully, and
*one which will not be upset that, after they finish, I will be canceling their password access.
Toolset still sells and supports Types. Go to their website instead of using a Link from here.
FYI, the Toolset Types plugin you linked to above is no longer available.
This plugin has been closed as of April 4, 2019 and is not available for download. This closure is permanent.
Any other suggestions?
Hey Bill, thanks for the info. I will update the article to remove that reference. I am not sure of an alternative to that plugin unfortunately.
In my settings.php file there was empty table prefix, so i left blank that field while using FG drupal to wordpress plugin, but error appeared showing cannot connect to database, table prefix error , parameters errors. What should I do? Please help !!
I am trying to import content from live drupal site to my local computer, after everything setup on my local computer i am going to put it on live server.
Keep away from Imagify. They will bill you automatically without any prior notice renewal which is illegal in many countries. Stole 35$ from me in the same way! I also deleted wp rocket, Obviously I don’t want to help a business which uses dirty tactics…
Thanks for your comment Amir.