
There are a couple things you can do to speed up your WordPress website, and they won’t cost you a dime. In this post, you will learn how to install and configure the W3 Total Cache plugin to use it in conjunction with the free version of Cloudflare CDN (Content Delivery Network). Not only will it help speed up your website, it will make it more secure as well.
If your website is painfully slow and takes forever to load, you have a serious problem on your hands. Make sure you provide your visitors with a quality browsing experience, and don’t annoy them by having a super slow site. People are impatient, and will simply leave your site if it doesn’t load quickly.
If you’re looking for quality shared hosting for your WordPress website, we highly recommend A2 Hosting. They offer unlimited SSD space, free automatic site backups, hosting optimized for speed and 24/7/365 guru technical support.
It’s important to mention that there are a number of things that can greatly affect your website speed, including the following:
- Your
hosting – some hosting providers are terrible (GoDaddy shared hosting comes to mind), and should be avoided at all costs. If you have a crappy hosting plan, your site will be slow, period. If you see “reduce server response time” in your Google Page Speed Insights test, then your hosting is slow and you should invest in quality web hosting. - The quality of coding in your theme – multi-purpose themes are super bloated and full of features that most people never even use. Instead of choosing a multi-purpose theme, try to select one that will fit your site’s needs, but is not overkill.
- The amount of WordPress plugins you use on your site. As a general rule, you want to keep the amount of plugins you use to a minimum.
The speed at which your website loads is extremely important, and cannot be overlooked. Honestly, it makes a terrible first impression for the unfortunate people who happen to stumble onto your site. The bottom line is that visitors simply will not wait for your site to load. Instead, they will look for what they need somewhere else, praying that the next site loads faster than yours.
What is W3 Total Cache?
A caching plugin is a must-have for your WordPress website, and should be one of the first plugins you install. WordPress is a database-driven content management system (CMS) which relies on queries to and from a MySQL database to fetch and render both pages and posts. W3 Total Cache is a plugin that improves the user experience of your site by caching every aspect of your website, resulting in improved user experience and enhanced server performance. W3 Total Cache reduces website download times by creating static copies of your pages and posts, which makes them load more quickly.
Take the performance of your site even further by using W3 Total Cache in conjunction with the free version of Cloudflare CDN. See all free and paid Cloudflare plans to make sure the free version will work with your site.
Save yourself some time and download my recommended W3 Total Cache settings instead of going through the guide below.
To upload them, go to Performance > General Settings, then click on the Import/Export Settings button.
You will have to adjust a couple things to reflect your site, but it will still save you a good amount of time. Make sure you enter your URL in the settings under Performance > Extensions > Cloudflare. You do not need a DropBox account to download the file, just click on the link and the download will start.
Configuring W3 Total Cache

The W3 Total Cache settings are quite extensive, and it is difficult to know which settings are best for optimal performance. I will walk you through all the different settings with the help of images.
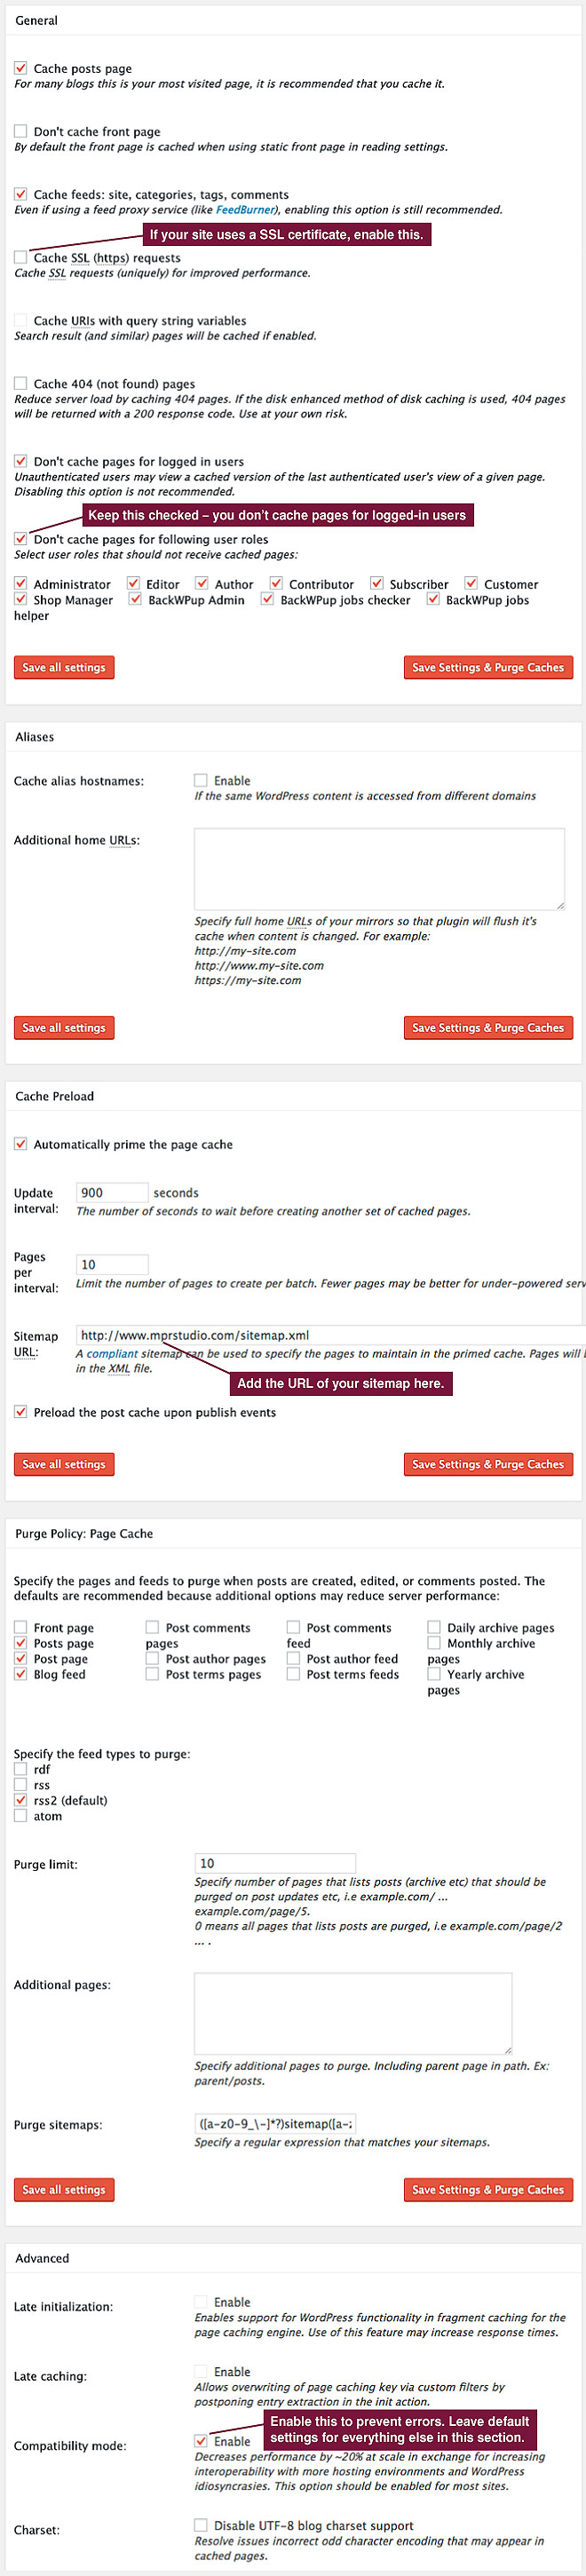
1. General Settings

2. Page Cache
3. Minify
If you’re going to use Cloudflare, Minify should be disabled in General Settings – it will be handled by Cloudflare instead. If you’re NOT going to use Cloudflare, then the default settings are recommended.
4. Database Cache
It is recommended that you use the default settings.
5. Object Cache
The default settings should be used here as well.
6. Browser Cache

7. Extensions

In the Extensions tab, activate Cloudflare, as well as any other extensions you are using. I currently have both Cloudflare and Yoast SEO activated, but everything else is turned off. Your situation may be different, and you may have more extensions enabled.
After you activate Cloudflare, click on Settings and configure the extension as seen below.
8. Cloudflare

Enable hotlink protection to prevent crappy websites from using your images on their site, while you’re still hosting them. They do this by posting an image link on their site which refers to the image hosted on your website. It eats up your hosting bandwidth, and can put a huge strain on your hosting server. It’s a good idea to regularly monitor the links to your site using Google Search Console.
After you have configured the Cloudflare extension settings in W3 Total Cache, you will need to create a Cloudflare account.
What is Cloudflare?
Cloudflare is a company that provides a variety of helpful features, including a Content Delivery Network, performance and security optimization, as well as website analytics. By using it in conjunction with W3 Total Cache, you can drastically improve both the speed and security of your WordPress website.

You can get started with the free version Cloudflare in just a few minutes. Simply follow this step-by-step guide and you’ll have it up and running in no time.
Configuring Cloudflare
To register, simply enter your email address and desired password, then click Sign Up. You will then need to check your email to confirm your account. After you let them know that you’re not a robot, you can proceed with the setup.
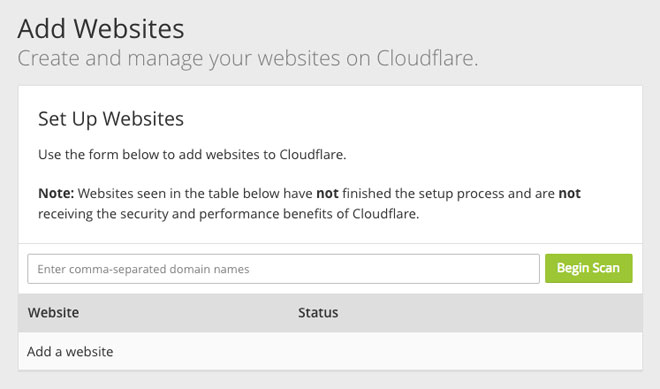
After you login to your account, click the + Add Site link in the upper right hand corner.
Enter your website url in the box, then click the Begin Scan button.
Next, you will click Continue Setup.

Then, scroll all the way down and click on Continue.
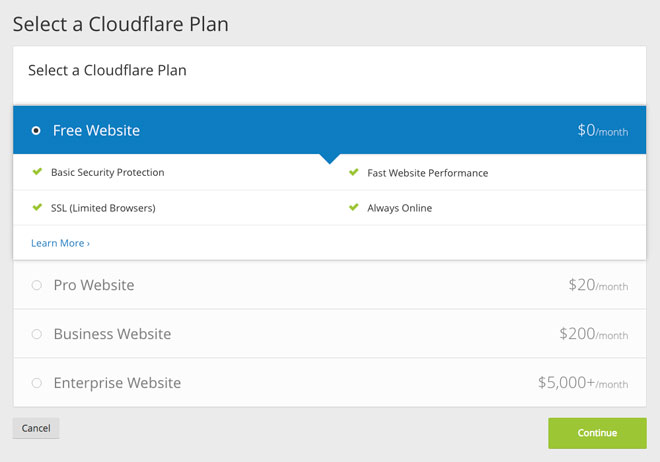
Select ‘Free Website’, then continue.
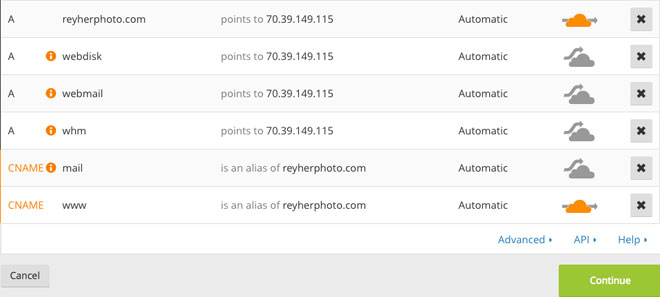
Changing DNS records
At this point, Cloudflare will provide you with two nameservers to use. You will have to change the DNS records at your registrar. In most cases your registrar will be the same as your hosting provider, but not always (e.g. I purchased my domain name for https://reyherphoto through GoDaddy, but host the site on InMotion Hosting).
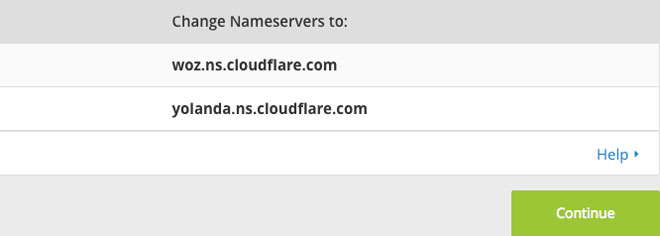
In order to change your nameservers, do a search on Google for “change DNS + name of your registrar.” You will simply replace the old nameservers with the new Cloudflare ones using the custom nameservers option. Now, you can head back over to Cloudflare and click on I’ve added all missing records, continue.
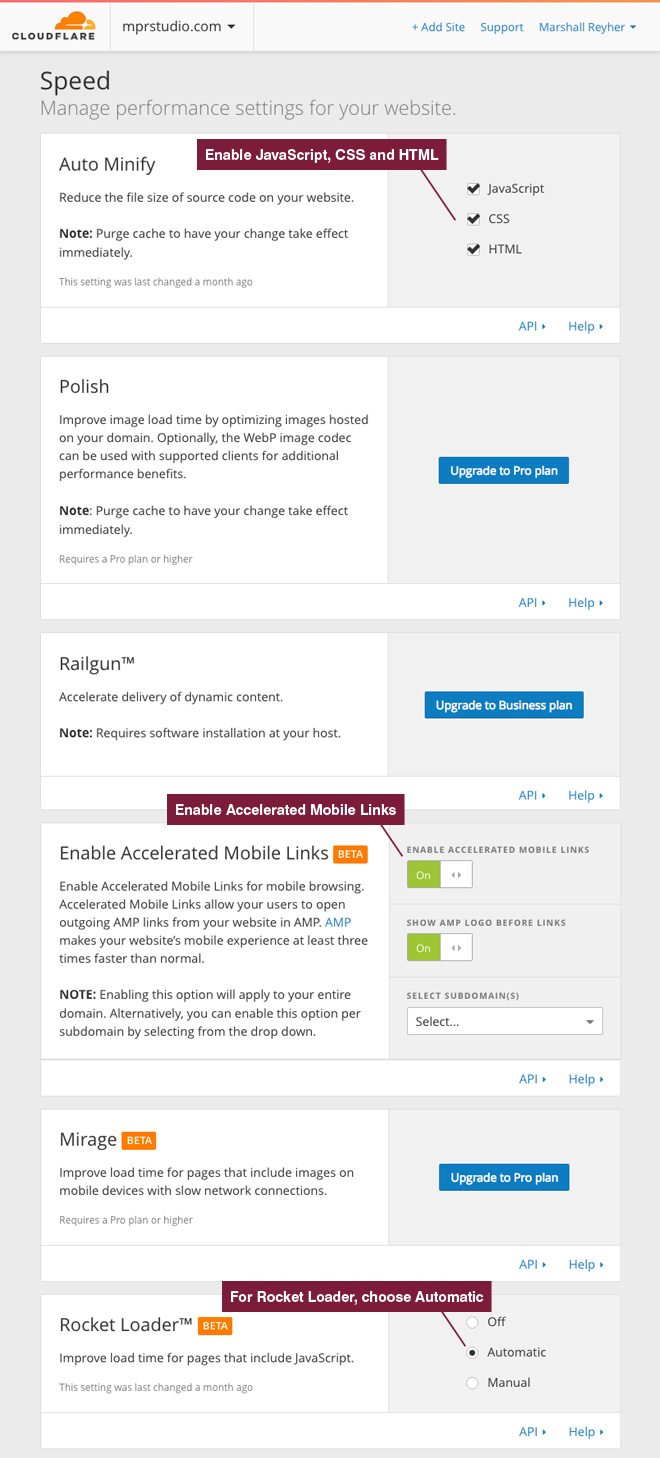
Speed settings
At this point, you will configure Cloudflare for optimal performance.
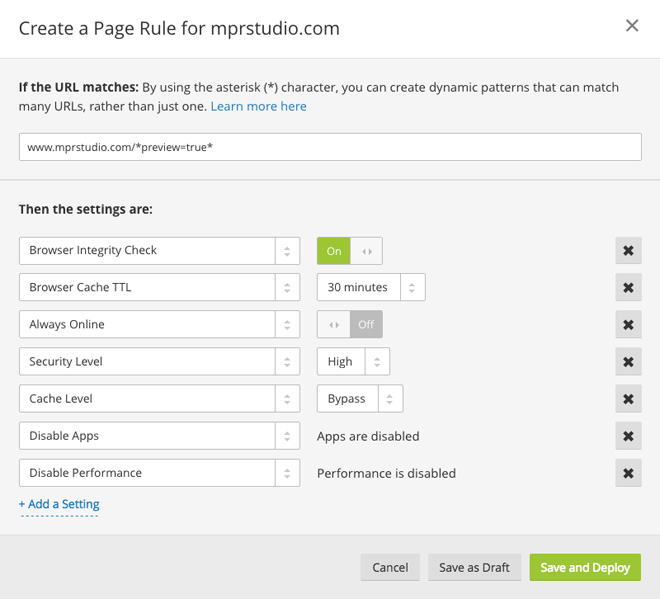
Adding page rules
After optimizing the speed section of Cloudflare, you will want to create a few page rules. You are allowed to use 3 of them with a free account, and can purchase extra ones if you need them. I think you’ll be set if you just use the 3 below.
Create a page rule for your login page. In most cases, your admin URL will look like this: yourdomain.com/wp-admin*.
If you have changed the login page (highly recommended for security reasons), then enter the new URL followed by an asterisk and no trailing slash.
Then, add the following conditions by choosing the proper dropdowns on the left, and setting the options on the right as seen below. Once you’re finished, click the Save and Deploy button.

Now, create another page rule using your homepage URL (with a trailing slash) followed by *preview=true*. Again, choose the proper dropdowns on the left, and set the correct options on the right. Then click Save and Deploy.
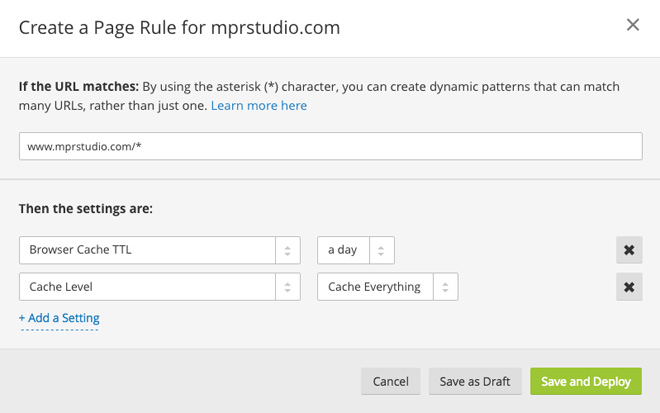
Create one more page rule for your homepage url followed by a trailing slash and asterisk. Once again, select the proper dropdowns (only two this time), and set the correct settings on the right. Once you click the Save and Deploy button, you’re finished setting up Cloudflare’s page rules.
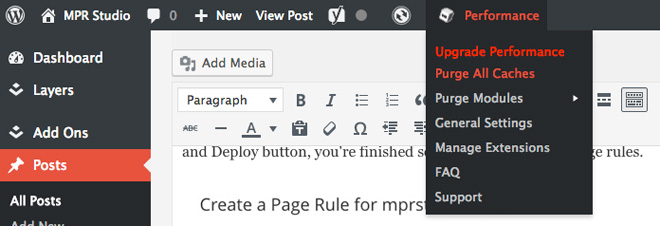
Purge all caches
Once you’ve completed the setup in Cloudflare, you should purge all caches in W3 Total Cache (see screenshot below). Just hover over Performance at the top of your dashboard, and click Purge All Caches.
Common Problems
Messed-up site appearance – In some cases, using minify will mess up the formatting of your website. If something goes awry with the look of your site, simply turn off minify in the general settings tab of W3 Total Cache. If you followed this guide, you won’t have this problem because we took care of minify in Cloudflare, and kept it disabled in W3 Total Cache settings.
Dashboard is super slow – Make sure that Object Cache is disabled in the General Settings tab of W3 Total Cache.
Any time your site is acting up, it’s a good idea to disable all plugins, then reactivate them one-by-one to see which one is problematic. Certain plugins conflict with one another, and some plugins do not work well with certain themes.
If you’ve checked all the plugins and they are not causing any problems, it is likely a conflict with your theme. To be sure of this, you can switch to a default WordPress theme (try Twenty Sixteen) to see if the problem persists. If everything works fine when you switch to a default theme, then you know that your theme is the problem. At this point, you can try to get help from the theme developer. He/she may just tell you to use an alternate plugin which is compatible.
Slower website load times – You may have to wait up to 72 hours for propagation. When I changed my nameservers to Cloudflare, the propagation was pretty quick, but it can take a while so be patient.
Your Website Crashes – If for some reason your website crashes, you may need to edit your wp-config.php file. Open it up and delete the following lines:
/** Enable W3 Total Cache */
define(‘WP_CACHE’, true); // Added by W3 Total Cache
Then, you’ll want to open up your .htaccess file and delete all the lines between and including the following:
# BEGIN W3TC
# END W3TC
Next, you’ll need to delete the following files from your wp-content folder:
- advanced-cache.php
- objectcache.php
- db.php
Finally, you should delete the W3-total-cache folder located in wp-content/plugins.
Conclusion
Website speed is critical, and cannot be overlooked. I don’t know about you, but I have zero patience for slow-loading sites, and find myself leaving them right away… never to return again. Don’t piss off your visitors, and make sure your website loads quickly.
Follow and implement the tactics in this guide to boost your WordPress website speed. This post is modeled after one written by Tom Dupuis of Online Media Masters, who creates a variety of super helpful WordPress guides.
Can you think of any more helpful speed optimizations that I may have missed? Leave a comment and let me know.
Do you need help creating a WordPress website? Sign up for your FREE WordPress Setup today.
If you found this post helpful, please share it and spread the word!
Want more like this? Sign up for my newsletter to receive helpful WordPress Tutorials, Tips and Tricks.


Great post, however I seem to be having issues with Yoast SEO’s sitemap after adding Cloudflare and the W3 settings. I even added a Cloudflare rule with wildcards for sitemap and it only displays temporarily after a cache purge.
It might just be my browser but I also can’t view yours at /sitemap_index.xml.
Hi Andrew. Cloudflare shouldn’t interfere with your sitemap. Mine is active and visible at the link you mentioned, so not sure why you couldn’t view it.
Thanks a ton for being so uber helpful.
Could not grasp: Leave CDN Disabled if you are only using Cloudflare.
If I am not using any other CDN provider other than Cloudflare, only then do I leave it unchecked? Does it emerge that we can use more than 1 CDN for the same website?
..Warm Regards, Forever.
Hi Pranav,
Sorry for the late response. Yes, if you’re only using Cloudflare (like me), then you want to leave it unchecked. Hope that helps!
Just wanted to say really helpful! There are so many incomplete guides, and this finally contained everything! Big thank you
Hi Jonas, glad you liked it!
Fantastic guide and very helpful. It took my desktop score from 2s to under 1s on pagespeed tests.
However, mobile tests are now showing crazy scores of 15s due to render blocking CSS. It only highlights this on mobile. Any thoughts on steps to cure this?
Hi Chad, page speed is a tricky thing and it depends on so many factors that it’s hard for me to tell without taking a closer look at your site.
Thank you so much! This significantly improved the speed. Perfectly written article!
Glad it helped you Mira.
Hi, amazing explanation and step by step guide. Though I’m a bit confused on
– why some blogs ask to enable ‘object cache’ while you are recommending otherwise?
Another thing I wanted to know what adding those rules will lead to?
Hi Hridja,
Glad you liked my tutorial. I am not sure why other blogs say to enable object cache, but I keep it disabled (and recommend doing so). Adding the page rules just helps you optimize different pages of your site for security and caching.
The creator of my theme recommends that I set the Leverage Browser cache via htaccess. What is your opinion, is it better not to do it when I set everything according to your instructions?
That sounds like good advice from your theme developer. If you add it in your site’s .htaccess file, then you don’t need to enable it within W3 Total Cache. Hope that helps!
I was very excited to find step by step instructions as I am not a developer. Problem is, when I ran GTmetrix before and after going through the settings, my score was even lower! Not a clue what to do now.
Hi Amy, site speed and performance is dependent on a number of factors, including hosting, theme and plugins used, image sizes and more. It can be tricky to isolate what’s causing it. Where is your site hosted?
Hi Marshall,
Thank you so much for this very helpful article! I have followed the instructions to the letter and double, triple checked the settings in W3 Total Cache and Cloudflare. The combination of software improved my website’s performance immensely. However, when I test the site with GTmetrix and other performance tools, the reports say that browser-level caching is not working. The site fails that test. The site also does not appear to be handling small inline CSS and JS, and the report give a low score on “Avoid CSS @import”. Any thoughts on correcting these performance points? I appreciate your assistance.
Sincerely,
Bill Qualls
Hi Bill,
Thanks for your kind words, and I’m glad that your site performance has improved. Regarding the browser-level caching in GTMetrix, it looks like it has to do with your theme, some plugins, and some of your site images, as well as google maps API (which you can’t do much about because it’s external). With inline CSS and JS, also theme and plugins. I see you’re using Jetpack, which is kind of an overkill plugin. As far as Make fewer HTTP requests in YSlow, you can try to install the Autoptimize plugin. Hope that helps!
Thank you for the comments, Marshall. I will investigate your recommendations. Much appreciated.
Sincerely,
Bill Qualls
Hi ,
I followed all instruction given by you in this article. i am using w3 total cache with cloud-flare but not able to improved my website in Google page speed. my speed score is 86 for desktop. not able to improve in image section. please suggest what can i do for image.
Hi Suraj,
First of all, you’re better off using GTMetrix as opposed to Google PageSpeed Insights. With regards to optimizing your images, you should size them as large as you need and not bigger. You can check out my in-depth guide about optimizing web images here https://www.mprstudio.com/optimize-images-seo/. Hope that helps!
Hi,
I’m not seeing the more advanced settings for things like page cache…e.g. anything about SSL or 404… just the very basics (whether to tick the cache page checkbox or not), similarly can’t see anything about cloudflare. I have the most up to date version of w3 total cache (just updated) – what could i be doing wrong?
thanks
Hey Gareth,
You’re not seeing the more advanced settings within W3 Total Cache? If so, hover over Performance in the left sidebar of your WordPress dashboard and you’ll see a bunch of items. Cloudflare is under Performance > Extensions. Hope that helps!
Great guideline. Thanks for that
You’re welcome Pascal. Glad you liked it.
Hello,
I can not save CloudFlare settings in Extension! I use CDN of Cloudflare for subdomain only (I’m using Let’s Encrypt for main domain). Does this configuring work correctly with that?
Thank you,
Quan.
Hi Quan,
Thanks for your question. Since a subdomain is technically separate from your main domain, I would think it should work. However, I’ve never tried to configure W3 Total Cache and Cloudflare on a subdomain, so I’m not sure.
Best,
Marshall
Hi there, so glad i found this as it has been really helpful. However, i keep getting the message “CloudFlare not available: Failed to reach API endpoint” not sure how i can fix this so would love to hear some suggestions.
Hi Iain, I recommend either googling CloudFlare not available: Failed to reach API endpoint or contacting Cloudflare support and explaining your problem to them. I imagine they’ll be able to help you.
I swear, I just loved it. I was really struggling to have a proper setting for the page rules in Cloudflare.
It’s fixed now. Thanks a ton for this lovely guide.
My pleasure Pritom, glad it helped you.
Hi,
I had a weird issue with the Page Rules and the Purge issue in Cloudflare today with the settings – i couldn’t log on (had force_get_before_post=1 all the time). I solved it here – https://wordpress.org/support/topic/im-getting-force_get_before_post1/#post-10606730
Hey Richard, glad you got it working. Thanks for sharing your experience and the helpful link to the WordPress support forum post.
Sooooooo incredibly helpful. Thank you so much! So easy to understand, and it even fixed my inability to get https to work properly via Cloudflare, which I’ve been struggling with for days.
Have now enabled W3 Total Cache on all of my sites thanks to you, and it took me less than an hour. Could not be happier :)
I’m glad you found it helpful, and that you were able to get SSL working properly with Cloudflare.
very useful info. although i had an issue at my site – page would not load. also no login access. i had to add:
define(‘FORCE_SSL_ADMIN’, true);
// in some setups HTTP_X_FORWARDED_PROTO might contain
// a comma-separated list e.g. http,https
// so check for https existence
if (strpos($_SERVER[‘HTTP_X_FORWARDED_PROTO’], ‘https’) !== false)
$_SERVER[‘HTTPS’]=’on’;
define(‘WP_HOME’,’https://example.com’);
define(‘WP_SITEURL’,’https://example.com’);
/* That’s all, stop editing! Happy blogging.
in the wp-config.php.
Hey Richard. Glad you liked the tutorial, and that you were able to fix your problem. Thanks for the comment!
Thanks for this helpful post! One thing I’m not clear on is whether I need the CloudFlare plugin in addition to the W3 Total Cache CloudFlare extension? I somehow ended up with the plugin and wondering if I can delete it?
Hi Susan, glad you found my post useful. I do not use the Cloudflare plugin, and you don’t need it either if you set everything up as per my tutorial. Just make sure that the Cloudflare extension is activated, then configure it within W3 Total Cache (7 and 8 above). Hope that helps!
Thank you for clarifying!
My pleasure Susan.