
Are you looking to sell physical or digital products on your self-hosted WordPress site? If so, WooCommerce is an excellent choice for your online shop. With a 4.6 star user rating and over 3 million downloads, it is by far the most popular eCommerce plugin available.
WooCommerce is user-friendly, and makes it easy for anyone to set up their very own eCommerce website.
Here are some great reasons to use WooCommerce for your online store:
- It integrates seamlessly with self-hosted WordPress, and gives both developers and store owners complete control.
- It is free and open source, which means you don’t need any licenses to use it.
- You can set it up and configure it quickly and easily (usually in a couple hours).
- It works with a wide variety of themes (some are more compatible than others).
- You can use it to sell all kinds of things, including: digital products (software, ebooks, downloads); physical products; services; subscriptions; affiliate products; and more.
- There are a bunch of premium extensions you can buy to add all kinds of functionality to your store.
In this tutorial, I’ll show you how to set up a fully-functioning, SEO-friendly, optimized online store with WooCommerce.
If you’re looking for quality shared hosting for your WordPress website, we highly recommend A2 Hosting. They offer unlimited SSD space, free automatic site backups, hosting optimized for speed and 24/7/365 guru technical support.
- Step #1: Choose a domain name
- Step #2: Purchase web hosting
- Step #3: Install WordPress
- Step #4: Set SEO-friendly permalinks
- Step #5: Install and configure WooCommerce
- Step #6: Add products to your store
- Step #7: Choose a theme for your online store
- Step #8: Configure your shop pages
- Optimizing your shop and products with Yoast SEO
- Rules of good eCommerce design
- Add extensions to WooCommerce
- Add other must-have plugins
- Conclusion
You can also check out the video below.
Let’s get started, shall we?
Step #1: Choose a domain name

The very first step to starting your eCommerce site (or any kind of site) is selecting a domain name. In some cases, it is as simple as using your business name followed by .com, .net or some other domain extension.
When choosing your domain name, come up with something that you like which will be easy for people to remember. Avoid using long and confusing domain names, as well as URLs with numbers and/or dashes in them.
There are a number of domain name registrars to choose from, and you can even get free domain name registration for 1 year included in certain web hosting packages.
Step #2: Purchase web hosting

Once you’ve gotten a domain name, you’re ready to purchase a hosting plan for your site. There are numerous types of hosting services available, but a starter hosting package will be fine in the beginning. It shouldn’t be too expensive, and will be more than enough for a site that is brand new. You can always upgrade your hosting plan when your site traffic grows.
My recommendation (hosting I use): Cloudways is one of the absolute best when it comes to managed cloud-based hosting platforms specializing in managed WordPress WooCommerce Hosting.
Reasons to choose Cloudways:
- Renowned cloud providers
- Dedicated server resources
- Multiple applications
- Unlimited applications on a single server
- 60+ global data centers to choose from
- 1-click free SSL certificate
- Optimized hosting stack
- Multiple layer security
- Server & application cloning / monitoring
- Staging environment
- Custom varnish rules
Web hosting is super important, and you want to stay away from certain hosts – do yourself a favor and avoid all of the ones owned by EIG, which are listed here. If you choose a crappy web host, it can make your site slow and totally ruin its performance, both of which will surely annoy your visitors.
I don’t know about you, but most people are impatient when it comes to waiting for a site to load. If it’s not quick, they will simply leave. Having a slow site is so unbelievably unprofessional, and it makes a terrible first impression.
Don’t get the cheapest hosting possible because you get what you pay for. It’s worth it to spend a few extra bucks to get quality hosting – it makes a huge difference in your site performance.
Update: While I used to highly recommend and use SiteGround, they’ve since totally fallen apart… so stay away!
Step #3: Install WordPress
Now that you’ve registered a domain name and purchased hosting, you’re ready to install WordPress. There are numerous ways to do this, but I’ll take you through the 1-click installation method in cPanel (most quality hosts offer this).

Click the WordPress Installer in the WordPress Tools area of cPanel. You will be guided through the setup.

Click on the Install tab.

Choose your protocol:
- http://
- http://www
- https://
- https://www
I prefer to use URLs without www, but it makes no difference in terms of SEO whether you use coolwebsite.com or www.coolwebsite.com.
Add SSL
Your online store is going to process payments so it’s imperative that you use SSL. I recently added SSL to many of my own sites, and it’s really easy. Let’s Encrypt offers free SSL certificates, so there’s no reason not to make your site secure.
There are different levels of SSL, as explained in this post. In the beginning you can just install a free one from Let’s Encrypt, then upgrade to a paid (and more trusted) SSL certificate later.
Not only does an SSL certificate ensure that payments made on your site are encrypted, it’s a small ranking factor on Google. If two sites are identical in terms of SEO and quality, the one with SSL will outrank the other.
Most good hosts let you install SSL with a couple of clicks. If you’re using a different hosting company, simply contact technical support or google “install SSL on + your web host name” to find instructions for your host.
As soon as you select your protocol, select your domain in the dropdown.
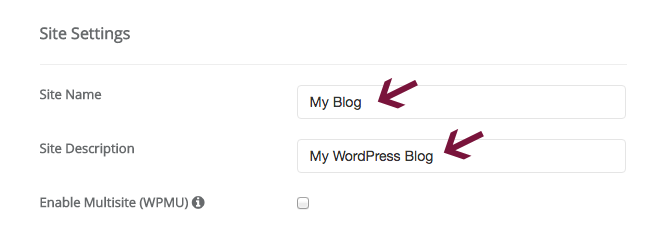
Enter a name and description for your site under Site Settings. It doesn’t have to be perfect now. You can update it later.
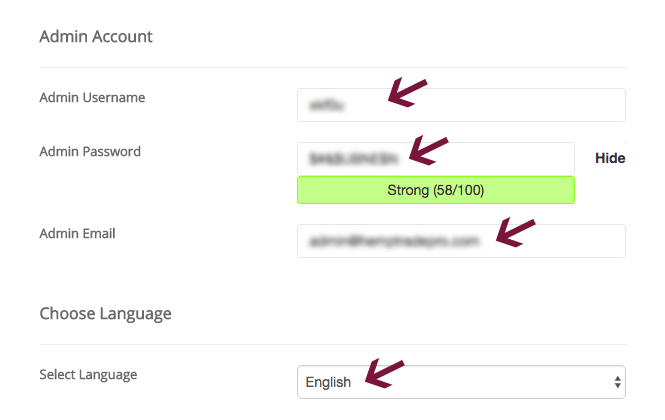
Under Admin Account, enter an Admin Username and Admin Password. The installer will create a username and password for you automatically, but feel free to change them if you’d like.
For security purposes:
- Don’t use admin as your username.
- Make sure you use a very strong password.
Under Admin Email, enter the email address where you’d like to receive site-related notifications.
Choose the language for your WordPress installation and disregard everything else.
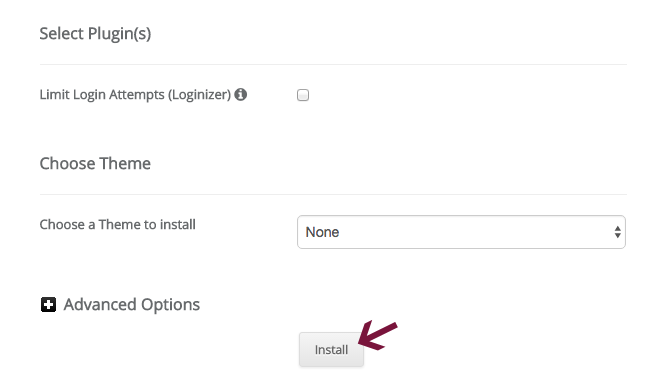
Last but not least, click the Install button and let the installer do its thing.
If you’d like more detailed instructions, check out our comprehensive WordPress setup guide.
As soon as the WordPress installation is complete, log in to the Dashboard using your username and password.
Go to Settings > Reading and make sure that the box next to Discourage search engines from indexing this site is NOT checked. It should not be checked by default, but double-check.
Step #4: Set SEO-friendly permalinks

Permalinks are static hyperlinks to a web page or blog post. Make sure you’re using a SEO-friendly permalink structure on your new site.
Ideally, you want your URLs to effectively describe the content of your page or post.
- https://www.mprstudio.com/wordpress-web-design/
The URL above is descriptive and gives both visitors and search engines a clear idea what the page is about.
You don’t necessarily have to use the exact page or post title, but can shorten it a bit. Whenever possible, use short and concise URLs.
Starting in WordPress 4.2, Post name is the default permalink structure. Go to Settings > Permalinks to double-check your setting.
Step #5: Install and configure WooCommerce
Now comes the part where you add eCommerce functionality to your WordPress site.
Go to Plugins > Add New in your WordPress dashboard and search for WooCommerce.
Click the Install Now button, and wait for it to do its thing. Once it’s finished, click Activate.
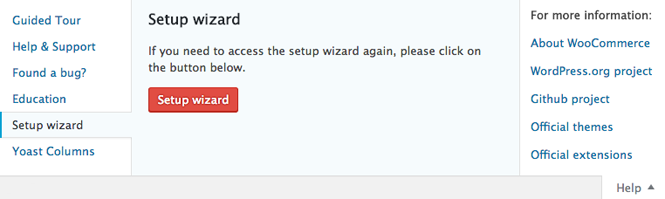
Setup Wizard
Now, you should see WooCommerce’s Setup Wizard. If you don’t (or closed it by mistake), you can go to the Help tab at the top of any WooCommerce page to open it again.
Store Setup
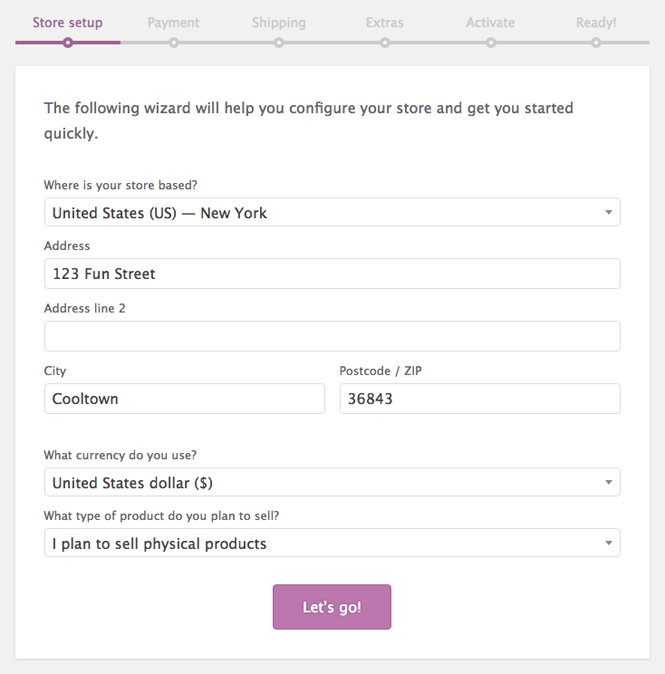
- Select your country from the dropdown menu.
- Enter your street address, city and postcode/ZIP.
- Choose the currency you want to use.
- Select whether you want to sell physical products, digital products or both types.
Payment
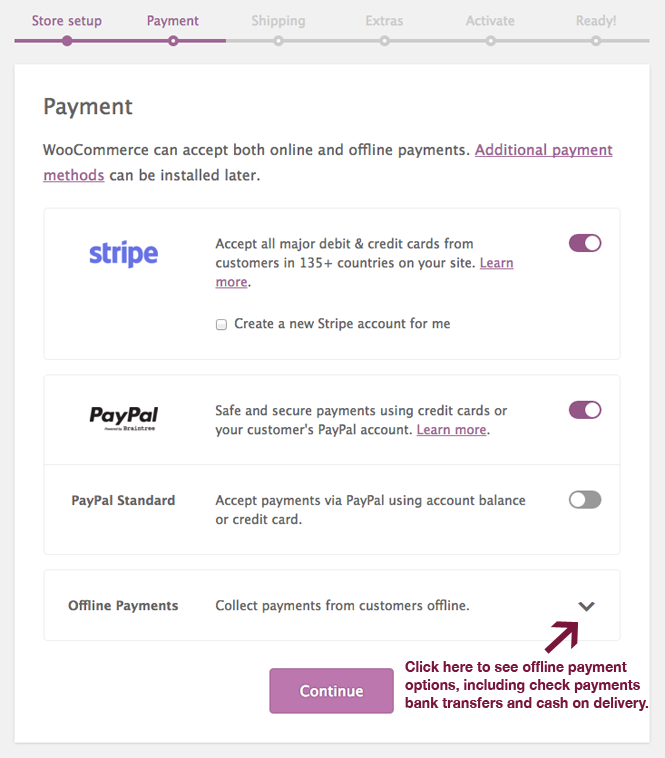
In the payment settings, choose whether you’d like to accept payments via stripe or PayPal. You can also choose to accept other offline payment methods.
- For PayPal powered by Braintree and Stripe, you can download free and separate plugins from WordPress.org.
- For PayPal Standard, simply enter the email address associated with your account.
Please note: To accept online payments, you need to sign up for an account with either PayPal or Stripe. These WooCommerce settings are only for integrating your existing accounts with your online shop.
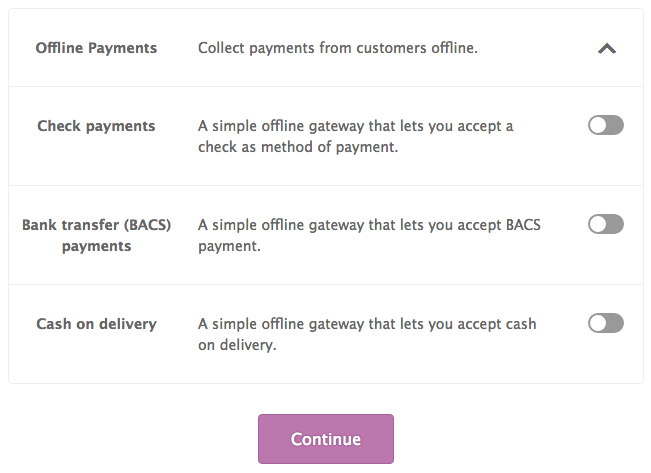
Click the down arrow next to Offline Payments to see/enable the following offline payment options:
- Check payments – accept checks as method of payment.
- Bank transfer payments – lets your customers to pay you via bank transfer (BACS).
- Cash on delivery – accept cash on delivery (C.O.D).
Shipping
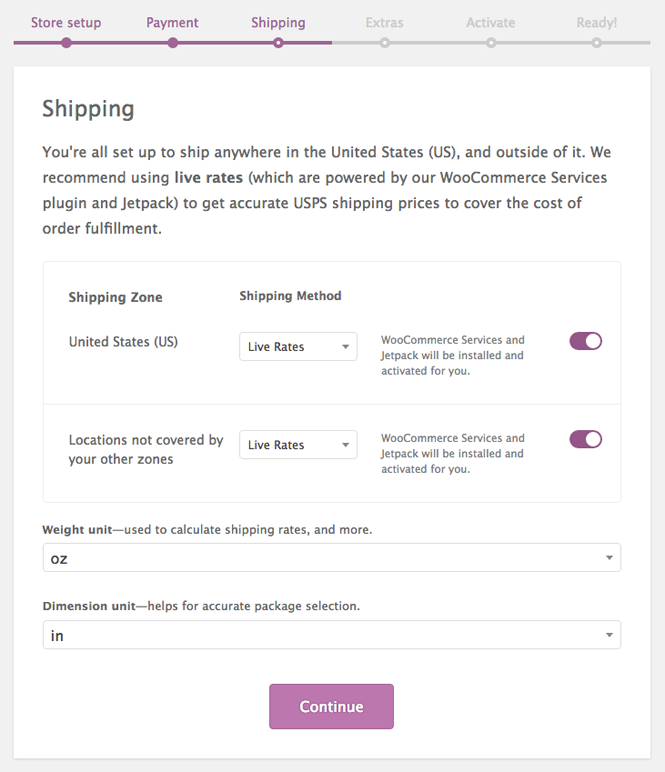
You can enable USPS Shipping for your online store if you live in the United States.
If you enable Live Rates in the dropdowns (and make sure the switches are active), WooCommerce Services and Jetpack will both be installed and activated on your site.
Live Rates lets you show live shipping rates on your store, and print labels right from WooCommerce. Currently, it’s only available for stores in the U.S. and Canada. Learn more about it here.
Choose the unit of measurement for weight and dimensions of your items, then move on to the next step.
Extras
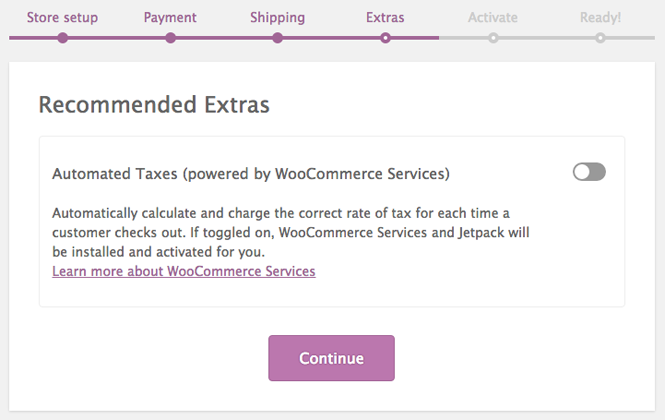
In the Extras tab, you can turn on Automated Taxes. Again, if you choose this option, WooCommerce Services and Jetpack will be installed and activated on your site.
This lets you automatically calculate and charge the correct tax rate for your customers when they check out.
Activate
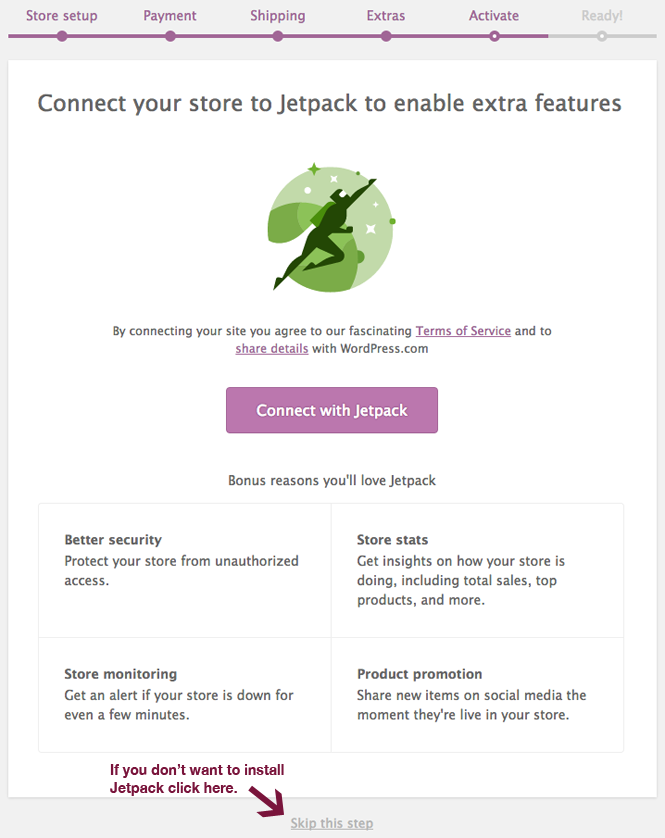
In this section, you can connect your site with Jetpack. In order for Live Rates and Automated Taxes to work properly, both Jetpack and WooCommerce Services must be installed and activated.
Ready
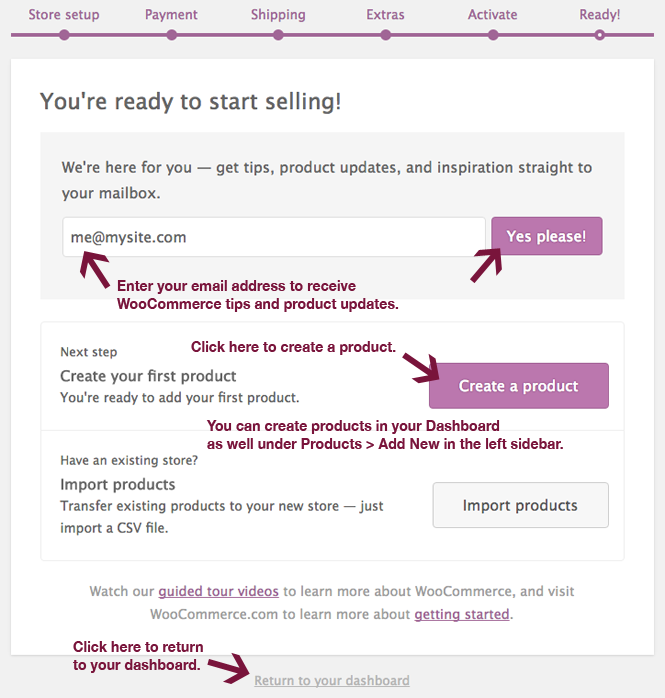
This is the last step in the Setup Wizard.
Enter your email and click the Yes please! button to sign up for WooCommerce’s free newsletter.
Then, you can either create individual products or import existing products from a CSV file.
You can also do this later in your WordPress dashboard by going to Tools > Import and clicking Run Importer under WooCommerce products (CSV) near the bottom of the table.
Step #6: Add products to your store
Now that your basic setup is complete, you’re ready to start adding some products to your online store.
Go to Products > Add New in your dashboard’s left sidebar.

This will take you to a new page where you can add all your product details.
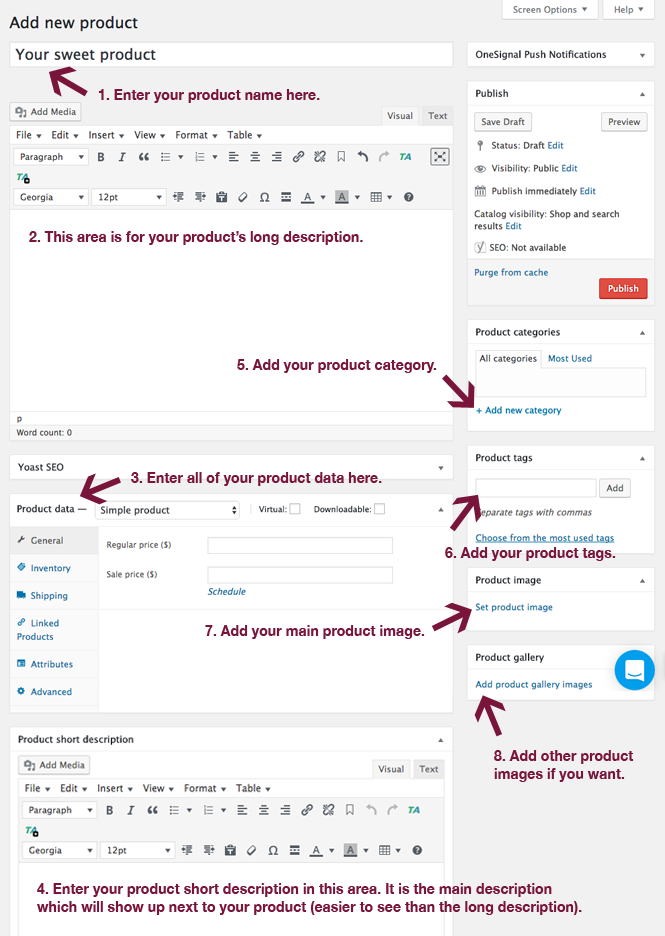
- Product Name – Enter your product name here.
- Long Description – Put your product’s long description in this space. It shows up under additional information (often closer to the bottom on product pages, depending on theme theme you’re using). Using WooCommerce’s Storefront theme, it shows up under Additional Information below the main product area.
- Product Data – Specify all product data in this section. You can choose from the following product types: Simple product, Grouped product, External/Affiliate product and Variable product.
General – Lets you set regular and sale prices.
Inventory – Enter Stock-keeping units (SKUs) and stock status.
Shipping – Specify the weight, dimensions shipping class of your product.
Linked Products – Link the current product to Upsells (products that are better quality, more expensive, more profitable) or Cross-sells (similar products you promote based on the current product).
Attributes – Set product attributes, including size, color, style and more. Once you create all attributes for a given product, you can easily create variations for all the product options you offer.
Advanced – Here, you can create a custom purchase note, specify menu order and enable/disable product reviews. - Short Description – Enter a well-written description of your product. This is the most visible text which is displayed under your product name.
- Product Categories – Create product categories to group similar products (e.g. shirts, hats, sweatshirts, etc.).
- Product Tags – Use these to further organize your products.
- Product Image – Set your default product image here. Make sure your products stand out by using high-quality images which are properly optimized in terms of size, filename, alt text and more. Read my image SEO guide to learn more about properly optimizing your site images for SEO.
- Product Gallery – Add more images to make your product even more appealing (e.g. photos taken from different angles).
Once you’ve set all the options for your product, click the Publish button.
Pro tip: If you use similar options for more than one of your products, you can copy existing products to create new drafts (will help you save time when creating new products).
Step #7: Choose a theme for your online store
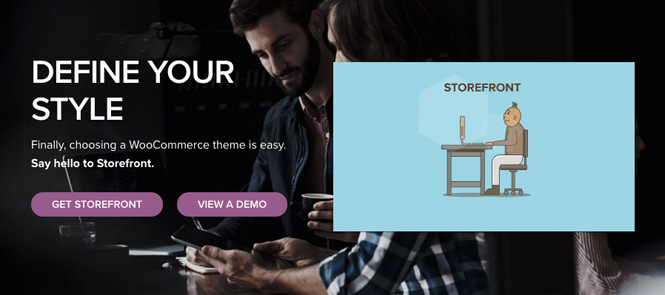
After you’ve added one or more products to your store, you can select a theme to use. I highly recommend starting out with Storefront, the official WooCommerce theme. There are some free and premium Storefront child themes you can check out as well.
With a product or two in your shop, you’ll be able to see what both your shop and individual product pages look like.
WooCommerce works with pretty much any WordPress theme, but it looks much better with certain themes.
What if I like my current theme and don’t want to switch?
If you already have a working WordPress site with a design you like, then keep your current theme and customize it to make your WooCommerce pages look good.
If you don’t already have a working WordPress site, then choose a theme which is optimized for WooCommerce right off the bat.
No matter which option you choose, you’ll need to make sure that all the individual pages of your online store display and function properly.
Step #8: Configure your shop pages
In order for WooCommerce to function properly, you’ll need to define a few pages on your site, including the following:
- Shop
- Cart
- Checkout
- My Account
It’s also a good idea to have a Terms & Conditions page, so shoppers know your online store’s policies.
Shop page
Your shop page is the main area where all of your products can be found. If you used the setup wizard, then this page will be located at yoursite.com/shop by default.
It is a standard WordPress page which can be edited under Pages in your WordPress dashboard.
Here are some things to consider with regards to your shop page:
- Do you want to add a slider to your shop page? Some themes may have built-in slider functionality for WooCommerce, or you can customize your theme by adding a slider.
- How do you want to sort your products? The default sorting option works pretty well, but you can sort them by popularity, average rating, most recent, and price as well.
- Choose whether you want to have a sidebar on the page. This functionality works with your theme’s page templates and may or may not be available depending on the theme you’re using.
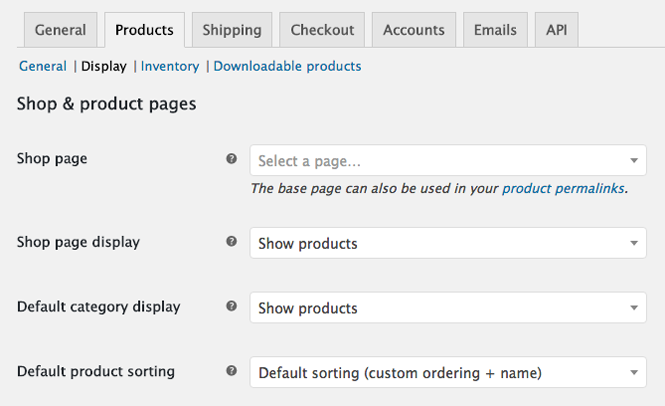
What do you want to display on your shop page? Go to WooCommerce > Settings > Products. In the Display tab, you can select whether to show products, categories or both. Choose whichever one works best for your site and make sure to save your settings.
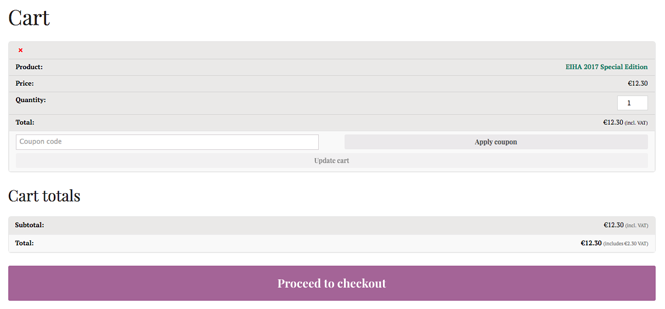
Shopping Cart
With your shopping cart page, I suggest using a full-width layout. You don’t want your customers to be distracted, so keep it nice and simple.
Go to Pages > All Pages and click on the shopping cart page. Then, in the dropdown under Page Attributes, select Full width and save your changes.
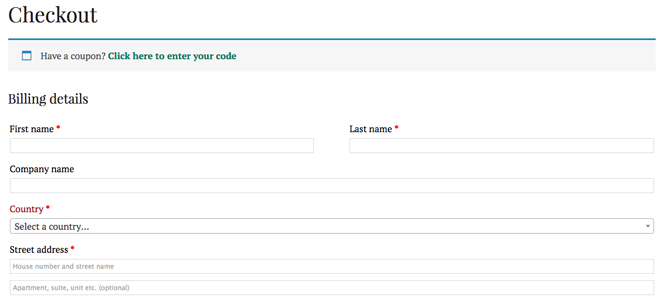
Checkout
As with the shopping cart page, you should make your checkout page full-width as well. In some cases, you may want to customize your checkout area – you can add checkboxes to let your customers sign up for promotional emails or to receive your shop newsletter.
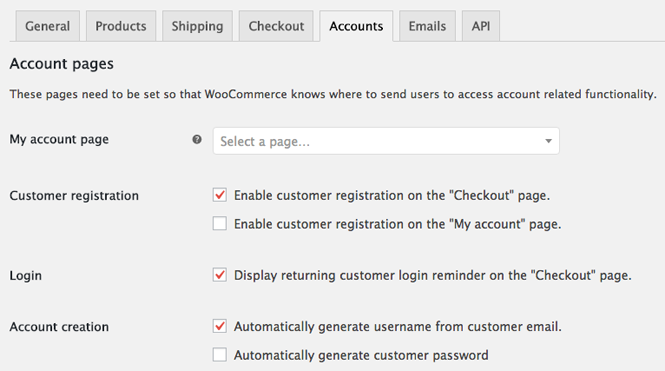
My Account
The last WooCommerce page you’ll need to configure for your store is the My account page. It is used for all customer account-related functionality and makes it easy for return buyers to login and make a purchase. By default, the page will be called My Account and the URL will be yourdomain.com/my-account.
Product Pages
To see what your individual product pages look like, click on any product listing from your Shop page or go to Products > All Products in the left-hand sidebar and click on any product.
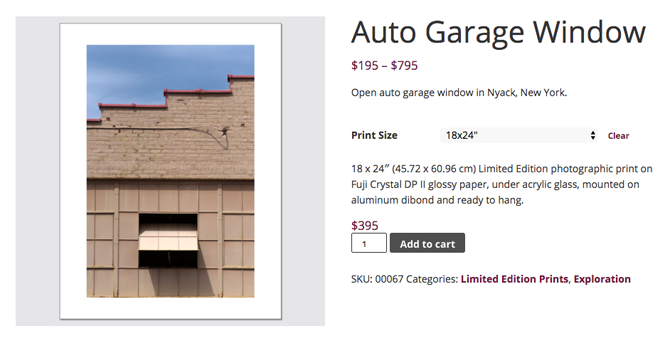
If you’re using a good theme, your product pages should look nice. Use a well-written short description – 1 or 2 sentences – to accurately describe your product and include a more thorough explanation of it in the long description area (shows up below the main product info area).
Optimizing your shop and products with Yoast SEO
You can optimize your store and product listings for on-page SEO using the must-have Yoast SEO plugin. It lets you easily update both the SEO title and meta descriptions for pages, posts and products.
If you don’t have it installed yet, go to Plugins > Add New and search for Yoast SEO. Install and activate it, then configure it as per my WordPress SEO guide.
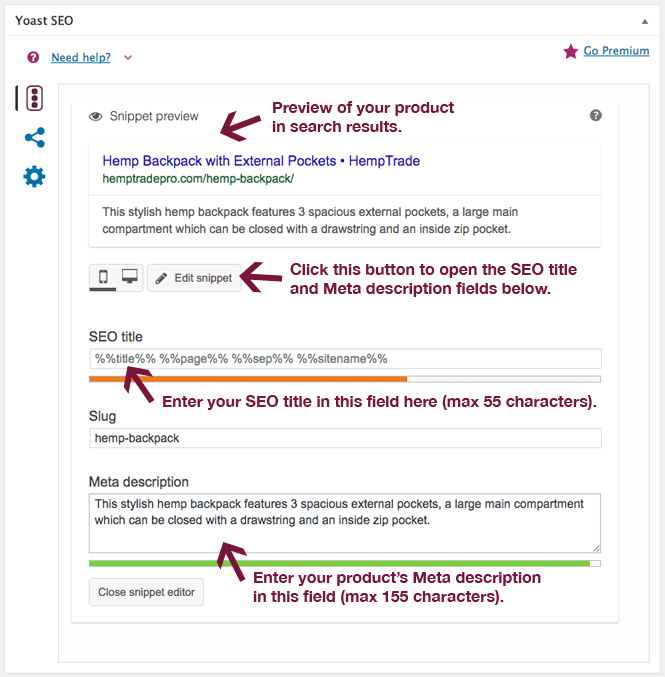
To optimize a product’s SEO title and meta description, follow the steps below:
- Go to any product and scroll down to the Yoast SEO box underneath the main content area.
- Click the Edit snippet button.
- Enter an SEO title for your product, up to 55 characters.
- Enter your product meta description, up to 155 characters.
- Save your changes by clicking Save Draft, Update or Publish.
Make sure you create custom SEO titles and meta descriptions for all of your pages, posts and products. The SEO title is the single most important on-page SEO element, and well-written meta descriptions encourage searchers to click on your site in Google search results.
Use keywords in both the SEO titles and meta descriptions for all your products, but make sure to do so in natural fashion. NEVER, EVER stuff keywords. Try to include your keyword as close as possible to the beginning of your SEO title.
*If you’d like to even further optimize your products, take a look at the Yoast WooCommerce Premium Bundle.
Rules of good eCommerce design
When creating your store, you want to think about every element to make sure your customer’s shopping experience is as good as it can possibly be.
In order for your online store to have the best possible chance for success, there are a few things you should keep in mind.
Make sure that your site meets the following criteria:
- It must be FULLY-RESPONSIVE – Your site must display and function properly on all devices, including tablets and smartphones. Having a mobile-friendly site is a Google ranking factor, and they will penalize you in search results if your site doesn’t have an easy-to-use mobile version.
- Use CLEAR navigation – It needs to have well-organized navigation menus and site structure. Make it super easy for your customers to find what they’re looking for.
- Optimize it for SPEED – Your online store needs to load quickly. This means that you should use quality web hosting, use a CDN (content delivery network) and size your product images correctly.
- Make sure it’s WELL-DESIGNED – Your shop needs to look clean and professional. Again, you want your site visitors to have an enjoyable shopping experience, and not be confused. Grab their attention right away so they stick around… and hopefully buy a few things.
- Use QUALITY product photos – Make your store products very appealing by using high-quality photos of them. Pictures are worth 1,000 words, and that couldn’t be more true than with your product images.
For even more on creating an awesome online shop, check out BigCommerce’s WordPress eCommerce guide.
Add extensions to WooCommerce
You already know that WooCommerce is an amazing eCommerce plugin you can use on your WordPress site to sell anything really well, but let’s take it even further.
There are dozens of extensions you can use to add all kinds of enhanced functionality to your online store.
Some extensions worth mentioning include the following:
Payment gateways – Add a variety of different payment gateways to your site, including: stripe, Square, amazon pay, Authorize.net and many more. Many of the most popular gateways are free, but some will cost you.
Accounting – Easily integrate your shop with a number of different accounting solutions.
Shipping – Choose from a number of carriers to use, advanced shipping and delivery options, as well as inventory and fulfillment management.
WooCommerce Bookings – Lets your customers purchase time or date-based bookings. This is perfect for those of you looking to offer appointments, services or rentals.
WooCommerce Subscriptions – Add subscription functionality to your products or services, and configure payment frequency (weekly, monthly or annually).
EU VAT Number – This gives valid EU businesses the choice of paying tax at your store. Add a field to collect a customer’s EU Value Added Tax (VAT) number. If they enter a valid number, they will NOT be charged VAT at your store.
TaxJar – Don’t worry about sales tax with your store, and let this powerful extension calculate the proper amount to be collected at checkout time. This extensions ONLY supports U.S. and Canadian tax collection.
If you don’t want to spend any money, take a look at their free extensions.
Add other must-have plugins
Drastically improve your eCommerce site’s performance by installing and configuring the plugins listed below.
W3 Total Cache
As I mentioned earlier, having a quick website is absolutely crucial to your online shop’s success. Install W3 Total Cache to further optimize your site’s load speed.
WordPress is database-driven, and operates by sending queries to and from a MySQL database to fetch and render site content. This process causes your pages and posts to load slowly and uses more server resources.
A caching plugin effectively creates static copies of your site content, and serves them to your visitors instead of fetching and rendering everything from the database.
Please note: As I mentioned earlier, there are a number of factors which affect your website speed, including hosting, the quality of your theme, the size of your website images and more. Make sure you optimize every facet of your site for optimum performance.
Wordfence
The security of your online store should never be overlooked, so make sure you’re protected from the latest threats. Wordfence Security is an amazing plugin designed to keep your site safe from a variety of malicious activity.
It is available in both free and premium versions, both of which offer a complete firewall to block malware, brute-force attacks, back door vulnerabilities and more.
Wordfence blocks Brute Force Attacks in the following ways:
- locking users out after too many failed login attempts.
- locking out users who use the “forgot password” link too many times.
- locking out anyone using an invalid username.
- ensuring WordPress doesn’t give hackers info about usernames used to login.
The plugin also scans core files, themes and plugins for malware, code injections and backdoors, which it then compares to those same items in the WordPress repository. Wordfence can then accurately see any changes caused by unwanted malware.
Check out the differences between the free and premium versions here.
Please note: If you’re using WooCommerce and Wordfence in conjunction with W3 Total Cache, make sure you turn off database caching in w3 Total Cache settings. If not, it can cache both error pages which Wordfence serves to blocked visitors and WooCommerce shopping cart pages.
WPML & WooCommerce Multilingual
Make your online shop multilingual with the help of WPML and WooCommerce Multilingual. Easily expand your site’s reach by making it available in multiple languages.
WPML is a premium plugin, and you’ll need the Multilingual CMS version to run an eCommerce shop in multiple languages. The annual subscription costs $79 for the first year, then $39 for each year thereafter. Alternatively, you can purchase their Multilingual CMS Lifetime package for a one-time payment of $195.

Key features include the following:
- Translate all of your WooCommerce posts, pages, products and custom types.
- Translate menus, tags, categories and custom taxonomies.
- Translate widgets, as well as text in your theme and plugins.
- Manage attachments in different languages so you can optimize all your product images.
- Detect your customer’s browser language setting to serve them with the proper language.
- Configure customer and admin emails to be sent in different languages.
- Track inventory in one place without separating products.
- Operate a single WooCommerce store using multiple currencies.
Step-by-step instructions for setting up a multilingual shop can be found here. Upon installation, you will be guided through their setup wizard. It will help you translate your store pages and set options for other attributes to be translated. You can also enable multi-currency mode and configure other settings as well.
In order for WooCommerce Multilingual to run properly, you will need to have the following components active on your site:
- WPML Multilingual CMS 3.4
- WPML String Translation 2.0
- WPML Translation Management 2.2
- WPML Media 2.1
If you have any questions about using WPML and WooCommerce Multilingual, you can get help at their support forum.
BackWPup
It’s super important for you to make regular backups of your eCommerce site. You need to be prepared should something happen to your site. Time is money, and you cannot afford to have your website offline for an extended period.
Some hosts offer free website backups as part of their hosting plans. If your host does not offer a backup service, you can use a plugin like BackWPup. It works really well, and lets you create both partial and full backups that you can run manually or automatically (every day, week, month, etc.).
Conclusion
Setting up an eCommerce shop can seem like quite a complicated task, especially if you’ve never done it before. Hopefully, this guide has helped make the process as easy and pain-free as possible. Don’t get overwhelmed, and take it step by step. If you get stuck or have any questions, feel free to leave a comment and I’ll do my best to help out (no guarantees though).
Choosing a domain name
Purchasing web hosting
Installing WordPress
Setting SEO-friendly permalinks
Installing and configuring WooCommerce
Adding products to your store
Choosing a theme for your online store
Configuring your shop pages
If you found this post helpful, please share it and spread the word!
Want more content like this? Sign up for my newsletter to receive helpful WordPress Tutorials, Tips and Tricks.


This is really helpful tutorial to build an online store but can you guide me how to connect store with Facebook as I have already gone through this resource https://www.cloudways.com/blog/woocommerce-store-with-facebook/ for store integration with Facebook but the issue is the store not redirects to Facebook.
Hey Alvina, in that resource you mentioned it talks about redirecting users on facebook to your product page when they click the Buy Now button there, but not from your WooCommerce shop to facebook. Since the transaction takes place on your site, that’s where they make the actual purchase.