
Are you planning to set up a WordPress website? This step-by-step, comprehensive tutorial will guide you through the process of getting your WordPress website up and running, with all the tools needed for your site to grow.
WordPress is one of the most popular Content Management System (CMS) platforms available, and for good reason. Self-hosted WordPress is super flexible in terms of both design and functionality, and can be used to create all kinds of websites, from eCommerce to dynamic news sites and everything in between.
According to WordPress.org, it is used by 27% of all websites on the internet. Originally created as a blogging platform, it has evolved into an all-purpose CMS over the years.
If you get stuck or have any questions about setting up your site, feel free to leave a question or comment. I will try my best to help you out.
If you’re looking for quality shared hosting for your WordPress website, we highly recommend A2 Hosting. They offer unlimited SSD space, free automatic site backups, hosting optimized for speed and 24/7/365 guru technical support.
If you prefer visual tutorials, check out the video below:
Choosing a domain name

Before you start the process of putting your site online, you will need to consider a few things. First and foremost, you will have to choose your domain name. This is an important element of your online presence because it helps define your brand, and is your chance to make a good first impression on your site visitors.
In some cases, choosing a domain name may be very easy. You can simply use your or your company’s name, followed by .com, .net, or some other domain extension.
It’s important to carefully choose your domain name, but don’t overanalyze it. Come up with something you like that will be easy for people to remember… and type. You want to stay away from long and confusing domain names.
There are a number of domain name registrars to choose from, and you can often get a year of free domain name registration included with your hosting package.
Please note, you don’t have to purchase your domain name and web hosting from the same company and it’s often a good idea to keep them separate.
Selecting web hosting

Once you’ve selected a domain name, you will need to get web hosting for your site. There are many different types of hosting available, and shared web hosting will be adequate in the beginning. It is the least expensive, and will work well for a new site with very few visitors. As your site traffic grows, you can upgrade to a better – and more expensive – hosting plan.
IMPORTANT: Whatever you do, make sure you AVOID all hosting companies owned by EIG. You will notice a lot of bloggers recommending BlueHost because they offer generous affiliate commissions. These people are doing you a huge disservice by promoting a crappy host that will make your site performance suffer.
Take this advice: I used to use and highly recommend SiteGround, but they truly suck now so don’t bother. While I’ve never used A2 Hosting, I’ve heard good things about them. In this tutorial, I will go over the process of signing up with A2 Hosting.
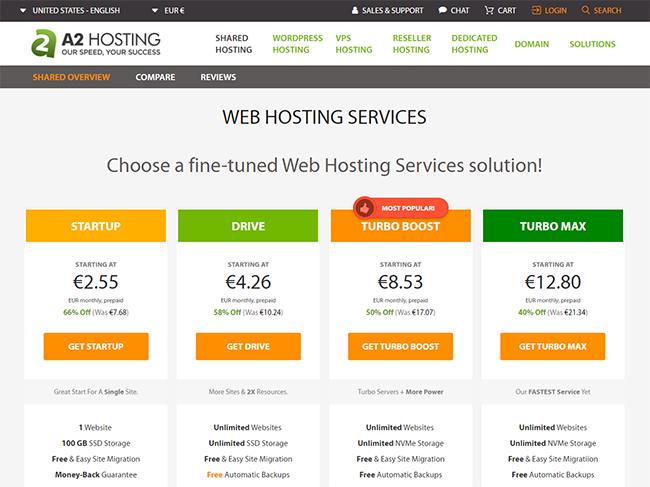
First, go to A2 Hosting, and click on Shared Hosting at the top.
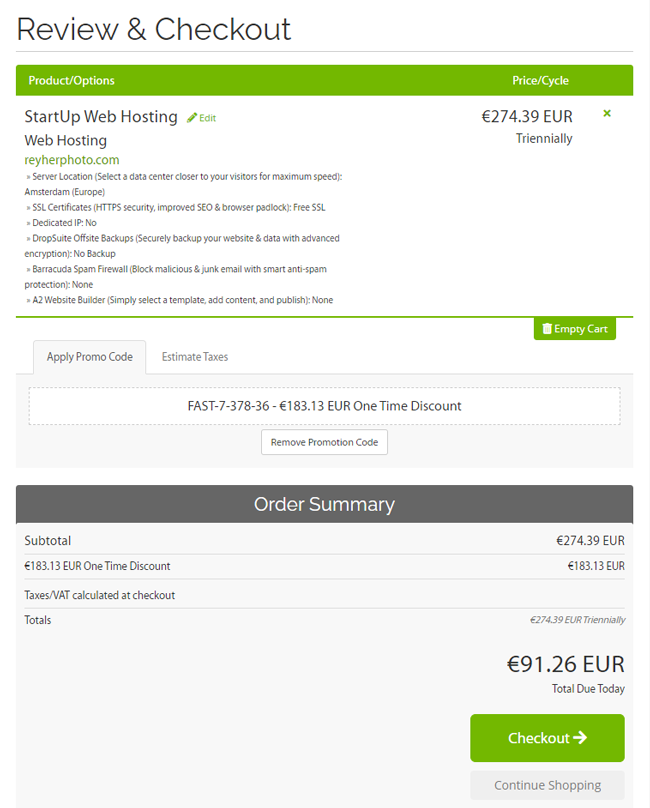
Then, choose from the STARTUP, DRIVE, TURBO BOOST or TURBO MAX shared hosting plans. If you only plan on having one site to start, then click the STARTUP plan. You can always upgrade later if need be.
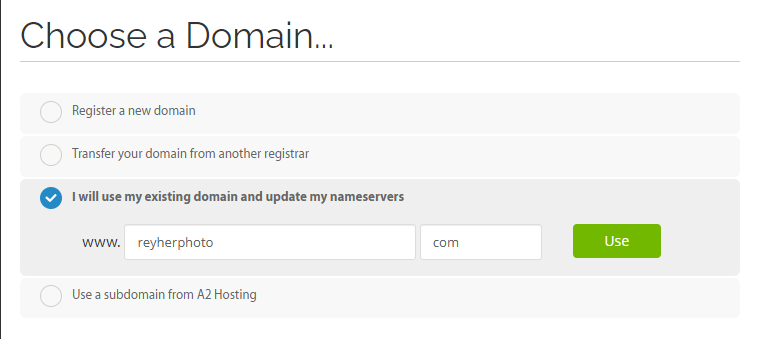
On the next page, specify whether you will be:
- Registering a new domain
- Transferring your domain from another registrar
- Using an existing domain and updating your nameservers
- Using a subdomain from A2 Hosting
In order to lock in the rates shown on the shared hosting page, pre-pay for 36 months up front. If for some strange reason you don’t want their best price, choose one of the other options.
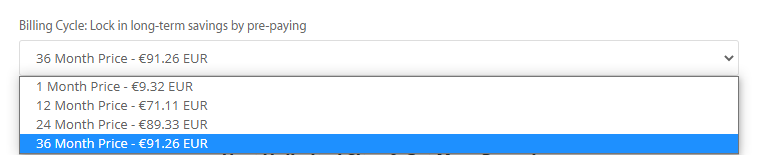
Once you choose your billing cycle, you’re ready to customize your hosting.
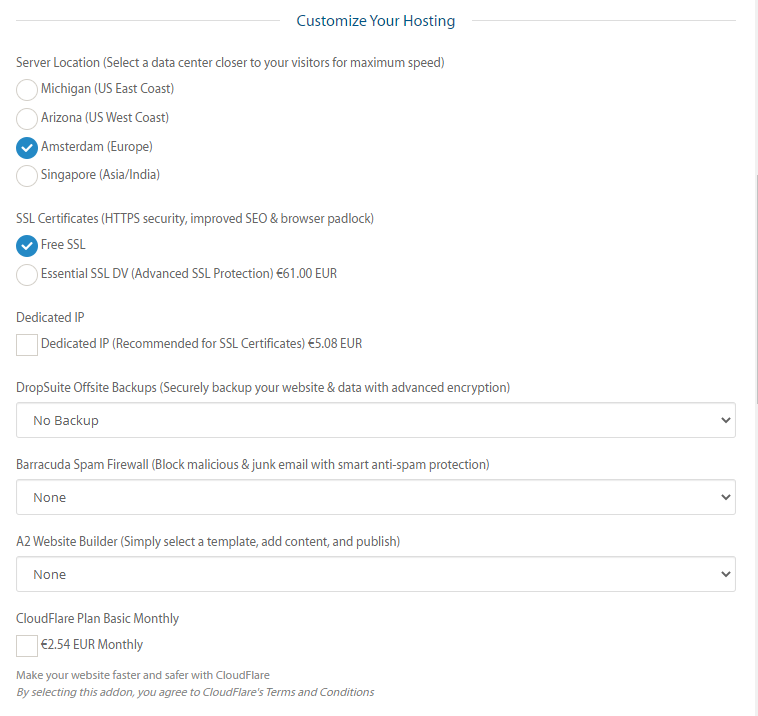
Server Location – Select a data center closest to most of your site visitors for optimal speed. You can choose between Michigan (US East Coast), Arizona (US West Coast), Amsterdam (Europe) or Singapore (Asia/India).
SSL Certificates – Choose whether you want to use a Free SSL certificate or paid one. I recommend you choose the free option. If for some reason you’d like to upgrade, you can do that later if need be.
Dedicated IP – If you’d like to get a Dedicated IP, you can check this box. I wouldn’t worry about it.
DropSuite Offsite Backups – A2 Hosting lets you automatically back up your website/s using their paid service. Personally, I would just back up my sites for free using BackWPup.
A2 Website Builder – Since you’ll be using self-hosted WordPress for your website, you won’t need to use the A2 website builder.
Cloudflare Plan Basic Monthly – If you’d like to use Cloudflare with your site and not worry about configuration, you can select this option. In my opinion, you don’t need it and can manually configure Cloudflare separately.
Auto-Install Application – Here you can choose an application to install automatically on your new hosting account. Go ahead and choose WordPress – A2 Optimized from the dropdown list.
Last but not least, click the green Continue button at the bottom.
On the next page, you can review all your selections.
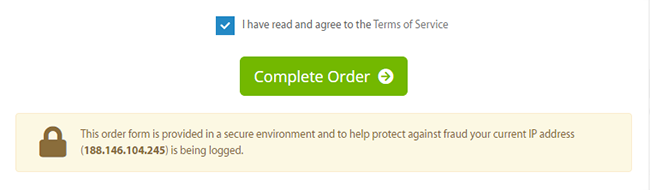
On the next page, enter all your details, select payment type, check that you’ve read and agree to the Terms and Conditions, and click the Complete Order button.
Some web hosts are terrible, and you want to avoid them at all costs. I recommend not getting your hosting from Bluehost, HostGator or any other hosting companies owned by EIG. SiteGround is another host you should absolutely stay away from!!! If your hosting service sucks, it can create a lot of problems, including a slow website and server downtime. It’s worth spending a few extra bucks to get quality hosting.
When choosing a web hosting service, look around and check out reviews online. You can register your domain at GoDaddy, but DON’T use their shared hosting services. I had the misfortune of working on a site hosted on one of their shared hosting plans, and it was an absolute nightmare.
Installing WordPress
Once you have your domain name registered and web hosting service chosen, you are ready to install WordPress. I will go over both 1-click and manual WordPress installation methods below.
1-Click Installation
The majority of web hosts offer a 1-click installation of WordPress, as well as other CMS platforms. This makes the process really quick and easy. You will be guided through the whole setup in the control panel of your web hosting account.
In your hosting dashboard, log in to cPanel and go to the WordPress Tools section.

Next, click on WordPress Installer and you’ll be guided through the installation.

Click the Install tab on the left.

Choose your chosen protocol from the dropdown, then select the domain where you’d like to install WordPress.
* As of July, 2018 Google Chrome shows a Not Secure label to the left of the URL area for all sites not using SSL. Most good hosts let you easily add a FREE Let’s Encrypt SSL certificate to your site, so there’s no reason not to make your site secure.
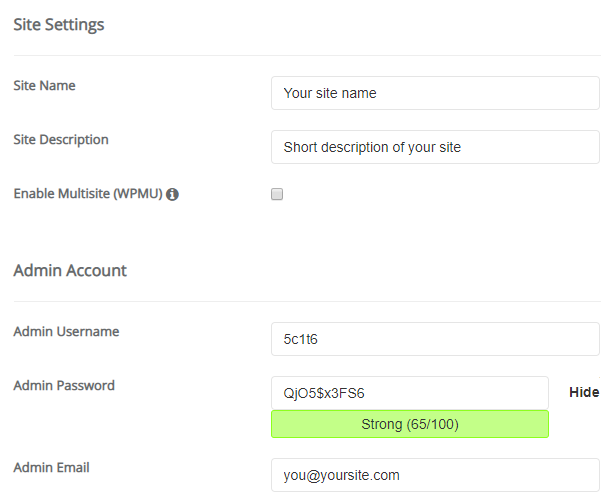
Then, enter your Site Name and Site Description in the fields provided. Don’t worry, it doesn’t have to be perfect now, as you can easily update it once you’re finished with the WordPress installation.
In the Admin Account section, you’ll need to create an Admin Username and Password. While the installer will automatically create a username and password for you, feel free to change them if you wish.
Don’t use admin as your username and make sure you use a strong password (not something you can easily remember).
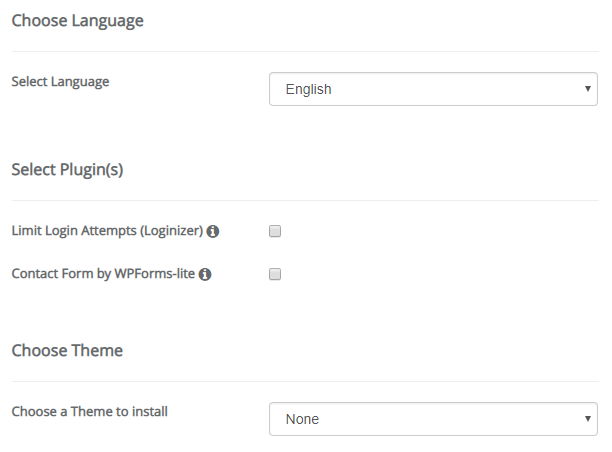
In the language section, you will select the language you want to use for your site from the dropdown menu.
Optional: You can choose to install the Limit Login Attempts and Contact form by WPForms-lite plugins, as well as a theme if you’d like. I normally don’t do this here, but install any plugins I need in my WordPress dashboard instead.
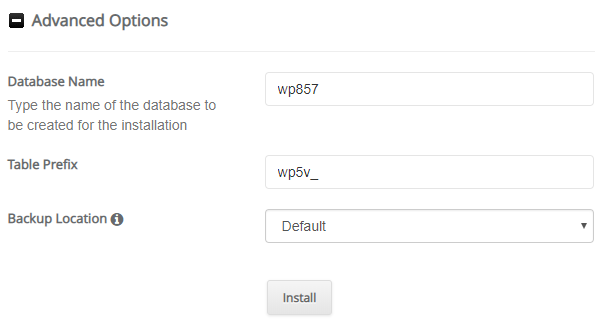
In the Advanced Options section, you can choose a Database Name, Table Prefix, and change the Backup Location. You can just leave the default values as well.
Finally, click the Install button and be patient while the software is installed.
Once the installation is complete, you can log in to your WordPress dashboard with your chosen username and password at yoursite.com/wp-admin/.
Manual Installation
If your web host doesn’t offer a 1-click installation, you will have to install WordPress manually. To perform a manual installation, you will need to download and use an FTP client. FTP stands for File Transfer Protocol, and it allows you to upload and download files to and from your web host.
Having FTP access is super helpful, and will help you solve problems quickly and easily if you cannot get in to your WordPress dashboard for some reason.

Step 1 – Download an FTP client if you don’t already have one installed on your computer. I personally use FileZilla, but you can also try CyberDuck (both are available for Mac or PC) or a number of other clients.
Step 2 – Once installed, you will need to get your login credentials from your hosting account. Log in and head over to cPanel to get your ftp host, username and password. To make your life easier, you can save this login information in your ftp client so you don’t have to enter it every time.
In FileZilla, go to File > Site Manager.
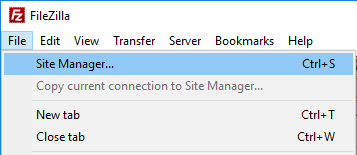
Then, click on New Site.
Enter the Host, choose FTP or SFTP from the Protocol dropdown and select an Encryption method (I selected Use explicit FTP over TLS if available).
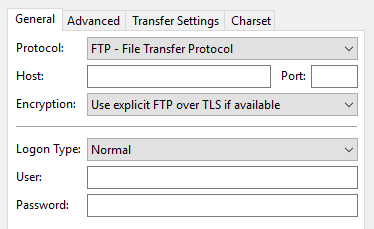
Then, choose Normal for the Logon Type, and enter your username and password.
Click the Connect button, and your login information will be saved for future use.

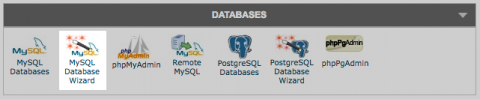
Step 3 – In your hosting cPanel, click on MySQL Database Wizard.
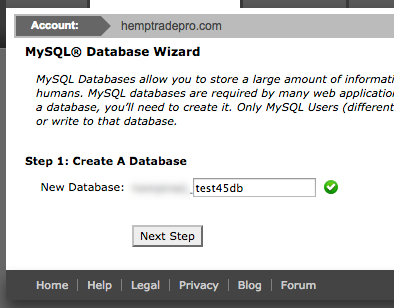
Make note of your MySQL database name, user and password because you will need this info in a moment.
Choose a unique name for your database. For security purposes, it’s wise to use both letters (lower case only) and numbers. Note that the full database name in the screenshot below includes the blurred part to the left of the text field. Once you’ve chosen a database name, click on Next Step.
Here, you will choose a Username and Password for your MySQL database. You can use the password generator to create a super strong password, but make sure that you copy it. Once finished, click the Create User button.
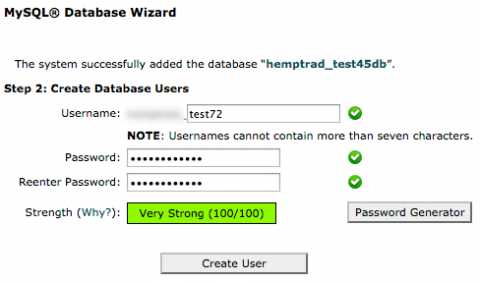
Your MySQL database user has been successfully created. On the next screen you’ll want to make sure that the All Privileges checkbox is selected.
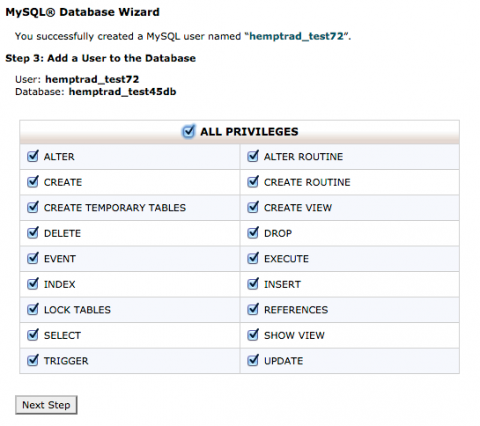
Once all steps are complete, you’ll see the screen below. Your MySQL database is now ready to use with your WordPress site.

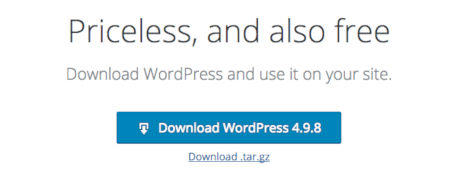
Step 4 – Head over to https://wordpress.org and download the latest version of self-hosted WordPress. Then, unzip the folder on your computer.
Now, open up the wp-config-sample.php file within the WordPress folder you that just unzipped.
Copy and paste the database name, username and password that you copied before in the spaces provided between the quotation marks (see screenshot below).
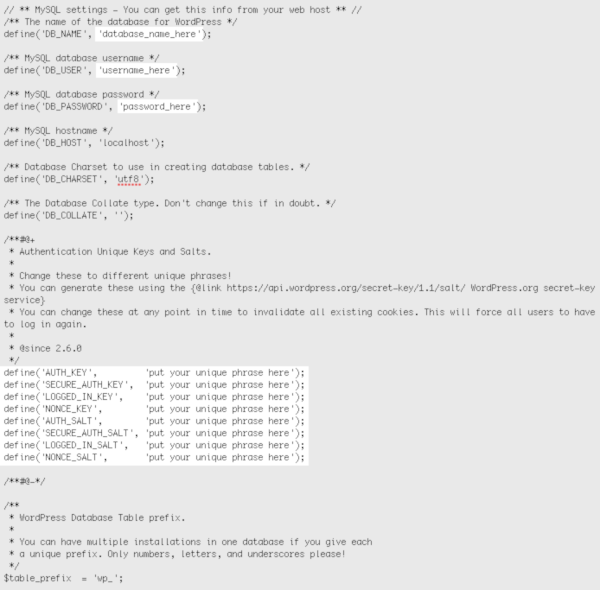
As an extra precaution, you should also add authentication unique keys and salts. You can generate them easily by going to https://api.wordpress.org/secret-key/1.1/salt/. Then, simply copy and paste the keys in the space provided.
Finally, save the file and rename it wp-config.php.
Upload the contents of the WordPress folder on your machine to a directory within the public_html folder.
Finally, go to yoursite.com to complete the installation.
The installer will walk you through all the steps needed to finish up the process. Make sure you write down your username and password to log in to your WordPress dashboard.
Adding essential plugins
One of the reasons WordPress is so great is the amount of plugins you can use to add a wide variety of functionality to your site. A plugin is simply an application which lets you add new features to your site or help to optimize it in a number of ways.
While you may be tempted to go crazy and install a whole bunch of plugins right away, it’s best to install and use them somewhat sparingly.
Keeping what I wrote above in mind, there are a few plugins that you can automatically add to any new WordPress site, including the following:
Yoast SEO
Yoast SEO is a must-have plugin designed to help you optimize important on-page site elements for Google, including page titles, meta descriptions, XML sitemaps and much more.
Page Title – This is what shows up at the very top of your browser window, as well as in Google’s search results as the main title. It is regarded as the single most important on-page SEO element.
Meta Description – This is the blurb that shows up beneath the page title in search engine results. By writing compelling titles and meta descriptions for both pages and posts, you can encourage users to click on your site.
XML Sitemaps – Another great built-in feature of Yoast SEO is the ability to create an XML sitemap, which makes it super easy for search engines to index your site content. It is automatically updated any time you publish something new.
For more information about configuring Yoast SEO, check out my WordPress SEO guide.
As an alternative, you could also use All In One SEO Pack. Both plugins have similar features, and some themes may not be compatible with Yoast SEO.
Wordfence Security
Wordfence Security is an amazing plugin designed to keep your website safe and secure. It is a very popular security plugin for WordPress, and is available in both free and premium versions.
Both versions offer a complete firewall to block malware, brute-force attacks, back door vulnerabilities and more.
Web Application Firewall – This built-in firewall prevents your site from being hacked by identifying malicious users and blocking their access to your site. It is protected using Wordfence’s Threat Defense Feed, which is updated regularly to ensure your site is safe from the latest threats. Even if you’re using a vulnerable theme or plugin, Wordfence can effectively block attacks based on certain patterns.
Brute Force Attacks – Upon downloading and activating the plugin, you may see a number of unsuccessful login attempts. Wordfence will automatically lock out users who try to guess your username and password.
It prevents attacks in the following ways:
- locking out users after a specified number of failed login attempts
- locking out those who click the “forgot password” link too many times
- the option to instantly lock out anyone who uses an invalid username
- ensuring that WordPress doesn’t give out any information about usernames used to login
Malware Scanner – Wordfence scans all core files, plugins and themes for malware, code injections and backdoor vulnerabilities. It compares the files on your site with those in the WordPress repository, and recognizes any malicious inconsistencies between the two. They perform regular scans of your site using a cluster of high-performance servers in their data center.
If you’d like to try a different security solution for your WordPress site, check out iThemes Security (formerly Better WP Security) or All In One WP Security & Firewall.
W3 Total Cache
When it comes to optimizing your WordPress site for speed performance, the role of caching should never be taken lightly. WordPress is driven by a MySQL database, and relies on queries to and from your database to fetch and render pages and posts. This process can make your site load slowly, and uses valuable web server resources.
Using a caching plugin creates static copies of your site’s pages and posts, which are then served to your site visitors instead of fetching and rendering them every time.
While a caching plugin will certainly help improve your site performance, there are a number of other factors that affect site speed, including:
Web host – if you use a crappy hosting service (e.g. Bluehost or any EIG-owned hosting company), your site performance will suffer.
Size of your site images – if the images on your site are too big, it will slow down your site. Make sure you size images at the size you intend to display them on your site.
Quality of your theme – some themes are poorly coded, which makes them bloated and slow.
Using a content delivery network – a CDN stores multiple copies of your site assets on servers throughout the world, which makes your site load quickly for users regardless of their location.
Take your site speed and performance even further by using W3 Total Cache with Cloudflare CDN.
BackWPup
Backing up your website is super important, just in case something bad happens. While some hosts include daily backups as part of their hosting service, it’s a good idea to make your own backups as well.
BackWPup is easy to configure, and can be set up to automatically backup your site at specified intervals. You can also choose the time at which you’d like your backups to run. This is great, as you can essentially set it and forget it.
Using this plugin, you can backup your site to a number of different cloud backup services, including:
- DropBox
- S3 service
- Microsoft Azure (Blob)
- Rackspace Cloud Files
- SugarSync
In addition, you can have backups emailed to you (if your site is small) or uploaded to an ftp folder.
I backup my sites every week to DropBox, which offers both free and paid plans. With a free account, you’ll have more than enough space to backup multiple websites. I set BackWPup to store the most recent 3 backups of my sites, but you can adjust this if need be.
Contact Form 7

Every website should have a contact form, which makes it easy for people to reach you without displaying your email address publicly. Contact Form 7 is a super popular contact form plugin which you can use to create all kinds of forms.
In addition, you can set up autoresponders and connect it to an email newsletter service such as MailChimp. This is useful for adding subscribers to your email list.
To create a contact form for your website, follow the steps below:
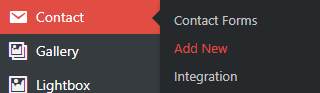
Go to Contact in the left sidebar of your dashboard, and click Add New.
Give your contact form a name and click Save.
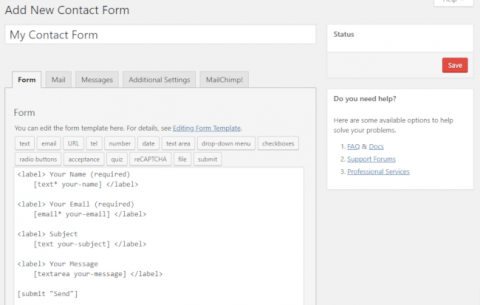
By default, there will be a few fields already created in your form, including: Your Name, Your Email, Subject, Your Message and a Send button.
Based on your specific needs, you will likely want to adjust the default contact form fields or add new ones.
The available form fields are as follows:
- text – a simple text field, (probably the most commonly used).
- email – email address.
- URL – website URL
- tel – telephone number
- number – small form field for numbers
- date – input field for a date or specified range
- text area – larger text field for longer text
- drop-down menu – add items to a drop-down menu
- checkbox – lets people select items, and can be configured to allow multiple selections
- radio buttons – similar to checkboxes, but with a different look and only one selection is allowed
- acceptance – box which corresponds to a specific condition (e.g. agreeing to terms and conditions, etc.)
- quiz – add a simple quiz to prevent bots from filling out and submitting forms
- reCaptcha – better way to prevent bots from submitting forms
- file – allow people to attach files to your contact forms
- submit – simple button at the end of your form to submit it
After you add the form fields you need, it’s time to configure the mail section, which controls who the form will be sent to, the subject, any additional headers such as reply to and cc addresses, and more. You can also set up an auto responder email to be sent upon form submission.
To get started, click on the Mail tab.
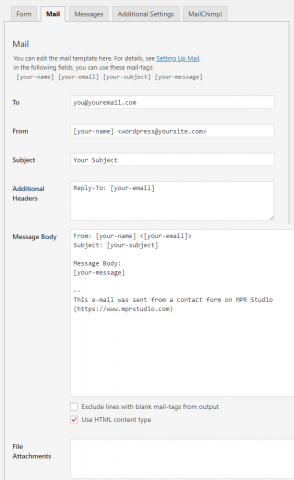
To – in this field, enter the email address where you want to receive form submissions.
From – here, you can use an email address from your domain (e.g. [email protected]). It is simply the address from which the form will be delivered.
Subject – if your form is for a specific subject, enter it here. Alternatively, you can use the subject shortcode so whatever the person inputs in your form will show up.
Additional Headers – you can add a Reply-to address as well as Cc addresses if you’d like submitted forms to be sent to multiple people.
Message Body – In this area, you will configure all the form fields to be displayed according to your needs. If you know a little coding, you can use HTML here, and format your forms nicely so they’re easy to read. Just make sure the Use HTML Content Type box is checked at the bottom of the field.
File Attachments – If you let people upload attachments to forms, you can include the shortcode here so that any attachment is sent to you along with the form.
Mail (2)
In this section, you can set up an autoresponder to be sent upon successful form submission. Using tags, you can even make them appear “somewhat personalized” by adding the person’s first name or other details (e.g. Hi [first-name], etc.)
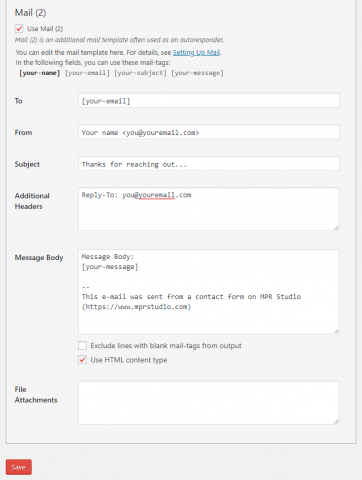
If you have products or services you’re trying to promote, adding them to an autoresponder is a great way to make sure people who are contacting you see them. You can even format it nicely if you know a little HTML.
Messages
In this tab, you can change the default messages that users see in a number of different situations, including when their form was submitted successfully or if there was an error of some kind.
Generally, I just leave these as they are, but if you’re feeling creative or have your site in another language go ahead and change ’em.
Additional Settings
Here, you can add any customization code snippets if you’d like. To learn more, visit https://contactform7.com/additional-settings/
Mailchimp or any other extensions
If you’ve added any extensions to Contact Form 7, you can configure their settings in the last tab. I use the MailChimp extension which lets me automatically add people to my email list when they opt in for my newsletter.
Choosing and installing a theme
After you’ve installed WordPress, you’re ready to start looking for a theme. There are countless free and premium themes available for WordPress. You can start out by browsing through the WordPress Theme Directory, with over 6,000 free themes to choose from.
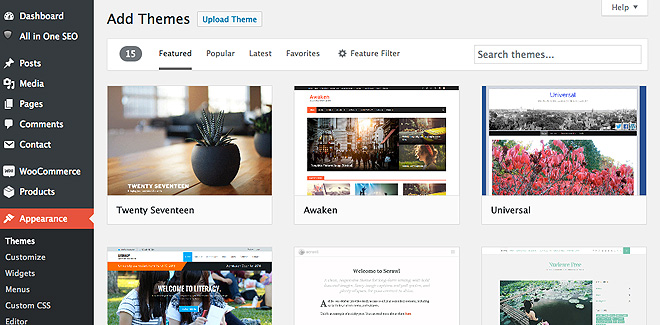
In your WordPress dashboard, hover over Appearance in the left sidebar and click on Themes.
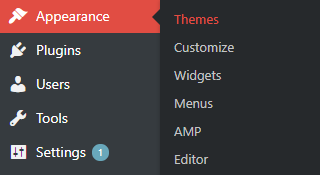
Then, click the Add Themes button at the top of the page. Here, you can use a number of filters to find themes for certain types of websites, and even search for themes with specific built-in features.

To see what a given theme will look like, simply click the Preview button on the bottom right of its thumbnail. While this will give you a rough idea what your site could look like, if you don’t have content on your site, it won’t look like the screenshot.
Pay attention to specific site elements, including layout options, colors, typography and features.
Once you find a theme suitable for your site, click the Install button and give it a second. Once the theme is installed, go ahead and click Activate.
Then, you can add some pages and posts to get a good feel for what your site might look like. Don’t worry, you can always change themes later, so don’t get too attached to anything at this point.
There are a few things to keep in mind when selecting a WordPress theme.
Setting permalinks
The default permalink structure in WordPress is not ideal for SEO, so you’re going to want to change it.
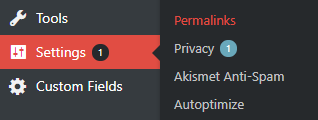
Hover over Settings in the left-hand sidebar, and click Permalinks.
In most cases, you’re going to want to choose Post name as your URL structure (it’s what I and many other bloggers use).Then, with any pages or posts that you create, make sure you use short and concise permalinks (e.g. yoursite.com/services).
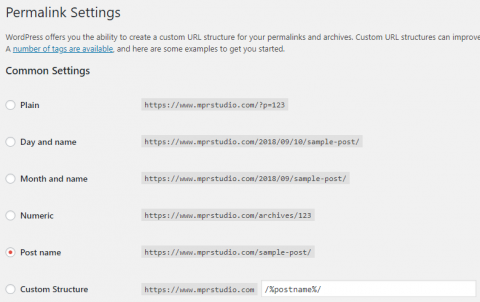
You can also choose your own custom structure based on your needs, or choose one of the options with the date in the URL – either day and name (https://yoursite.com/2018/09/12/post-name/) or month and name (https://yoursite.com/2018/09/post-name/). The date-based options are popular among news sites that publish a lot of content on a regular basis.
I recommend using the Post name structure, but there are reasons you may want to adjust it.
Adding pages to your site
Once you have your theme chosen, it’s time to start adding some content to your website. Within the WordPress dashboard, it is very easy to create new pages, as well as upload various media items (photos, illustrations, PDFs, etc.).
To start, you can add the following pages (or similar) to your site:
- home page
- services or products
- blog
- about
- contact
Your specific needs may differ from those mentioned above, so add whichever site pages you’d like.
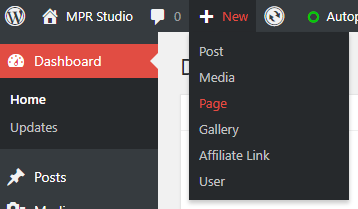
To add a new page, hover over the + New item in the top bar of your WordPress dashboard, then select Page.
At the top, give your page a name, and adjust the permalink so it’s short and concise.
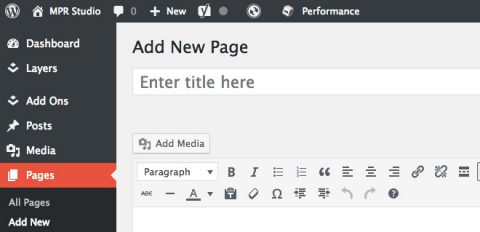
In the content area, add whatever text and images you’d like. While you’re working on the page, you can save your changes without making it public by clicking the Save Draft button.
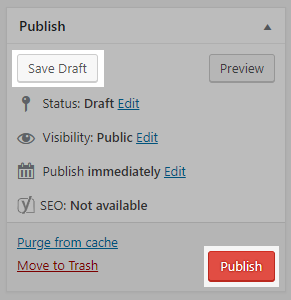
Once the page is in good shape, click the Publish button on the right-hand side of the page.
Setting your blog page
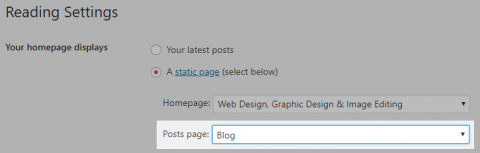
In order to add a blog to your site, you will first need to create a blog page. Go to Pages > New and give it a title – blog works just fine, but you may want to call it something else (news, updates, etc.) based on your content and the nature of your posts.
Any new posts that you create will show up on the blog page of your website, which you can configure under Settings > Reading.
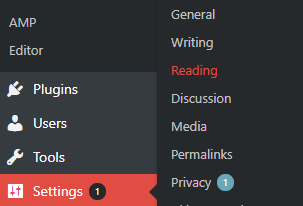
Simply choose your blog page from the Posts page dropdown menu.
Creating a navigation menu
Now that you’ve added a few pages to your site, it’s time to create a menu so your visitors can navigate your site easily.
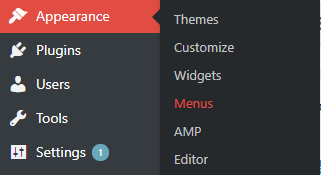
First, go to Appearance in the left sidebar of your dashboard and click on Menus.
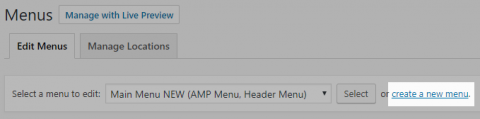
On the next page, click the create a new menu link.
Now, you’re ready to add items to your menu.
You can include pages, posts, custom links, and much more. For now, adding your site pages will likely be good enough.
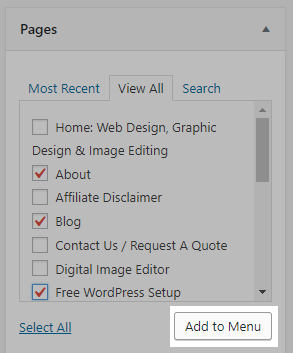
In the Pages section on the left, simply check the boxes next to the pages you’d like to add and click the Add to Menu button.
Now, you can rearrange the pages however you’d like by dragging them.
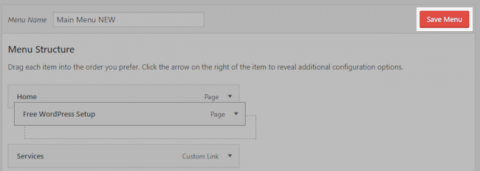
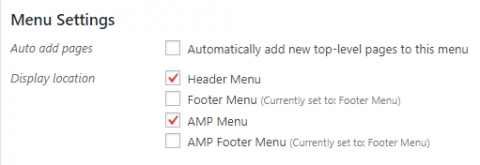
At the bottom, make sure that your new menu is set as the Main Menu (it can also be referred to as Header Menu, Top Menu, Primary Menu, etc.). Every theme has different menu locations, but it will generally be near the top of your site.
When you’re done, don’t forget to click the Save Menu button.
Adding blog posts
To add a post, simply hover over the + New in the header and select Post. The procedure for adding posts is the same as pages, and the screens are identical.

Give your blog post a title, and use an optimized permalink. Add some text and images, then save your changes by clicking Save Draft. You will notice areas where you can select Categories and Tags to effectively organize your blog posts. For more about the differences between these two, check out this post.
Once you’re ready to publish your first post, click the Publish button.
Making money with your WordPress site
Now that you’ve created your site and customized it accordingly, you’d probably like to know how you can make some money with your site.
There are quite a few different ways to monetize your blog, and I’ll summarize them below.
Affiliate marketing
Affiliate marketing is a popular way for bloggers to earn income. You simply recommend various products and services through links on your site. When a visitor clicks on an affiliate link and then makes a purchase, you receive a referral commission.
It’s important that you ONLY recommend top-notch products and services that you can personally vouch for. While I was an affiliate for SiteGround (they used to offer great service), I am not anymore because the quality of their service and support have totally gone downhill.
Google AdSense
Google AdSense lets publishers serve text, image, video or interactive advertisements on your site. It works by allowing advertisers to bid on keywords related to your content, and placing relevant ads on your site.
When a visitor clicks on the ads placed on your site, you earn a commission. It is very popular among bloggers and other content creators as well.
Online shop
With WordPress, it’s super easy to create an online store. You can sell a wide variety of items, including physical products, digital downloads (eBooks, music, etc.), or even services.
There are a few different eCommerce plugins for WordPress, but we highly recommend using WooCommerce. For step-by-step instructions, refer to our in-depth guide to creating an online shop (link to online shop post).
Frequently Asked Questions
Having helped a good amount of people start their own site with self-hosted WordPress, we’ve received a bunch of questions about the CMS. Below, you’ll find some answers to Frequently Asked Questions regarding WordPress.
What is the difference between and WordPress.com and self-hosted WordPress?
Do I have to run a blog on my site?
How should I choose a theme for my WordPress site?
How can I embed videos on my site?
Conclusion
There is quite a bit that goes into creating a WordPress site, but it’s not as complicated as it may seem. By following this comprehensive guide, you can have a basic site up and running within an hour or two.
If you get stuck or have a question about setting up your self-hosted WordPress site, please leave a comment below and I’ll try my best to help you out.
Choosing a domain name.
Selecting web hosting.
Installing WordPress
Adding essential plugins
Choosing and installing a theme
Setting permalinks
Adding pages to your site
Setting your blog page
Creating a navigation menu
Adding blog posts
Making money with your WordPress site
If you found this post helpful, please share it and spread the word!
Want more content like this? Sign up for my newsletter to receive helpful WordPress Tutorials, Tips and Tricks.

A very complete tutorial. Thank you for your efforts. I am using siteground now, it is performing very well.
Thanks, appreciate your comment.
Are there any Themes that highlight Industrial Hemp i.e Cultivation, Harvesting, Processing.
Thanks
While I don’t know of any hemp-specific themes, there are plenty that would suit that particular kind of site. You could start by simply finding a handful of sites you like, then look for similar sites in the WordPress theme directory. Hope that helps!