Your web browser, hosting server, content delivery network and WordPress caching plugins all serve cached content, which can make updates and changes to your site not immediately visible.
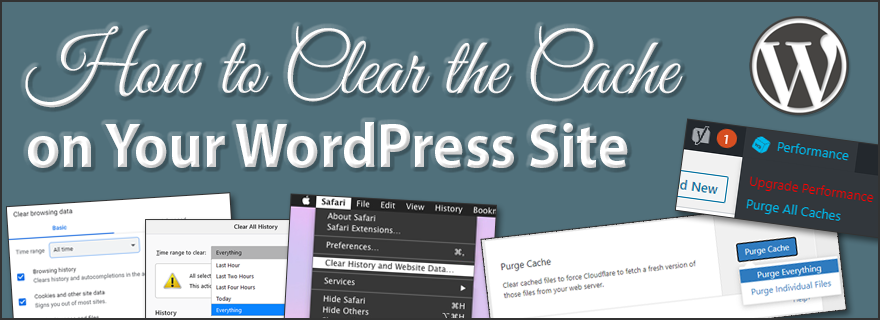
As far as troubleshooting problems on your WordPress site, clearing your various caches is a common first step. In this tutorial, you will learn how to clear a variety of caches on your WordPress website, including:
- Web browser history/cache
- WordPress caching plugins
- Cloudflare and other content delivery networks
If you’re looking for quality shared hosting for your WordPress website, we highly recommend A2 Hosting. They offer unlimited SSD space, free automatic site backups, hosting optimized for speed and 24/7/365 guru technical support.
What is caching and why is it important?
Caching basically stores static versions of your website’s content. This lets WordPress bypass the running of heavier PHP scripts, which helps to improve your site speed.
Web Browsers – All modern browsers also store cached versions of pages you visit to make them load more quickly the next time around.
WordPress caching plugins – There are a number of caching solutions available, the most popular of which are WordPress caching plugins like W3 Total Cache, WP Super Cache and WP Rocket. They provide an easy-to-use interface for controlling which items to cache, when the cached content should expire and cleaning up the cache on demand.
Managed WordPress web hosts – Certain hosting companies use built-in caching tools on their servers so there is no need to use a plugin. Other hosts have their own caching plugins.
Content Delivery Networks – MaxCDN and Cloudflare also use caching for your site content on servers around the globe. I use the free version of Cloudflare for the majority of my sites.
Web Application Firewalls – If you’re using security plugin like Sucuri or Wordfence Security, their firewalls also use caching to help speed up your site and minimize downtime.
While caching is essential for speeding up your site and vastly improving user experience, it can cause some problems too. The most frustrating thing I’ve experienced with caching is not being able to see changes I’ve made to my website right away. To solve this, you simply need to clear all your caches and reload the page you changed on the front end.
Now that you know a little about different caching tools, let’s go over how you would clear all of them on your WordPress website.
Clear your web browser cache
The first step is to clear your browser history/cache. Modern web browsers store the following types of static content:
- stylesheets
- JavaScript
- images
It does this to make subsequent visits to the same site quicker.
In some cases, the web browser cannot decipher whether a page has changed. Then, it will reload the page from cached content, instead of fetching the fresh, updated copy.
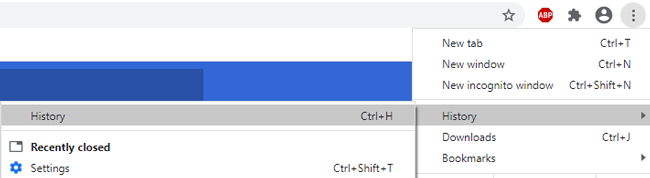
Google Chrome – First, click on the three vertical dots in the top right of the browser, hover on History and click History in the second dropdown.
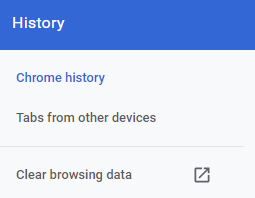
On the next page, click on the Clear browsing data link on the left-hand side.
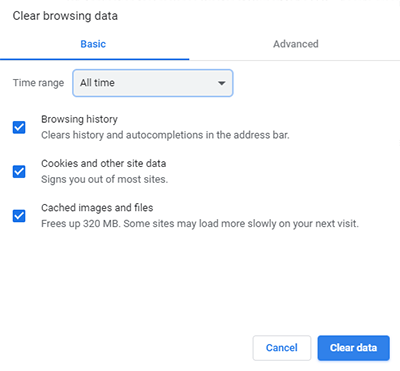
On the popup, select All time from the dropdown, make sure all boxes are checked and click the Clear data button.
Firefox – Click the menu button (3 horizontal lines) in the upper right-hand corner of your browser window. Then, click on Options.
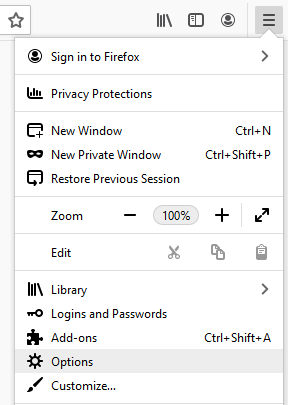
In the left sidebar, select Privacy & Security. Scroll down to the History section and click the Clear History button.

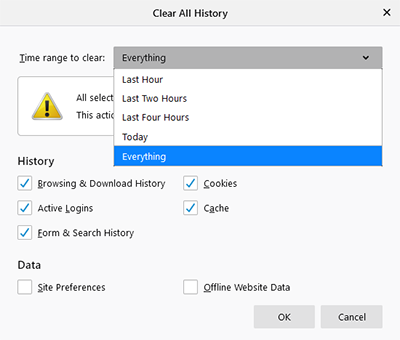
Then, choose Everything under the Time range to clear dropdown. Make sure all boxes under History are checked, and hit the OK button.
Safari – Go to the Safari menu in the top bar, and select Clear History and Website Data from the dropdown.
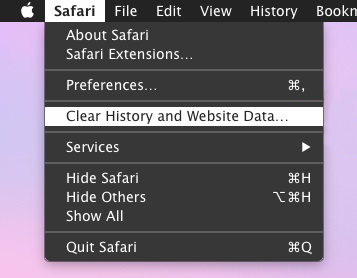
Then, select all history from the dropdown on the popup. Finally, click the Clear History button.
Pro Tip: Instead of clearing your cache, you can open up your site in an incognito or private browser window to see if your changes are visible.
Clear the cache in your WordPress caching plugin
If you’re using a caching plugin on your WordPress website, then you need to clear the cache in that as well. The majority of them allow you to do this very easily from the plugin’s Settings page or even in the top bar of your dashboard.
Clear cache in W3 Total Cache
In this popular plugin, the process is very simple.
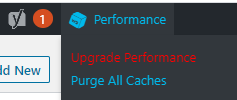
- Click the Performance link in the top admin bar.
- Then, click the Purge All Caches link from the dropdown.
Clear cache in WP Super Cache
Another popular free WordPress caching plugin, WP Super Cache also lets you clear your cached site content very easily.

- Log in to your WordPress dashboard.
- Click the Delete Cache button in the top admin bar.
Clear cache in WP Rocket (paid option)
Widely-considered the best WordPress caching plugin on the market, WP Rocket actively builds your WordPress cache in the background, ensuring that your users are always served a cached version of your site.
It is super easy to clear cache files using WP Rocket with a couple clicks.
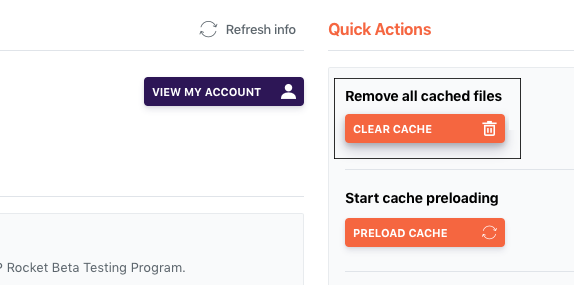
- Go to Settings > WP Rocket in the left sidebar of your WordPress dashboard.
- Click the orange Clear Cache button under Quick Actions.
Clear cache in Cloudflare CDN
With Cloudflare, you can clear the cache by logging in to your account, or from within your WordPress dashboard using a plugin.
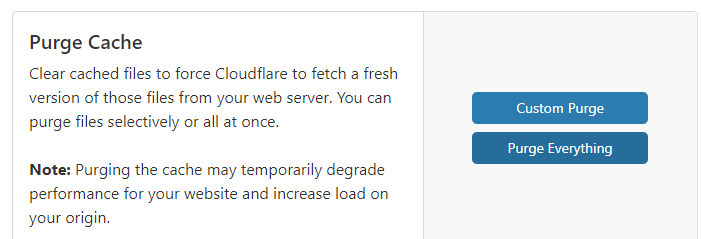
Clearing the cache on cloudflare.com – Log in to your account, then choose the site whose cache you want to clear. Next, click on the cache icon.
On the next page, click on the Configuration link at the top left. Then, click on the blue Purge Everything button.
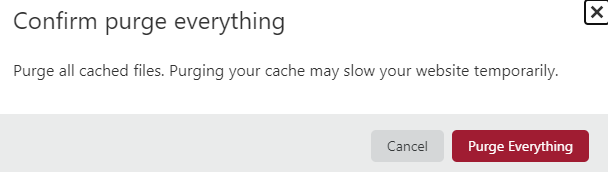
On the popup that appears, click the red Purge Everything button.
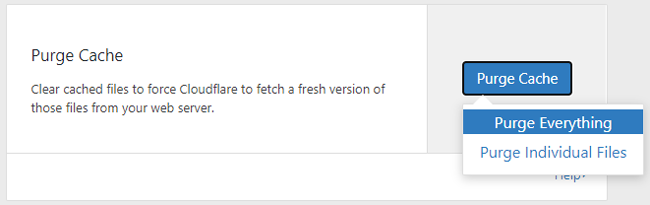
Clearing the cache using the Cloudflare plugin – In your WordPress dashboard, go to Settings > Cloudflare.

On the next page, click on the blue Purge Cache button, and select Purge Everything from the dropdown.
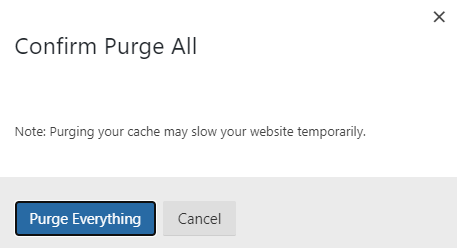
On the popup, click the Purge Everything button.
My Experience: I have personally dealt with caching issues on a number of websites I manage, including one for my Dad. He occasionally calls me and says things like “my changes aren’t showing up on the front end.” Then, I proceed to ask “did you clear your browser cache?” If he says he has, I will follow up with “well, try clearing the cache of the caching plugin in WordPress.” If he’s done both things, then I tell him to clear the Cloudflare CDN cache.
Conclusion
If you’re having issues where your changes are not visible on the front end, it’s likely being caused by your web browser history/cache, a caching plugin/tool on your hosting server, or a content delivery network (if you’re using one). Hopefully, you understand a bit more about caching now that you’ve read this post. When it comes to site optimization, it cannot be overlooked.
If you found this post helpful, please share it and spread the word!
Want more like this? Sign up for my newsletter to receive helpful WordPress Tutorials, Tips and Tricks.

