Are you looking to add membership functionality to your WordPress website? Whether for an online course, premium news or a subscription-based digital product or service, creating a WordPress membership site is a relatively straightforward task.
Self-hosted WordPress is a super-flexible CMS with a wide variety of plugins for managing users and roles, handling payments and adding all kinds of features you’d need for your membership site.
Having a membership site allows you to control who has access to various areas of your website, and gives you options in terms of monetization as well.
If you’re looking for quality shared hosting for your WordPress website, we highly recommend A2 Hosting. They offer unlimited SSD space, free automatic site backups, hosting optimized for speed and 24/7/365 guru technical support.
- Registering A Domain Name
- Buying Web Hosting
- Installing WordPress
- Choosing A Membership Plugin
- Free or Premium Membership Plugin?
- Adding Membership with WP-Members
- Recommended WordPress Settings
- WP-Members Options
- Registration Form Fields
- Dialogs and Error Messages
- Emails
- Managing Content
- Managing Users
- Registration
- User Profile
- Membership Products
- Menus
- Customizing Emails
- Customizing Forms
- Shortcodes
- Conclusion
In order to create your WordPress membership site, you’ll need the following:
- A domain name
- Hosting
- Self-hosted WordPress installed
- A membership plugin
Registering A Domain Name
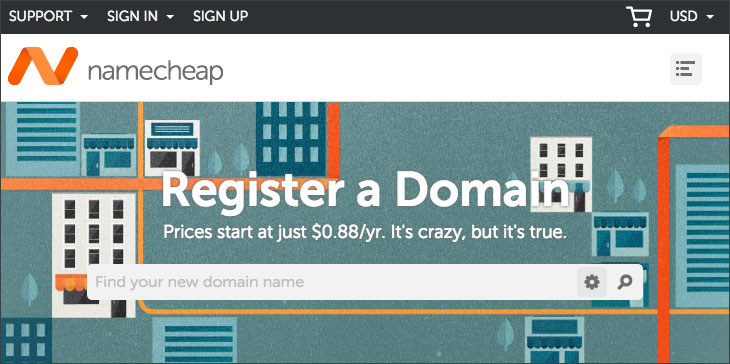
The very first step is to choose a domain name for your website. This is a vital element of your online presence as it helps you define your brand and make a good first impression on your site visitors.
Sometimes, selecting a domain name is really easy. You can choose to use your company’s name followed by .com, .net or another domain extension. Other times it’s not so simple.
While it’s important to choose your domain name with care, you don’t have to overanalyze it. Think of something that will be easy for people to type and remember. Avoid long and confusing domain names, and strive for simplicity.
Here are some tips for choosing the perfect domain name:
- Avoid numbers and hyphens if possible.
- Make it easy to type, pronounce and remember.
- Keep it short and concise.
- Choose brandable over generic.
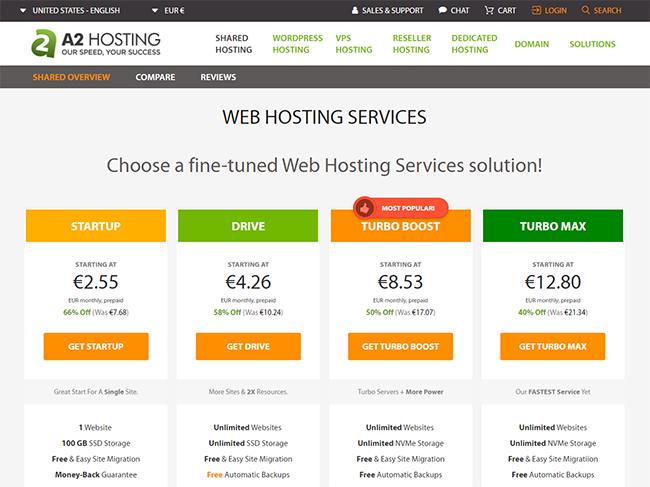
Buying Web Hosting
Now that you have a domain name for your site, it’s time to get a web hosting plan. There are numerous types of hosting available, and shared hosting will be more than enough to start out. It is the most affordable, and will suffice for a new website with very little traffic. You can always upgrade to a better (and more expensive) hosting plan as your site becomes more popular.
READ THIS: Steer clear of any hosting companies owned by Endurance International Group. While many bloggers recommend them, they only do it because they receive big commission payouts for each affiliate sale.
I have heard good things about A2 Hosting (shared plans) and Cloudways (cloud hosting).
I believe in ONLY promoting products that I personally use and know are amazing.
For this reason, I no longer recommend SiteGround. They used to be great, but have totally fallen apart.
Just know that some hosting companies are absolute garbage, and should be avoided like the plague. Don’t go with the cheapest option (you’ll get what you pay for) or listen to one blogger who recommends a certain host. Do your research and check out multiple reviews. Bluehost, Hostgator, and all companies owned by EIG are terrible and you don’t want to use them. UPDATE: SiteGround is also awful now, so avoid them!
Installing WordPress
Now that you have a domain name and web hosting, you’r ready to install WordPress. With most hosts, you’ll be able to use a 1-click installer within cPanel, but I will go over the manual method as well.
1-click installation
It’s highly likely that your host offers a quick, automated WordPress installation within your control panel. This makes the process super simple, but I’ll go over it below just in case.

Log in to your hosting account, then go to cPanel. Find the WordPress Tools section, and click the WordPress Installer.

Then, click on the Install tab at the top left.

Select your protocol from the dropdown list, then choose the domain where you want to install WordPress.
* Since July, 2018 Google Chrome started showing a Not Secure label in the URL area for all websites not using SSL. With many reputable hosting companies, you can add a FREE Let’s Encrypt SSL certificate, so there’s no reason not to use it.
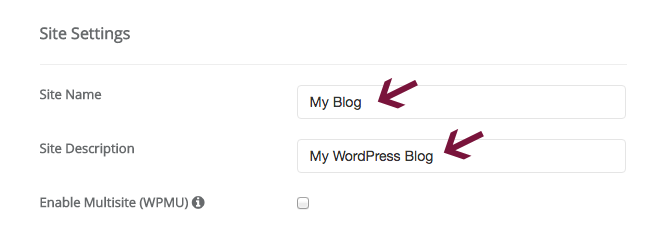
Next, enter your Site Name and Site Description, but don’t worry if they’re not perfect. You can always change them after you’ve completed the installation.
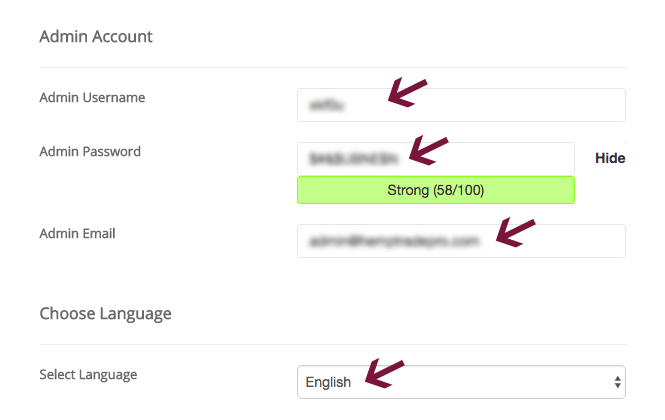
In the Admin Account section, you need to create an Admin Username and Password. The installer will automatically choose a username and password for you, but you can change them if you’d like.
Whatever you do, don’t use admin as your username and use a super strong password (NOT something you can remember).
Select the language for your installation from the dropdown.
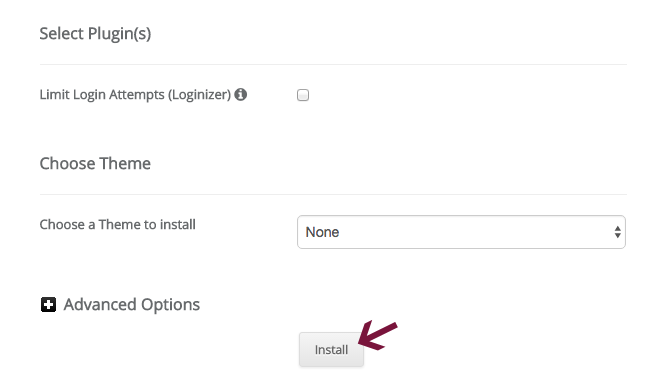
In the Select Plugins area, you can decide whether you want to install the Limit Login Attempts (Loginizer) and/or Contact Form by WPForms.
Under Choose Theme, you can select a theme to use if you’d like.
PRO TIP: It’s easier to just evaluate what plugins you need later, and choose a theme once WordPress is installed as well. Don’t worry about these two items for now.
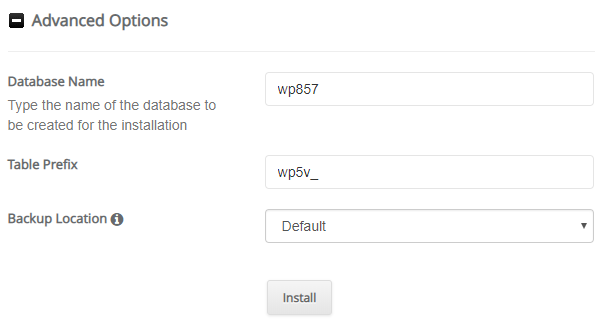
In the Advanced Options area, you can specify a Database Name, Table Prefix and change the Backup Location. It’s fine to just leave the default values as well.
Last but not least, click the Install button and give it a few seconds.
Once the installation is finished, you can log in to your WordPress dashboard using your chosen username and password at yourdomain.com/wp-admin/.
Manual installation
Some hosts don’t offer a 1-click installation, in which case you’ll have to install WordPress manually.
In order to perform a manual installation, you’ll need to download an FTP client, which allows you to upload and download files to your web hosting account.
PRO TIP: Having FTP access is very useful, and will let you quickly solve problems if you are unable to log in to your WordPress dashboard.

Step 1 – Download an FTP program if you don’t already have one installed. I personally use and recommend FileZilla, but you can use CyberDuck (both can be used on Mac or PC) or a number of other FTP clients.
Step 2 – Once installed, get your login credentials from your hosting provider. You can get your ftp host, username and password by logging in to cPanel. To make life easier, you can save your FTP login information so you don’t have to manually enter it every time.
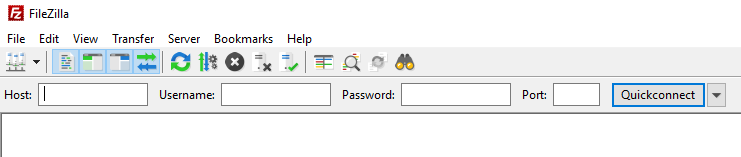
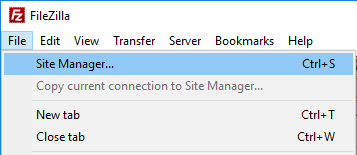
In FileZilla, you do this by going to File > Site Manager.
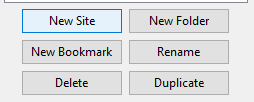
Click the New Site button.
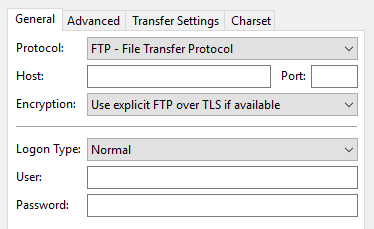
Next, enter the Host, select FTP or SFTP from the Protocol drowdown and choose an Encryption method (I recommend Use explicit FTP over TLS if available).
Then, select Normal for the Logon Type, and enter your username and password.

Finally, click the Connect button, and your login information will be saved for future use.
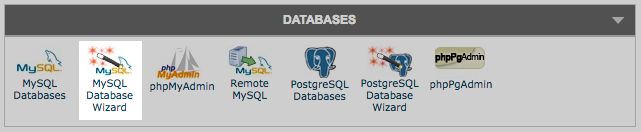
Step 3 – In your hosting account cPanel, click on MySQL Database Wizard in the Database section.
IMPORTANT: Copy down your MySQL database name, user and password because you will need to enter them in your wp-config file shortly.
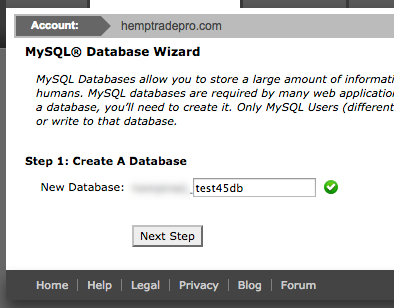
Choose a name for your database. To increase site security, it’s a good idea to use both letters (lower case only) and numbers. The full database name seen below includes the blurred out part to the left of the text field. Once you’ve chosen a database name, click on the Next Step button.
Now, you will choose a Username and Password for your MySQL database. You can let the password generator create a super strong key for you, but make sure to copy it. Once you’ve entered all the details, click the Create User button.
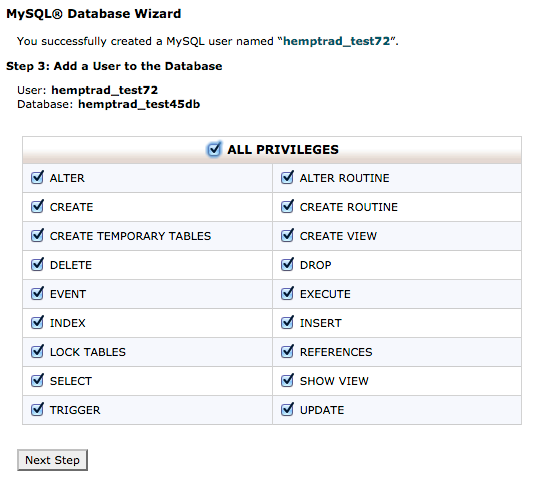
You have successfully created a MySQL database user. On the next screen, make sure that All Privileges is checked. Then, click Next Step.

Now, your MySQL database is ready to use with your WordPress website.
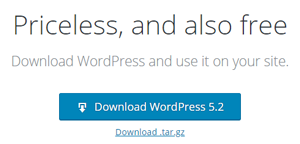
Step 4 – Go to https://wordpress.org and download the latest version of self-hosted WordPress. Then unzip the folder on your computer.
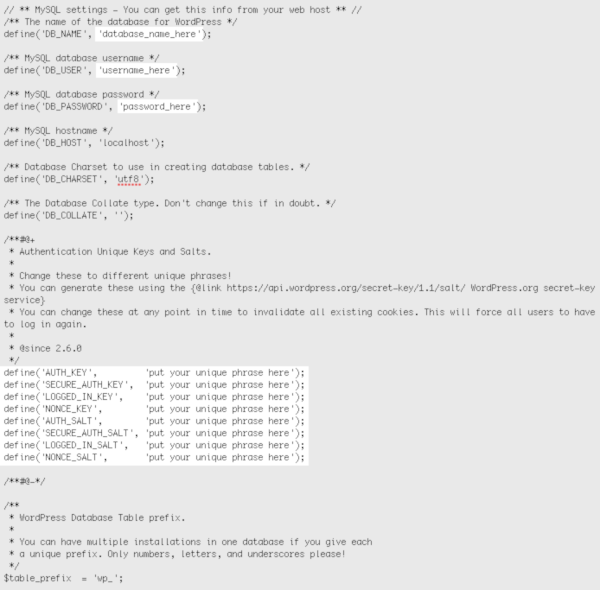
Open the wp-config-sample.php file in a text editor. Then, paste the database name, username and password that you copied before in the areas provided between quotation marks (reference screenshot below).
As an added precaution, you should add authentication unique keys and salts as well. You can generate them by visiting https://api.wordpress.org/secret-key/1.1/salt/. Simply copy and paste the keys where it says ‘put your unique phrase here’.
Last but not least, save your changes and close the file. Then, rename it wp-config.php.
Now, you can upload the contents of the WordPress folder on your machine to your public_html folder using FTP.
Once everything has been uploaded, go to yoursite.com to complete the installation.
You will be guided through all the steps necessary to complete the manual installation. Make sure you copy your username and password to log in to WordPress, and store it somewhere safe.
Choosing A Membership Plugin
When selecting a membership plugin, there are some things to consider. Not all of them have the same features, so you’ll need to decide exactly what you need before making your choice.
Some membership plugins are geared for selling simple subscriptions, while others offer more complex levels of membership and a variety of advanced features.
You should also keep in mind how you want to collect payments. Do you want to use PayPal, Stripe or integrate your membership site with another payment gateway?
Before you make your choice, write down a list of specific features and functionality that you need. Then, you’ll be able to determine which membership plugin to choose.
Free or Premium Membership Plugin?
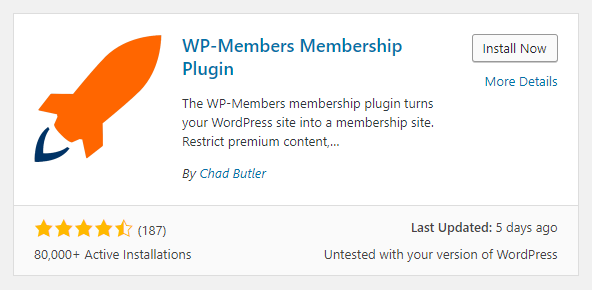
You can go with a free plugin like WP-Members, or choose a premium plugin like MemberPress if you need more advanced functionality.
To start, I recommend installing WP-Members, and seeing if it’s adequate for your site. You can always switch to a paid membership plugin (or premium add-ons for WP-Members) later.
Let’s get started, shall we?
Adding Membership with WP-Members
In your WordPress dashboard, go to Plugins > Add New and search for WP Members. Once you find it, click the Install Now button, followed by Activate.
Then, you will be redirected to a list of your installed plugins. Find WP-Members and click on the Settings link below it.
Recommended WordPress Settings
Since we’re talking about a membership site, you will want certain elements to be protected and only visible for members. There are some WordPress settings which are recommended for basic installations and testing.
Settings > General – Here, you want to make sure that the checkbox next to Anyone can register is unchecked. This prevents having an open registration on your login page (wp-login.php).
Settings > Reading – In this section, you want to make sure to select Summary where it says For each article in a feed, show. The default setting in a fresh WP installation is Full text, but this would let people read protected content in its entirety by viewing your RSS feed.
Settings > Discussion – You want to check the box next to Users must be registered and logged in to comment. This adds extra protection to your comments
If you’re not using the recommended settings, you will see the following warnings at the top of the WP-Members Settings page:
- Your WP settings allow anyone to register – this is not the recommended setting. You can change this here making sure the box next to “Anyone can register” is unchecked.
- Your WP settings allow anyone to comment – this is not the recommended setting. You can change this here by checking the box next to “Users must be registered and logged in to comment.”
- Your WP settings allow full text rss feeds – this is not the recommended setting. You can change this here by changing “For each article in a feed, show” to “Summary.”
On the majority of membership sites, you will likely want to use the recommended settings, but it really depends on your specific needs.
WP-Members Options
This tab contains the default settings to control what content is protected, membership pages, stylesheet used, as well as other settings.
Content
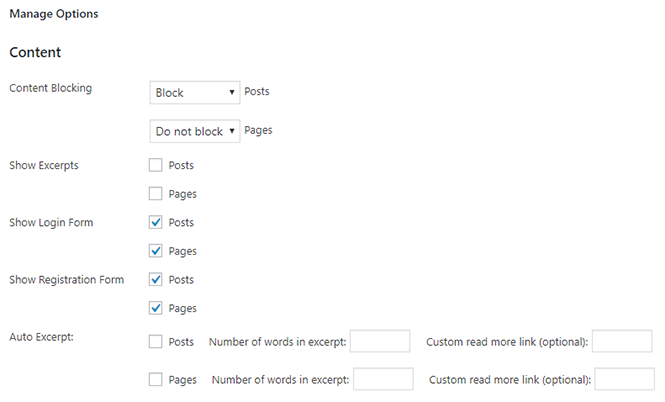
Content Blocking – Choose whether you want to block posts, pages or both by default. The setting you choose can be overridden on the individual post or page as well.
Show Excerpts – You can show an excerpt before a read more tag on protected posts and pages if you’d like.
Show Login Form / Show Registration Form – WP-Members displays both a login and registration form on all blocked content by default. You can disable this by unchecking the boxes.
Auto Excerpt – With this setting, you can define an excerpt for each post type. It makes it simple to show a specific excerpt automatically without having to go through every post to set “read more” tags. Note that the length you choose for Auto Excerpt includes HTML tags associated with images, and other content that may not be visible to users.
Other Settings
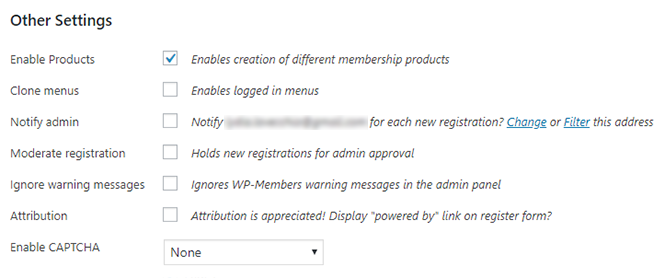
Enable Products – Select this to create a variety of membership products, which can include membership levels and groups, as well as special single page access and more. You can also define whether these products expire or not. If enabled, it will add a Memberships section in the left sidebar of your WordPress dashboard, where you can easily add and edit membership products.
Clone Menus – This allows the plugin to create menus based on a user’s login status. It clones a menu’s location, not the actual menu.
Notify admin – Set an email address where you’ll be notified when someone registers.
Moderate registration – This option lets you manually moderate new registrations, approving or denying them.
Ignore warning messages – You can choose to turn off WP-Members warning messages in your dashboard.
Attribution – Decide whether you want to show “powered by WP-Members” in the registration form.
Enable CAPTCHA – Set whether you want to enable CAPTCHA in your registration forms, which helps fight against spam and bots. The WP-Members plugin supports reCAPTCHA version 2, and Really Simple CAPTCHA. If you decide to use Really Simple CAPTCHA, you’ll need to install the Really Simple CAPTCHA plugin as well.
Please note: CAPTCHA is not supported on the login forms by default. You can add reCAPTCHA or Really Simple CAPTCHA to the login form using the wpmem_login_form_rows filter, then authenticate it with the wp_authenticate_user filter.
Pages
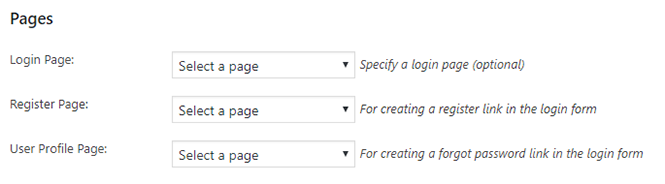
Login Page – You can specify a member login page. By default, WP-Members does not use this setting, but you may want to use it depending on how you set up your site.
Register Page – Choose a page for registration or enter a URL to create a register link in the login form . The register link can be displayed in the main content area as well as a sidebar widget.
User Profile Page – This is where members can update their password and registration information on the front end, as well reset their password if they’ve lost or forgotten it. Pick a page or custom URL to create a forgot password link in the login form.
Please note: The settings in this area DO NOT create the pages or add the needed shortcodes to them. You need to set up those pages and add shortcodes BEFORE you can configure them here.
Stylesheet

Stylesheet – As far as styling goes, WP-Members offers a dropdown where you can choose from installed theme stylesheets. In addition, you can select USE CUSTOM URL BELOW, and link to a stylesheet file of your choosing.
Stylesheet Selector – By default, the plugin be configured with the stylesheet of your site’s current theme.
Custom Stylesheet – If you choose to use a custom stylesheet, you need to enter the entire path to the location of your stylesheet. You can test the path in your browser to make sure that it loads correctly.
Custom Post Types
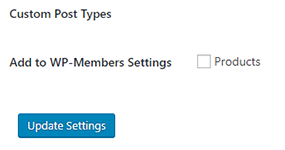
WP-Members can be configured to handle Custom Post Types, which you can also protect. If you add one, it will show up in the plugin’s main content settings that I went over earlier.
Please note: Every Custom Post Type is different, and some of them will not work well with WP-Members. Choosing a Custom Post Type with the plugin does not guarantee that it can be blocked as pages and posts can. For this reason, Custom Post Types are not automatically added to the plugin’s settings.
When you add a Custom Post Type, you will see a checkbox with an option to add it to WP-Members settings.
Registration Form Fields
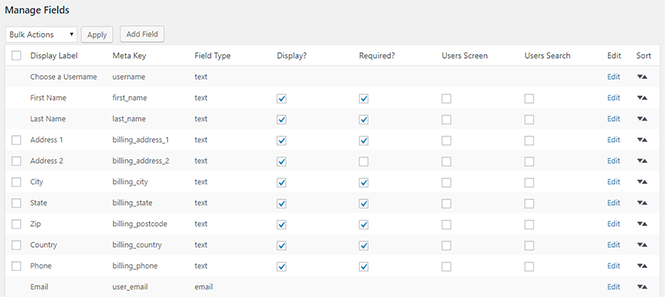
In this tab, you can select which fields you want to display in the registration form, and whether they are required or not.
Check the box in the Display column next to any fields you want to use in the registration form. To make a field Required, simply mark the box next to it in that column.
The following fields come with the plugin:
- First Name (meta_key: first_name, native WP field)
- Last Name (meta_key: last_name, native WP field)
- Address 1 (meta_key: addr1)
- Address 2 (meta_key: addr2)
- City (meta_key: city)
- State (meta_key: thestate)
- Zip (meta_key: zip)
- Country (meta_key: country)
- Day Phone (meta_key: phone1)
- Email (wp_users field: user_email, native WP field)
- Confirm Email (not stored)
- Web site (wp_users field: user_url, native WP field)
- Biographical Info (meta_key: description, native WP field)
- Password (wp_users field: user_pass, native WP field, hashed)
- Confirm Password (not stored)
- TOS (meta_key: tos, stored value: “agree”)
The only field listed above which is mandatory is Email. Any fields that are not set to display are for administrator use only.
You can drag and drop the fields to change the order in which they appear, and can remove any fields that are not being used.
In addition, you can add custom fields by using the Add Field form. All fields EXCEPT native WordPress fields can be edited by clicking the Edit link for the corresponding field.
Native WordPress fields are those which are part of WordPress and they’re automatically included on the User Detail Page. Data for any remaining fields will be located at the bottom of the user profile page under the WP-Members Additional Fields heading.
Checking the User Screen box will add a column for the field in the User Screen under Users > All Users.
Field types supported in form fields include the following:
- text
- textarea
- checkbox
- multiple checkbox
- select
- select multiple
- radio
- password
- image
- file
- url
- hidden
- number
Dialogs and Error Messages
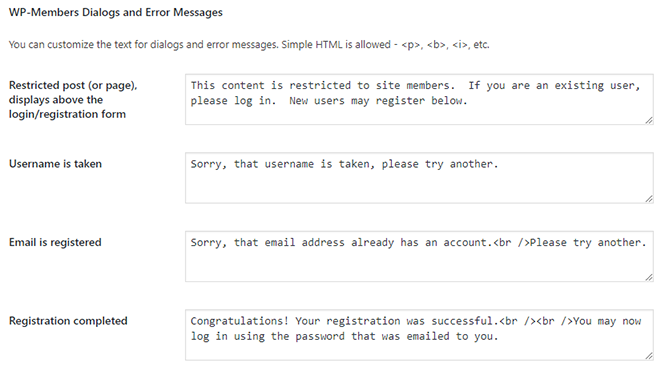
In the Dialogs tab, you can set your own dialog and error messages that are displayed including with empty registration fields, login errors, etc. You can use simple HTML formatting in these fields (e.g. <p> paragraph, <b> bold, <i> italic, etc.).
Built-In Dialogs
You can enter custom messages within the Dialogs tab for the following:
- Restricted content (shown above the login form when restricted page is viewed)
- Username is taken (error message on registration form)
- Email is registered (error message on registration form)
- Registration completed (shows when registration is successful)
- User update (shows when user successfully updates registration data)
- Passwords did not match (changing password error message)
- Password changes (shows when password change successful)
- Username or email do not exist when trying to reset forgotten password (forgotten password reset error message)
- Password reset (shows on successful forgotten password reset)
Emails
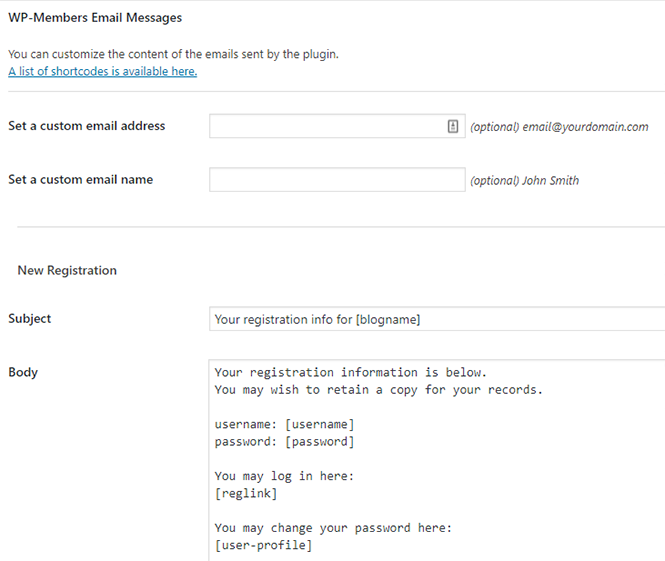
In the emails tab, you can control the email messages which are sent by WP-Members. The only messages that appear in this tab are those which are being used based on current plugin settings in the Options tab.
At the top, you can change the default email address and set a custom name that your messages come from (default is [email protected]).
You can also customize the content of your emails by using a variety of shortcodes for email content. You can use a number of filters as well, and even use HTML formatted emails if you’d like.
See email format documentation for more info.
Managing Content
When setting up your membership site, you need to think about what parts of your website you want to protect. It’s a good idea to have a good amount of quality content which is unprotected so google can index your site and help you drive some organic traffic.
Make a plan and figure out how you want to configure your membership site. Do you plan on protecting blog posts, pages or maybe both? You can also choose to have some posts open to everyone, and make some of them premium for members only. There are a variety of possible setups you can use, so carefully consider your specific needs.
Read below to understand the difference between posts and pages, according to the WordPress.org codex:
- Posts are entries that display in reverse order on your home page. Posts usually have comments fields beneath them and are included in your site’s RSS feed.
- Pages are generally for non-chronological, hierarchical content: pages like “About” or “Contact” would be common examples… Pages live outside of the normal blog chronology, and are often used to present timeless information about yourself or your site — information that is always relevant. You can use Pages to organize and manage the structure of your website content.
By default, WP-Members protects all posts, and leaves all pages unprotected. Below, we’ll go over all the settings, and show you how to manage content restriction on an individual post/page basis as well.
Restricting posts and pages
Within the WP-Members Options tab at the very top, Block Posts is selected by default. This simply means that all posts on your site will be protected, and visible to members only. If you select Do not block from the dropdown, all posts will be visible by default.
While posts are blocked by default, pages are not. The default settings here can be overridden on individual posts and pages, which we’ll go over below.
Posts can show up in a number of areas on your website, depending on how your theme is configured.
This could include:
- home and/or blog pages
- category and tag archives
- monthly and author archives
- search results
You can choose to show entire posts or excerpts on these different areas of your website.
To define an excerpt, you can either enter text in the Excerpt area of the right-hand sidebar on posts and pages, or simply use the More block within your content.
In order to protect posts with WP-Members, you must use an excerpt for any content you want to block (using the More block is preferred). This will make it so your teaser content is visible, but the rest is protected.
You can also set up an automatic excerpt which will be used on all protected pages and posts within the WP-Members Options tab under Auto Excerpt.
IMPORTANT: The Auto Excerpt setting is secondary to the More block tag, which means that if you have an existing More tag in a post or page, it will be used instead of the Auto Excerpt.
This way, you can get your membership content working using existing content with the Auto Excerpt setting, and customize your excerpts using the More tag later. Additionally, you can use the Auto Excerpt functionality by default, but use the More tag in situations where you want to generate content-specific excerpts.
Overriding default settings for posts and pages
Even if you have set all posts and pages to be blocked by default, you can override this on an individual basis. When editing a page or post, you will see a Restriction area in the lower right-hand corner of the right-hand sidebar.
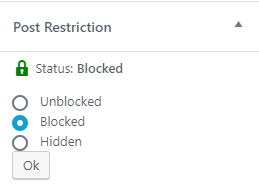
Here, you have three options to choose from:
- Unblocked – Content can be viewed by anyone.
- Blocked – User must be logged in to view any content after an excerpt (set with either a More tag or the Auto Excerpt).
- Hidden – This option lets you completely hide the content unless the user is logged in, including on your home or blog page, category archives or any other page on your site.
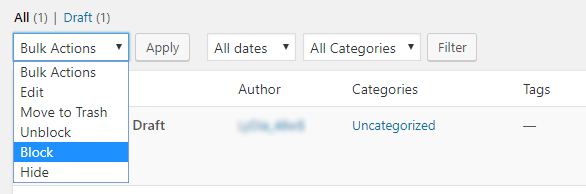
If you’d rather adjust post/page visibility settings in bulk, you can do that from the Posts > All Posts and Pages > All Pages tables. Simply select the checkbox next to the item you wish to adjust, and choose Block, Unblock or Hide from the Bulk Actions dropdown at the top or bottom of the table.
You can see whether a page or post is currently blocked in these tables by the icon displayed in the far right column.
- An open red lock indicates that content is unblocked.
- A closed green lock means the content is blocked.
- An eye with diagonal slash through it means content is hidden.
What Setting Should You Use?
When selecting your default settings, carefully consider whether most of your content will be restricted or not. Then, you can choose the appropriate default setting, and override it individually for any pages or posts that you’d like to adjust.
Managing Users
WP-Members uses data for users within the WordPress framework. It puts users in the users table and user_meta table in the WP database. A user’s username, password, email and website (if provided) are all stored in the wp_users table. Any additional fields are stored as metadata in the wp_usermeta table.
You can manage all of your site’s users by going to Users > All Users in the left sidebar of your WordPress dashboard.
User Details Panel
If you want to adjust a user’s details, simply go to Users > All Users and click the Edit link under the user you want to edit.
WP-Members will add any extra fields to the bottom of the user’s profile page. If you are manually moderating registration, and the user has not been activated yet, there is a checkbox which lets you activate the user. You can also see the IP address of the user when they first registered.
WP-Members adds some functions to the Users > All Users screen, which allows the administrator to further manage users.
Display Users
You can display all users in the table or just those not yet exported. In addition, you can show only those users not yet activated if you are moderating registration.
Bulk Actions
You can export all users displayed in the table in bulk. In addition, you have the option to only display and/or export users that were not exported before. Last but not least, you have the ability to activate a list of users awaiting moderation.
Exporting Users
There are a number of options when it comes to exporting users. You can search or filter the user list and export only specific users (e.g. pending, not exported, etc.). With the bulk menu, you can export only those selected in the table.
In addition to only exporting certain users, you can click the Export All Users next to bulk actions at the bottom of the screen to export all users.
Registration
By default, WP-Members has a 2-stage registration which requires users to enter a valid email address. Then, a randomly-generated password will be emailed to the user, which they can use to log in.
If you’re using a User Profile Area, your users can reset their random password.
Additionally, you can add a password field through the field management panel if you’d like users to be able to choose their password at time of registration. To enable the password and confirm password fields, simply enable them for display in the Fields tab.
Choosing Fields
Upon installation, WP-Members creates an array containing all registration field data, which is then stored in the wp_options table. These fields are shown in the Fields tab.
As mentioned earlier, you can choose which fields are displayed on the registration form, and which ones are required.
Changing Field Order
You can easily change the order in which fields are displayed by dragging and dropping it. The field order is changed as soon as you move it, and you’ll see a confirmation message letting you know the order has been updated.
Creating a Registration Page
In order to set up a registration page, simply create a new page and add the shortcode [wpmem_form register] to the body of the page.
If you’ve blocked pages by default within WP-Members settings, you’ll need to unblock this page for it to work.
Once you’ve created a registration page, you can add it to your navigation menu as you would with any page. In addition, you can enter the URL of your registration page in WP-Members settings, which will generate a Register link in the login forms.
Moderating Registration
WP-Members lets you manually moderate and activate registrations on an individual basis, which allows you to verify all users before letting them access member content.
Activating and deactivating users can be done on the User Detail page or in under Users > All Users. To activate or deactivate users, you can either select multiple users at once and choose from the Bulk Actions dropdown, or you can click the appropriate link under individual users in the table.
Notification
If you enable Notify Admin, you will receive an email at the email address specified in Settings > General every time someone registers.
By default, the admin notification email for new user registration will include a link to the user profile. If you’d like to, you can change this within the Emails tab if need be.
User-defined Passwords
If moderated registration is enabled and you let users choose their own password upon registration, you will need to adjust the template for the default emails sent to the user. If a user chooses a password at registration, you will not be able to send the chosen password to the user when the account is activated. In this case, you’ll need to send the password in the “Registration is Moderated” email, not the “Registration is Moderated, User is Approved” email, which is the default setting. Again, you can edit all of these in the Emails tab.
Default Messages
When someone successfully registers on the site, the default message a user receives indicates that registration was successful and that a password will be emailed to the user. In the Dialogs tab, this is the “Registration completed” message.
If you decide to use moderated registration, you will need to edit this default message and let the user know that registration is pending approval.
In the event that you are using the default of emailing a generated password, you will want to adjust the message to let the user know that they’ll get a password once approved.
Using CAPTCHA
WP-Members lets you use reCAPTCHA or Really Simply CAPTCHA in the registration process.
reCAPTCHA – If you enable reCAPTCHA in the plugin options, it will add an admin tab for CAPTCHA settings.
Here, you can paste in both API keys that you can obtain from Google here.
Really Simply CAPTCHA – Using Really Simple CAPTCHA is easy, but you’ll need to have the Really Simple CAPTCHA plugin installed to use it.
Once you’ve installed and activated the plugin, you can adjust settings in the CAPTCHA tab. You can set the characters you want to use in the image, number of characters, image dimensions, font and background colors, font size, space between characters and the type of image used.
Please Note: CAPTCHA does not provide added security, but simply fights spam registrations. It doesn’t work with the login form.
Turning Off Registration
With WP-Members, you have the option of turning off registration. You could do this if you plan to manage member registration elsewhere or if you want to disable registration from protected content.
Managing Registration Somewhere Else
If you want to have users register for your site through some other method, you can turn off registration and not set a registration page. This could be for membership sites that are invite only, where you don’t let anyone register.
Hiding Registration on Content
If you turn off the registration option, it will remove the registration form from all content areas. In this case, it is wise to specify a registration page where you can direct users.
PLEASE NOTE: Disabling registration in WP-Members is not the same as turning it off in WordPress. It is simply a way to remove the registration from member only content.
User Profile
WP-Members gives registered users an area to manage their profile settings, change their password or reset a forgotten password on the front end.
Setting up this profile page is just like creating a registration page, which we went over in the Registration section above.
Creating a user profile page is easy. Simply add the [wpmem_profile] shortcode in the body of the page you want to use.
Important: If you are blocking pages by default, make sure you unblock this page.
User Profile Location
Once you’ve created a User Profile page, you can use it as you would any other page on your WordPress site, and add it as a menu item.
In the main Options tab, you can enter the URL of your user profile page. This way, the plugin will know where the page is located, and use it to generate a Forgot Password link in login forms.
In order to show a forgot password link in the login form, you have a set up a User Profile page, and specify the URL in the plugin’s Options tab. A forgot username link will show up automatically on the forgot password dialog of the User Profile page.
Membership Products
With membership products, you have the ability to control access to posts, pages, and other content based on a user’s specific membership role.
Membership products is a term used to describe different items that members can have access to.
Setting Memberships
You can create memberships in the Memberships menu, but first need to make sure that Enable Products is enabled within WP-Member’s main Options tab (first item under Other Settings).
To add a new membership product, simply hover over Memberships in the left-hand sidebar of your WordPress dashboard, and click Add New.
On the next screen, enter a title for your product. When you hit the publish button, it will automatically create a slug (used in permalinks) for your membership product.
You can adjust the user roles that have access to the product by checking the box and choosing the desired role from the dropdown. In addition, you can add an expiration date for your membership product by entering a number and choosing Day, Week, Month or Year from the dropdown.
Editing Memberships
In order to edit a membership, go to Memberships in the left-hand sidebar and click on the one you want to edit. This will bring you to the membership editor screen (same one used for adding a new Membership Product).
Please Note: When editing memberships, be especially careful with the slug. It is used to assign memberships for all content (posts, pages, etc.) and users. If you alter the slug for particular content that has already been assigned or users have been granted access, the original info won’t be changed. This could result in users and content using an orphaned slug.
Setting Membership Levels for Content
You can set membership permissions for a post, page or other content in the WordPress editor. There is a Limit access to box in the upper right-hand corner where you can add the membership levels who have access to the current content.
Moderating User Access
With WP-Members, you have the option to enable or disable a user’s membership in their profile. Under the Product Access section, simply select Enable or Disable and update their profile.
Selling Memberships
Memberships are defined as a Custom Post Type, and are quite flexible. This means that you can integrate and customize how you assign user access.
You can even sell memberships as an eCommerce product with WooCommerce and the WP-Members Memberships for WooCommerce extension. The extension lets you link a WP-Members membership with a WooCommerce product so that when a user buys that product, he/she will have access to protected content for that membership level.
Menus
WP-Members lets you clone your theme’s menu locations to create various menus for logged in users. You can easily add a login/logout link in a menu as well.
Logged-in Menus
With this feature, you can create a separate menu to use for logged in users. It simply creates a clone of each menu area in your theme, and identifies the clone as being for logged in users.
There are no settings to adjust for this feature, but you do need to enable it in the WP-Member Options tab.
As soon as you’ve activated the Clone Menus setting, you will notice that it adds a copy of any menu location that your WordPress theme supports. This lets you show a different menu to logged in users for any menu location, and set up menus for both logged in and logged out users.
Login/Logout Menu Link
WP-Members lets you create a special login/logout menu item. It was created to provide a link to the login page for members, and as an easy way for logged in members to log out.
Setup
To create a menu item which is linked to the login page, go to Appearance > Menus in the left sidebar of your WordPress dashboard. Add your menu item as you normally would by choosing your login page and clicking the Add to Menu button.
The label you use for your login page is not important, but something like Log in makes sense. With this menu item, you need to give it the proper CSS class so that it matches the script used by WP-Members.
Note: By default, you won’t see the CSS Classes for your menu items. To enable it, click on the Screen Options tab at the top of the page, and check the box next to CSS Classes. Now, you’ll be able to set the CSS Class for any menu item.
For the login/logout page, you’ll want to enter wpmem_loginout as the CSS Class.
Once you’re done, make sure to click Save Menu.
Customizing Emails
In WP-Members, it’s really easy to customize the content of email messages sent by the plugin.
Setting a Custom Email Address
By default, emails are sent from [email protected], but you can easily update both the name and email address for the from field.
You can simply add different values in both the name and email address fields. Adjusting these settings is totally optional, and should be left blank if you want to use the defaults.
Important: Some hosts have restrictions on emails sent from server-side scripts, and they may require that you use a legitimate email address as well.
Adding Custom Email Content
WP-Members can generate numerous emails that go to users, including the following:
- New Registration – Lets the user know that they’ve registered successfully.
- Registration is Moderated – Informs the user that their registration is pending administrator approval.
- Registration is Moderated, User is Approved – Lets the user know that their pending registration has been approved.
- Password Reset – This email sends a new password to a user that forgot his/her old one.
- Admin Notification – Notifies site administrator/s of each newly-registered user.
- Email Signature – This is the signature placed at the bottom of all emails generated by WP-Members.
Not only can you set custom static content for emails within the plugin’s admin panel, but you can also set filter hooks for every email you send out.
With these filter hooks, you can filter the email that is sent and add/remove content from the email.
The following filter hooks are available:
- wpmem_email_filter
- wpmem_email_newreg
- wpmem_email_appmod
- wpmem_email_repass
- wpmem_email_notify
- wpmem_email_headers
- wpmem_email_shortcodes
- wpmem_notify_addr
- wpmem_notify_filter
Email Format
WP-Members uses the WordPress wp_mail() function to send emails. There are some important details about wp_mail(), including:
- All emails are plain text by default.
- You can change the content type to send HTML formatted email.
- By default, the from address is [email protected].
- To solve any email problems, use SMTP to send your emails.
Sending HTML Emails
You can send HTML emails by changing the content type using various filters.
Change all WP emails to HTML format
Use the wp_mail_content_type filter to set the content type to text/html:
add_filter( 'wp_mail_content_type', 'my_set_mail_content_type' );
function my_set_mail_content_type( $content_type ) {
    return 'text/html';
}
Change only emails generated by WP-Members to HTML
The wp_email_headers filter lets you adjust the email headers, which you can use to set the email type to text/html:
add_filter( 'wpmem_email_headers', 'my_wpmem_html_email' );
function my_wpmem_html_email() {
    return "Content-Type: text/html" . "\r\n";
}
Adding either of the above filter functions to functions.php or a custom plugin will enable you to send emails formatted in HTML. Then, you can use HTML in the email content from within the plugin’s email management tab (make sure you use the correct shortcodes).
Email Shortcodes
You can use a wide variety of shortcodes in email messages, but some of them are only available in the admin emails.
By default, the plugin uses the following shortcodes:
- [blogname] – the title of your site, set under Settings > General
- [username]
- [password]
- [email] – the email address of registered user
- [reglink] – a link to the page where the user registered (helpful to redirect a user to the protected content that they registered to view)
- [user-profile] – a link to a user’s profile where he/she can update password and/or registration information
- [exp-type] – type of expiration, either subscription or trial (only available if you’re using the PayPal Subscription Module)
- [exp-date] – date of membership expiration (only available if you’re using the PayPal Subscription Module)
- [login] – link to the login page if specified in the plugin’s main settings
- [register] – link to the registration page if specified in the plugin’s main settings
- [fields] – admin notification only – a list of any of the registration fields
- [user-ip] – admin notification only – the user’s IP address when they registered
- [activate-user] – admin notification only – a link to the user profile page so they can be activated (used if moderating registration)
* Other custom fields are available in the field’s option name/meta key found in the Fields tab (this does not include “user_login” and “user_email”)
Customizing Forms
The styling and layout of WP-Members forms are based on CSS. There are many ways to customize the look and feel of forms and other plugin elements, including:
- Using the WordPress customizer to add custom CSS.
- Choose a different stylesheet in the plugin’s main Options tab.
- Create and reference a custom stylesheet.
Customizing beyond CSS
For the majority of customizations, adding CSS will do the job. There may be times when you need to take things a bit further if you need to insert specific HTML tags, style definitions or if you want to add elements not included in the plugin or stylesheets.
There are a number of filter hooks in the plugin that allow you to customize the HTML which is output in the forms. This lets you add tags, classes and IDs.
Form filter hooks
Filter hooks let you replace elements generated by WP-Members with your own elements. There are a number of form filter hooks, including the following:
- wpmem_sidebar_form (tag)
- wpmem_login_form_before (tag)
- wpmem_login_form (tag)
- wpmem_register_form_before
- wpmem_register_form (tag)
- wpmem_register_heading
- wpmem_user_edit_heading
- wpmem_recaptcha (tag)
- wpmem_tos_link_txt
Shortcodes
All WP-Members shortcodes can be inserted into posts and pages from the shortcodes menu.
Pages and Form Shortcodes
Page shortcodes are used to create special WP-Members pages.
Login [wpmem_form login] – If you want to be able to send users to a specific page to login, you can add this shortcode.
Register [wpmem_form register] – With this shortcode, you can manually create a registration page.
User profile [wpmem_profile] – By adding this shortcode to a page, you can let logged in users change their password and other member details.
Password [wpmem_form password] – Inserting this shortcode will create a password reset form for users who are NOT logged in.
Forgot username [wpmem_form forgot_username] – Show a forgot username form by adding this shortcode.
TOS [wpmem_tos url=”http://yoursite.com/your-tos-page”] – This is a shortcode for Terms of Service, which is located in the settings for WP-Members under the dialogs tab. It is not used on any pages, but only within the TOS dialog.
Login Status Shortcodes
These status shortcodes can be used to display content to users based on their login status.
Logged in content – You can use this shortcode for content that is only to be shown to logged in users. This shortcode is used in the following way:
[wpmem_logged_in] Content that you want to protect. [/wpmem_logged_in]
In addition to using the shortcode above for more general situations, you can also add the following attributes to make it more specific:
- ID
- Role
- Meta Key or Meta Value
- Product
Field Shortcodes
With field shortcodes, you can display any registration fields for a logged in user. Parameters for fields correspond to that field’s option name, which you can find in the WP-Members Fields option tab.
In addition, you can use the field shortcode to display data about other users (passed in an id field). The ID needs to be either the user ID of a specific user “get” to specify that the user ID will be passed through a query string as “uid” (e.g. http://mysite.com/page-title/?uid=234).
With field meta keys, you can either specify a shortcode attribute or use the attribute field=”meta_key”, in which case “meta_key” is the meta key for the field.
Usage Examples:
Show the user’s username:
- [wpmem_field user_login]
- [wpmem_field field=”user_login”]
Show the user’s first and last name:
- [wpmem_field first_name] [wpmem_field last_name]
- [wpmem_field field=”first_name”] [wpmem_field field=”last_name”]
Show the email for a specific user (ID=123):
- [wpmem_field user_email id=”123″]
- [wpmem_field field=”user_email” id=”123″]
Show first and last name for an ID passed through a querystring (uid):
- [wpmem_field first_name id=”get”] [wpmem_field last_name id=”get”]
- [wpmem_field field=”first_name” id=”get”] [wpmem_field field=”last_name” id=”get”]
Parameters in Default Install
WordPress default fields:
- ID
- user_login
- user_email
- user_nicename
- user_registered
- user_url
- first_name
- last_name
- aim
- yim
- jabber
- description
WP-Members Default Fields:
- addr1
- addr2
- city
- thestate
- zip
- country
- phone1
- tos
Conclusion
As you can see, building a membership site with WordPress and WP-Members can be simple or complicated based on your specific needs. In many cases, you won’t need a lot of the information in this tutorial, but I included it just in case. If you want even more detailed documentation about WP-Members, you can get it at RocketGeek’s official site here.
If you have any questions or comments, feel free to leave them below. I will try my best to help you out and point you in the right direction.
If you found this post helpful, please share it and spread the word!
Want more content like this? Sign up for my newsletter to receive helpful WordPress Tutorials, Tips and Tricks.

