If you’re using self-hosted WordPress, you’ll need to choose a theme for your site. There are countless WordPress themes available for all kinds of websites, including both free and premium ones. In the WordPress repository, there are currently over 7,400 free themes to choose from.
In this tutorial, we will show you step-by-step how to install a WordPress theme. We’ll cover three different ways to do this.
If you’re looking for quality shared hosting for your WordPress website, we highly recommend A2 Hosting. They offer unlimited SSD space, free automatic site backups, hosting optimized for speed and 24/7/365 guru technical support.
Steps to take before installing a WordPress theme
Installing and activating a WordPress theme is simple, but doing it on a completed website will change its appearance and how it functions.
If you’re changing from an existing theme, you should take a few steps beforehand, including:
- Make a full backup of your website.
- Copy any tracking code, including Google Analytics.
- Put your site in maintenance or coming soon mode. We recommend using the Seedprod plugin for this.
- Copy any custom code snippets you’ve added to your site (including to functions.php file).
- Take a copy of sidebar content so you don’t lose it when you switch.
If you’re installing a WordPress theme on a brand new site, then you don’t have much to worry about.
Bonus Reading: You can check out my post about choosing the perfect WordPress theme.
Install a theme within WordPress dashboard
The easiest way to install a free theme from the WordPress theme directory is straight from your dashboard.
After you log in to your WordPress dashboard, hover on Appearance in the left sidebar and click Themes.
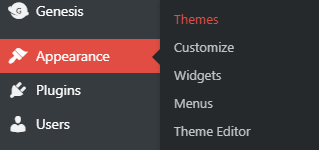
Then, at the top of the next screen, click the Add New button.

When the Add Themes page loads, you’ll be able to choose from Featured, Popular or Latest. You can also view Favorite themes from the WordPress theme repository if you’ve marked any while logged in with your WordPress.org account.
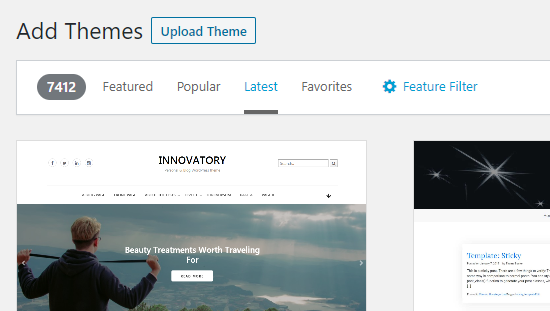
If you click on the Latest filter, you’ll see over 7400 free WordPress themes to choose from.
In addition, you can use the Feature Filter to specify theme based on certain features. You can sort by website type, various features and layout style.
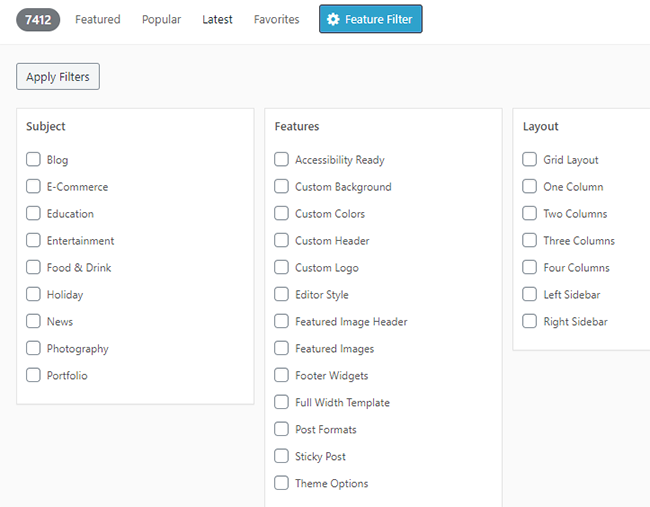
You can also search for themes by name using the search box in the upper right corner of the page.
Once you find a theme that you’d like to install, simply hover over it. Then, click the Install button that appears in the bottom right-hand corner.

Give it a second, and once it installs you’ll see both an Activate and Live Preview button.
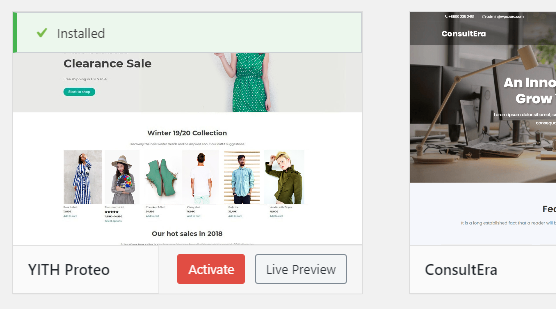
Click Activate to make it live on your site or click Live Preview to see what it looks like.
Once activated, you’ve successfully switched to your new theme. Depending on your choice, you may need to configure additional settings to get your site in tip-top shape.
Some themes recommend certain plugins. Others let you import demo content to make building your site easier.
Upload a WordPress theme in your dashboard
The method we used to install a theme above only works with free themes from the WordPress theme directory.
If you want to install a premium theme from a third-party vendor or a completely custom theme, you’ll need to upload it. But first, you’ll need to download the theme as a .zip file from wherever you purchased it.
Once you’ve downloaded the file, you will upload it in the same place we used before under Appearance > Themes > Add New.
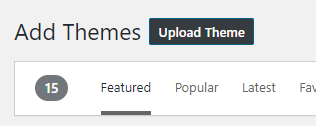
On the Add Themes page, you’ll see an Upload Theme button near the top. Click the button and locate the file on your computer. Next, you’ll click the Install Now button.
Once the theme has been installed, you will get a success message as well as links to preview and activate the theme. Click the Activate link to make the theme live on your site.
Your new theme may take some additional configuration. This could include setting theme options, installing recommended plugins or importing demo content.
IMPORTANT: You will only see the Upload Theme button if you’re using self-hosted WordPress. However, if your site is on WordPress.com, you will not be able to upload custom themes or those from third parties. Read my post about WordPress.org vs. WordPress.com (free version) for more info on the differences between the two. See Moving from WordPress.com to Self-Hosted WordPress for a step-by-step tutorial about switching from WordPress.com to self-hosted WordPress.
Install a WordPress theme using FTP
While the two methods above are definitely sufficient for installing any kind of WordPress theme, you can also try to install a new theme via ftp.
This method is slightly more advanced, but I have faith in you… You will first need to download the theme as a .zip file, and then unzip it.
Now, you have a folder which contains all of the theme files on your computer.

With the unzipped theme folder, you are ready to upload it to your web server.
To do this, you’ll need to use a ftp account connected to your web hosting account. Once you log in to your ftp account, you’ll need to go to the /wp-content/themes/ directory, where you can see folders for all the themes currently on your WordPress website.
You can then navigate to the theme folder on your computer in the left pane of your ftp client and right-click (or control click on Apple) and choose Upload. You can also simply drag the desired folder to the right-hand pane.

Alternatively, you can open the finder window with the theme folder on your computer and drag it into the right pane of your ftp client and let it upload.
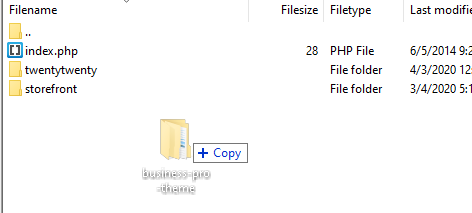
Once uploaded, you can see your new theme in Appearance > Themes. Hover over the theme, and click the Activate button in the lower right corner.
Frequently Asked Questions about WordPress themes
Below, we’ll answer some questions about WordPress themes.
1. How do I see which WordPress theme another site is using?
In most cases, you can easily see what theme another site is using by viewing the source code and searching for “theme.” Look for the URL that includes /wp-content/themes/site-theme/ and you can likely find the theme.
If they’re using a child theme, you can also try looking or searching for popular theme frameworks to give you some hints (e.g. Genesis, Divi, Astra, etc.).
2. What is a child theme?
It is best practice to always use a child theme for your WordPress website, especially if you’ve modified or customized your theme. If you use a parent theme and have made changes to it, they can be overwritten when the theme is updated. With a child theme, your changes will remain, even when the parent theme is updated.
3. Should I use a free or premium WordPress theme?
For starters, you can install the free Astra theme. It is a highly-optimized theme, and you can use it to build all kinds of websites. It even comes with a bunch of starter themes that you can install and easily customize to fit your needs.
If you’re looking for support and have some money to spend, then you can opt for a premium theme.
4. Do you have any tips for choosing the best theme?
Read my post about selecting the perfect WordPress theme for more information on this topic.
5. What is a theme framework?
If you choose to use a WordPress framework, you will install it as a parent theme, and then install a child theme to use with it.
Genesis and Divi are two popular theme frameworks to choose from, and there are a number of others as well.
Conclusion
Hopefully, this guide has answered any questions you may have had about installing and activating a WordPress theme on your website. If you get stuck or have anything to add, feel free to leave a comment below.
If you found this post helpful, please share it and spread the word!
Want more like this? Sign up for my newsletter to receive helpful WordPress Tutorials, Tips and Tricks.

