When starting your blog, you may have decided to use an all-in-one hosting platform such as WordPress.com. While it is sufficient for someone just starting out, there is a good chance your site has outgrown it. Migrating your site can be challenging, but it’s definitely worth it. The self-hosted WordPress CMS is much more robust and flexible.
If you’re looking for quality shared hosting for your WordPress website, we highly recommend A2 Hosting. They offer unlimited SSD space, free automatic site backups, hosting optimized for speed and 24/7/365 guru technical support.
- Before you begin
- Step #1: Exporting WordPress.com data
- Step #2: Installing self-hosted WordPress
- Step #3: Choosing a theme
- Step #4: Importing WordPress.com data to new site
- Step #5: Exporting and importing your Blogroll links
- Step #6: Setting up redirects
- Step #7: Fixing internal links
- Step #8: Updating your permalinks
- Step #9: Adding must-have plugins
- Conclusion
Here are a few reasons you should upgrade your site, and move it to the self-hosted version of WordPress:
- The WordPress.org content management system is completely free and easy to use, even if you’re just starting out.
- Domain name registration and quality hosting is affordable.
- You own the content on your site, and have total control of it.
- You can install and use a wide variety of helpful plugins for everything from SEO to site speed and much more.
- You can upload and create custom themes, and even modify them.
- You can more easily monetize your site through the use of display advertising, affiliate links, eCommerce and more.
- You can install analytics software to accurately measure website traffic.
Check out the video below to see Mashable’s Christina Warren walk you through the WordPress.com to self-hosted WordPress migration:
In this tutorial, you’ll learn everything you need to move your site and all of its content from WordPress.com to self-hosted WordPress.org. In addition, we’ll show you how to setup redirects and optimize your new site’s permalink structure.
Before you begin
Before you start the migration process, you will need to have a domain name and web hosting.
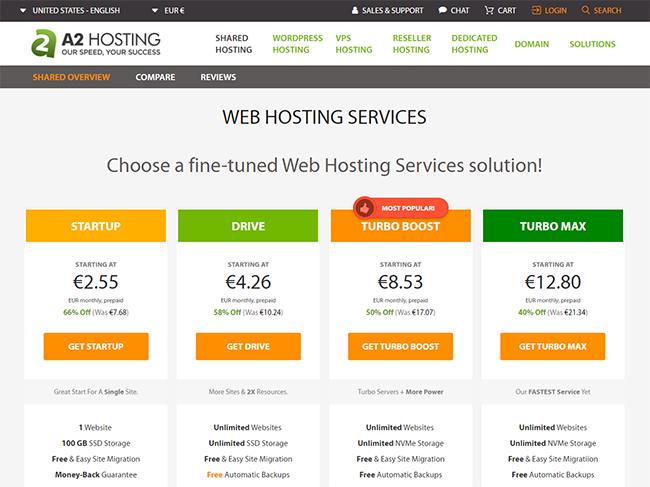
While I’ve never used A2 Hosting, they are highly recommended and a solid choice for someone in need of shared hosting.
UPDATE: In the past, I used and highly recommended SiteGround, but make sure you stay away from them. Their support has gotten worse, prices keep going up, and the move from cPanel to Site Tools was a disaster. After the switch, I was getting constant 500 Internal Server errors, despite having more than enough resources on my cloud hosting server.
If your old URL had wordpress.com on the end, you’ll need to register and buy a new domain name. If you already had a custom domain before (yoursite.com), you will simply need to point your domain name servers to your new host.
In order to move all of your pages, posts, media items, comments and other data to your new self-hosted WordPress site, you’ll need your login details to access the WordPress.com dashboard.
Don’t feel comfortable moving your site yourself? We will gladly perform the migration for you as part of our FREE WordPress Setup service.
Step #1: Exporting WordPress.com data
The first step is exporting all of your website data from WordPress.com. Login to your account and click on My Site in the upper left-hand corner. Next, go to Settings near the bottom in the left sidebar.
In Settings, scroll down to the bottom of the page and under Site Tools, select Export.
On the export page, you will have two options:

Export All – Use this to export all of your content. I recommend this option because you can easily delete items that you don’t need later on after you import everything to your new self-hosted site.

Export Selected Content – Use this option if you only want to export specific items, and not your entire site. You can choose from Posts, Pages or Feedback, and filter them using various parameters, including Author, Status, Start Date, End Date and Category.
Once you decide whether you went to export your entire site or only specific items, click either Export All or Export Selected Content.

At the top, a green bar will appear letting you know that the export was successful (you will also receive a download link via email). Click Download on the right of the bar to download the ZIP file.
Once the download is completed, double-click the ZIP file to uncompress it. Now, you will have an XML file which you can easily import into your new self-hosted WordPress site (see Step #4 below).
Step #2: Installing self-hosted WordPress

You now have all of your data from your old WordPress.com site, and are ready to setup your new website’s home. The self-hosted installation process is very straightforward, and you can follow our WordPress setup guide if you’ve never installed it before.
Most quality web hosts offer a 1-click WordPress installation, which really makes the process super simple. It guides you through the entire setup in your web hosting account’s dashboard, and takes only a few minutes.
If your host does not offer a 1-click installation, you can install WordPress manually using cPanel or an FTP client. While this method takes a little more time, it’s still pretty easy.
Step #3: Choosing a theme
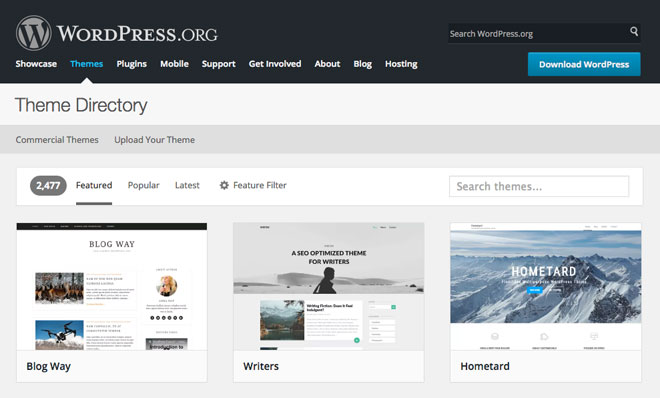
After you install a fresh version of WordPress, you can go ahead and choose a theme. The majority of FREE themes on WordPress.com are also available in the WordPress.org Theme Directory.
Don’t limit yourself and feel that you have to use the same theme you were using on WordPress.com. There are many more themes – both FREE and premium – available to you now that you’re using WordPress.org, and their Feature Filter makes it easy to search for specific themes matching your site’s specific needs.
You can filter theme search results by Layout, Features and even Subject. Install a few different themes and see which ones you like after you import all of your site content.
Pro Tip: You might want to ignore any themes that include the word “Lite” in them. In most cases, they have limited functionality, and you will likely need to buy the premium version to customize anything – even simple items such as logo size, navigation menus or text link colors. I have downloaded a bunch of them in the past, and always end up deleting them.
Step #4: Importing WordPress.com data to new site
Once you’ve installed the self-hosted WordPress, you are ready to import all of the data from your old WordPress.com site.

To do this, simply click on Tools > Import in your new WordPress Dashboard. Under the WordPress row at the bottom of the table, click Install Now.
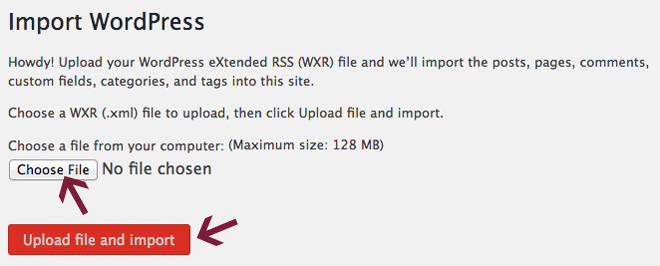
Once the installation is complete, select Run Importer. Then, on the Import WordPress screen, click the Choose File button and locate the XML file that you downloaded in Step #1. After you select the file, click the Upload file and import button.
It is possible that your exported XML file exceeds the upload limit on your self-hosted WordPress site. If this is the case for your site, you can easily increase the maximum upload and PHP memory limit.
If you use shared hosting and don’t feel comfortable changing this yourself, your web host might even do it for you. Every hosting company offers different services, so check with yours to make sure.
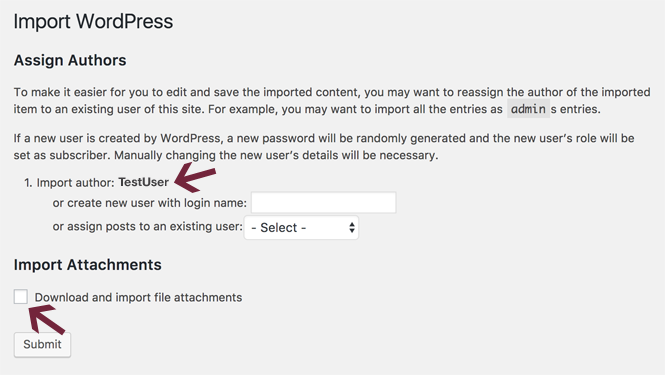
After you choose your WXR file and click Upload file and import, you’ll have the option to set the author for the content you’re importing.
You have a few options for this part:
- Import author (from WordPress.com site)
- Create a new user with login name: (fill in the blank)
- Assign posts to an existing user (admin of new site)
You can always change the author of individual posts and pages later, so don’t worry about it too much now.
Here, you will also want to make sure the box next to Download and import file attachments is checked. Then, click Submit. The import process may take a little while, so be patient.
After the process is complete, take a look at your site and make sure all the content was imported successfully.
Occasionally, there are problems with the import process (e.g. your images not showing up). If this happens to you, don’t worry. You can download your images manually from your old site, and easily upload them to your media library.
Do This: Make sure you delete the sample post and comments that are automatically included in a fresh install of WordPress.
Step #5: Exporting and importing your Blogroll links
If you were using a Blogroll (or Links Menu) on your WordPress site, you will probably want to move it to your new site. There are a couple ways to do this, including the export/import method and a totally manual method.
Exporting your WordPress.com links

Exporting your links on your WordPress.com site is straightforward – Simply visit http://example.wordpress.com/wp-links-opml.php (replace the italic with your domain name). After you enter the URL and hit enter, you will need to save the page on your computer. Go to File > Save Page As in Google Chrome and Firefox or File > Save As in Safari. Not sure what it is in Internet Explorer, but does it really matter?
You can also save the OPML php file by pressing Command+S on a Mac and CTRL+S on a PC.
Importing your links into self-hosted WordPress
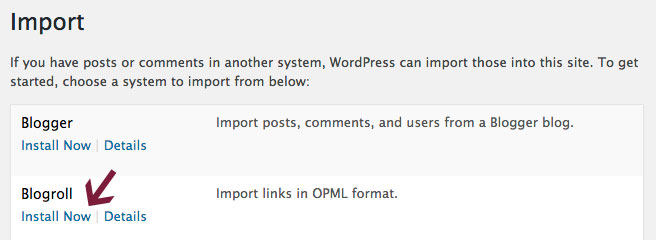
Now you’re almost ready to import your links. Go to Tools > Import and under Blogroll, click Install Now. After the installation is complete, click Run Importer.
Now, you will be taken to a screen where you can either import your blogroll by specifying a URL or choosing the exported OPML file on your computer. After you choose your option, click Import OPML File at the bottom.
Manual method
Instead of exporting and importing your Blogroll, you can simply copy the link text and URLs and add them to WordPress. It all really depends on the number of links you’re dealing with. If it’s just a handful, then the manual way might be the easiest option.
Step #6: Setting up redirects
If you used a free domain with .wordpress.com on the end of it, there is a chance you’ll want to redirect that URL to your new site. If your old site generated a good amount of traffic, then using a redirect is a smart idea. Please note, this is a paid service which will set you back $13/year.
If you already had a custom domain (yoursite.com), then you won’t need to set up a redirect. The only thing you’ll need to do is change your DNS records with your domain name registrar. Just google “change DNS + your web host’s name” to see how to update the name servers for your hosting.
To setup the redirect, do the following:

First, go to the Settings tab in your old WordPress.com Dashboard. Under Site Address, click on the redirect link in the sentence below the box. You will be taken to a page where you can enter your new URL and checkout to complete your order.
If your site did NOT have a lot of visitors or subscribers, you may totally disregard the redirect.
Instead of worrying about redirecting a site that had few visitors, focus on how you can build traffic to your new and improved self-hosted WordPress website.
What about custom domains?
If you already had a custom domain (e.g. yoursite.com), you have a couple options when moving it to your new site. If your domain is registered through WordPress.com, you can either transfer your domain to another registrar or update its DNS to point to your new web host.
If you had a custom domain on WordPress.com, it was using HTTPS (Hyper Text Transfer Protocol Secure). This means that search engines and other sites use this when they link to your site. When you move your site, it’s best that you get an SSL certificate with your new host.
This will help you avoid security warnings that make your site very “user-unfriendly” and even appear like it was hacked. Your hosting company likely offers SSL certificates for free or available as a paid upgrade, but make sure to check with your web host for their specific details.
You can also get your own free SSL certificate from Let’s Encrypt or use a service like Cloudflare to route your traffic through their secure servers.
If for some reason you don’t want to get an SSL certificate, your site will eventually work normally without displaying a security warning, but it may take a little while. This is definitely not the way to go, and it’s better to keep SSL.
If you were using a free WordPress.com domain, none of this is relevant and you don’t have to worry about it.
Step #7: Fixing internal links
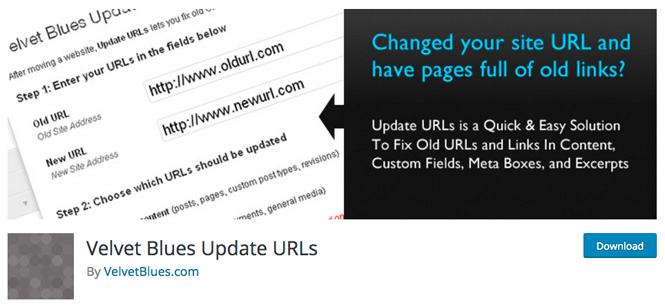
If you are switching domains, you will have to update all of the internal links that point to other pages, posts and media items on your site. Doing this manually can be very time consuming, especially on a site with a lot of content. To save time, you’ll be using a helpful plugin, Velvet Blues Update URLs.
Very Important: Using Velvet Blues to update these links makes changes to your database. Most likely it will not break your site, but it’s always a possibility. Before you start updating these links, make a complete backup of your site (I use the free version of BackWPup, which works really well). This way you can always restore it if something goes awry during the process.
Download and activate the plugin. Then, head over to Tools > Update URLs to configure all settings and change the links.
Follow the process below to update your internal links:
- Enter both the old and new URLs
- Specify where you want the URLs to be changed:
• in page content
• in excerpts
• in links
• for attachments (images, documents, media items)
• in custom fields and meta boxes
• ALL GUIDs (only use this option on development sites) - After you set your old and new domains, and specify which links you want to update, click the Update URLs Now button.
Step #8: Updating your permalinks

Your custom domain on WordPress.com used the Day and name permalink structure by default. As Brian Dean points out in his killer post about On-Page SEO, short URLs are more SEO-friendly according to Google. For this reason, you should use the Post name permalink structure – it yields simpler, shorter URLs. Keep your URLs short and sweet, and include keywords in them.
If your site received a decent amount of traffic, you can set individual redirects for each page or post. You can use the Redirection plugin to redirect your old URLs to new ones. It is very straightforward to use, just follow the instructions below.
How to redirect old URLs
Simply write down all of our old URLs and set up redirects for each page and post. Setting up redirects is simple, and can be achieved using the Redirection plugin.
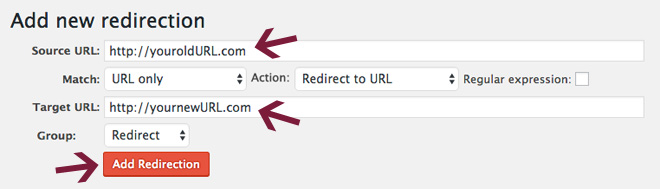
Download and activate the plugin, then follow the simple process outlined below.
- Enter the URL of your old site’s page or post where it says Source URL.
- Enter the URL of the new page of post in the Target URL box.
- Click the Add Redirection button.
Repeat these steps for every page or post you want redirected from your old site to your new one.
Step #9: Adding must-have plugins
Now that you’ve successfully moved your site to self-hosted WordPress, you can use a wide variety of plugins to add all kinds of functionality to your site. I suggest installing and configuring a few essential plugins for security, SEO, speed and website backups.
Wordfence Security – Helps secure your site against various threats. Check out my complete guide for protecting your site with Wordfence.
Yoast SEO – Optimize your site’s on-page Search Engine Optimization by configuring site titles and meta descriptions, adding an XML sitemap and much more. For more info, check out my tutorial about optimizing your site with Yoast SEO.
W3 Total Cache – Caching plugin which helps speed up your site a great deal. You can use W3 Total Cache with Cloudflare to boost speed even further.
BackWPup – Useful plugin which you can use to create partial and complete website backups. Learn how to configure this plugin and set it up with DropBox here.
There are a ton of WordPress plugins to choose from, and it can be hard to know which ones you should use. Don’t go crazy and install tons of plugins, but choose the ones that you really need.
When selecting a plugin, you should check when it was last updated and read some reviews about it.
Conclusion
Moving from WordPress.com to self-hosted WordPress may seem like a lot of work, but it’s totally worth it. It is much more robust, and will provide you with the freedom and tools you need to more easily grow your site.
I hope this tutorial has helped you to easily and quickly migrate your website. I try to make my tutorials as thorough as possible, so don’t hesitate to let me know how they could be improved.
Do you have any questions or comments? Please leave them below and I’ll try my best to help out.
If you’re looking to move your site from other platforms to self-hosted WordPress, check out these other migration guides:
- Weebly to WordPress
- Squarespace to WordPress
- Wix to WordPress
- Joomla to WordPress
- Drupal to WordPress
- Blogger to WordPress
- Tumblr to WordPress
- Medium to WordPress
If you found this post helpful, please share it and spread the word!
Want more like this? Sign up for my newsletter to receive helpful WordPress Tutorials, Tips and Tricks.

