If you have a WordPress website, it’s super important that you keep it properly maintained. By making sure your site is updated, you can ensure that it’s always optimized and running smoothly.
In this guide, we’ll go over 14 essential WordPress maintenance tasks that you should be performing on a regular basis. In addition, we’ll give you instructions to perform them safely by yourself.
If you’re looking for quality shared hosting for your WordPress website, we highly recommend A2 Hosting. They offer unlimited SSD space, free automatic site backups, hosting optimized for speed and 24/7/365 guru technical support.
- Why is WordPress site maintenance important?
- 1. Creating a full backup of your site
- 2. Keeping WordPress, themes and plugins updated
- 3. Optimizing your WordPress database
- 4. Running performance tests
- 5. Updating your passwords
- 6. Testing all contact forms
- 7. Searching for and fixing broken links
- 8. Deleting spam comments
- 9. Redirecting 404 errors
- 10. Clearing your WordPress cache
- 11. Deleting page and post drafts
- 12. Removing unused, old themes and plugins
- 13. Cleaning up your media library
- 14. Auditing your old content
- Conclusion
Why is WordPress site maintenance important?
Your WordPress website is comprised of many parts, including the following:
It’s essential that you make sure all of these elements are working well together, and that they are updated frequently.
If you’re using an outdated theme, plugins or even an older PHP version, your website is more vulnerable to hacks and attacks.
So, how often should you perform the maintenance tasks mentioned in this post? As far as updating your theme, plugins and WordPress core, I suggest doing these as soon as you see them in your dashboard.
When it comes to backing up your site, it depends how often it’s updated. Basically, you should back up your site whenever you add new content. If you blog on a weekly basis, set your backups to run after you publish a new post, once per week.
With performance tests, just run them periodically. You don’t need to worry about doing them on a monthly basis or anything like that. It’s important that you make sure your site is performing at a high level, so just check from time to time.
Let’s get started, shall we?
1. Creating a full backup of your site
Backing up your site on a regular basis is super important, just in case something goes wrong. You can accidentally break your site or it can get hacked. If you have a recent backup, you can always get your site back up and running quickly and easily.
There are numerous ways to back up your site, including within your hosting cPanel, using a plugin and manually by downloading your site files and exporting your MySQL database.
The majority of hosting services let you easily create a backup manually within your control panel. Some hosts even include automatic backups as part of their service.
There are a number of plugins which let you run both manual and automated site backups, including BackWPup and UpdraftPlus. You can then seamlessly sync backups with DropBox and other cloud-based storage services.
Check out my BackWPup site backup guide for step-by-step instructions to back up your site.
2. Keeping WordPress, themes and plugins updated

Within your dashboard, you can easily make sure that you are using the latest WordPress version, and that your theme and plugins are up to date as well. You can quickly check and see if anything needs to be updated in the left side of the top admin bar.
If you happen to be using a premium theme or plugin/s, you can easily miss updates. In this case, you can go to Appearance > Themes or Plugins > Installed Plugins and check to make sure that no updates are needed.
In addition, you can always manually check for updates by going to Dashboard > Updates at the top of the left-hand sidebar in your WordPress dashboard.
3. Optimizing your WordPress database

WordPress CMS is database-driven, which means that all your site content is stored in a MySQL database.
Over time, your database may become bloated with a bunch of unnecessary data. This can include information from plugins you once used, draft posts and pages, spam comments and more.
Optimizing your MySQL database will remove this unwanted data, which helps improve database performance.
Check out my post about optimizing your WordPress database for step-by-step instructions.
4. Running performance tests
There are a number of factors that affect your site performance, including hosting, the theme and plugins you’re using, image sizes and more.
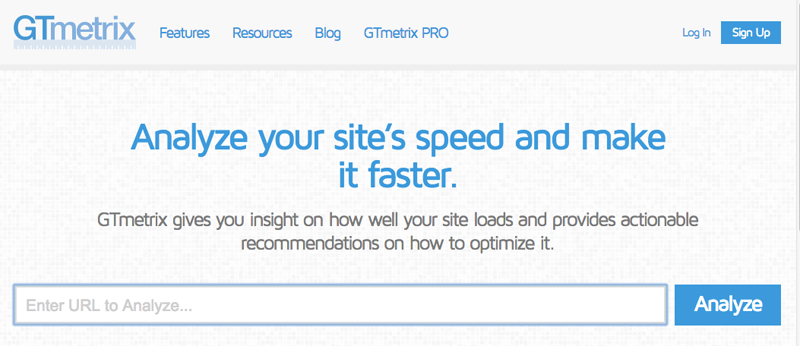
You can run some tests on your site to see how it’s performing, and where it can be improved.
GTMetrix and Google PageSpeed Insights will show you how your site is performing and where it can be improved.
Don’t worry about having totally perfect scores! Just use the tools to make sure your site isn’t so slow that it annoys your visitors and potential customers.
PRO TIP: Don’t use crappy hosting from any companies owned by EIG, including BlueHost, Hostgator and many others. Here is a complete list of hosts to avoid. Stay away from SiteGround too! They’ve totally gone downhill – poor customer support and unreasonable prices.
If you’re looking for affordable, quality shared hosting, check out A2 Hosting. While I’ve never personally used their service, I’ve heard good things about them.
5. Updating your passwords

Using a strong password is key to keeping your website safe. Make sure that you use long, complicated passwords for all parts of your site, including:
- WordPress dashboard
- web hosting
- ftp accounts
- MySQL database
WordPress security experts recommend changing your passwords on a regular basis, so go ahead and update them every once in a while.
6. Testing all contact forms
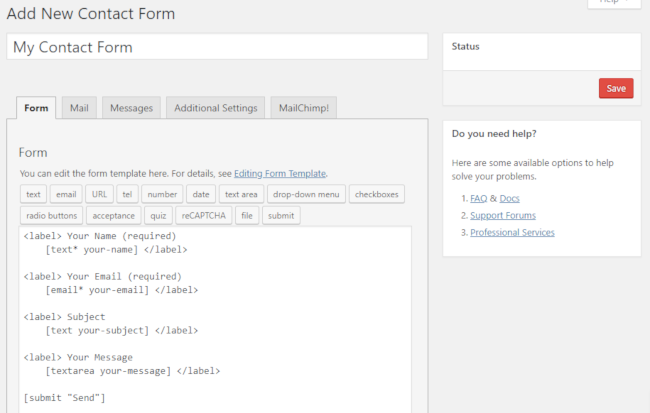
There are a number of contact form plugins available for WordPress, including popular choices Contact Form 7 and Ninja Forms.
While forms you create should work without any problems, it’s important you check them from time to time to make sure.
Sometimes, a misconfiguration on your hosting account or with your email service provider may prevent delivery of your form submissions.
Fill out your forms with dummy information just to ensure they’re in working order.
Don’t Do This: One of the contact forms on my site was not working, and I only found out when a reader contacted me via twitter to ask me if I had received his form submission. There was something wrong with how the contact form was configured, and I didn’t receive any submissions for quite a while. By checking your forms from time to time, you can make sure this DOESN’T happen to you!
7. Searching for and fixing broken links

To ensure an excellent user experience for your site visitors, you should make sure that all links on your site work. This includes external links to other sites, as well as internal links to images, pages and posts.
Over time, sources you once cited and linked to in your content may cease to exist. They could also have been moved to other URLs or domains.
You can use the Broken Link Checker plugin to easily check for any broken links and fix them in one place. It displays a table with all the broken links, and lets you update them by removing the link or editing the URL.
Make sure to check your site for broken links from time to time as part of your site maintenance.
8. Deleting spam comments

If you allow comments on your site posts, then you are likely already using Akismet to fight comment spam. While it generally does a great job at identifying spam comments, it doesn’t delete them.
If you allow comments on your site posts, then you are likely already using Akismet to fight comment spam. While it generally does a great job at identifying spam comments, it doesn’t delete them.
Occasionally, Akismet may mistakenly mark a legitimate comment as spam, so it’s smart to take a look through your spam comments to see if there are any real comments there.
After you’ve check for any real comments, you can bulk delete all of your spam comments by going to Comments in the left-hand sidebar of your WordPress dashboard. Then click the Spam link at the top. Next, you can highlight all the comments by marking the checkbox in the table next to Author. Finally, select Delete Permanently from the dropdown and click the Apply button.
There’s no reason to keep these spam comments on your site, so go through them every once in a while and look for legitimate comments. Once finished, you can bulk delete all the spam.
9. Redirecting 404 errors

When a site visitor requests a page on your site which doesn’t exist, they will be shown a 404 error page.
While this won’t negatively affect your site’s SEO, it is not ideal for user experience. As with broken links, you want to make sure that everything works properly on your site.
It’s important that you track 404 errors, and redirect them so your users aren’t left hanging. You can easily find all of your site’s 404 errors using Google Search Console.
To find all your 404 errors, do the following:
Log in to Google Search Console
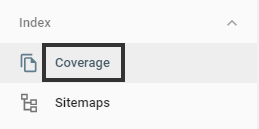
Under Index in the left sidebar, click Coverage.
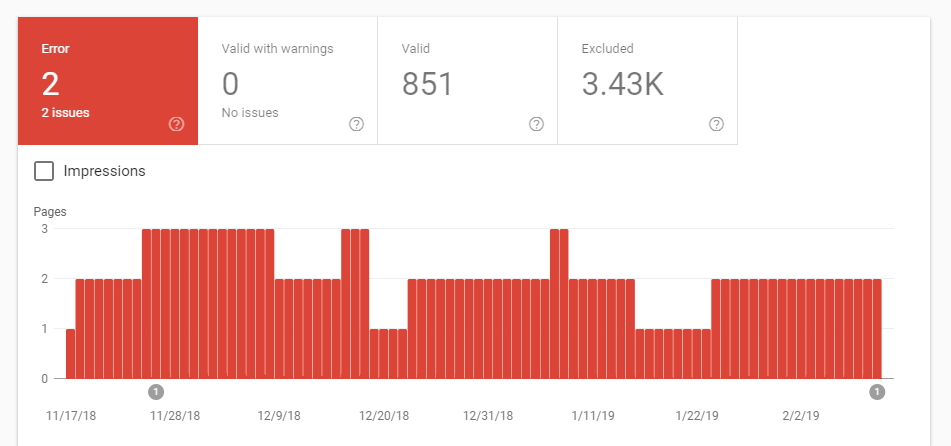
Click the Error tab at the top left of the page and check for any errors.

Look for any errors with the type Submitted URL not found (404).
Then, click on the row to view the URL returning a 404 error.
Make a list of all 404 error URLs on your site, and then you can set up redirects on your WordPress site using the Redirection plugin.
First, log in to your WordPress dashboard and go to Plugins > Add New. Find the Redirection plugin, then install and activate it.
Next, go to Tools > Redirection in the left sidebar.
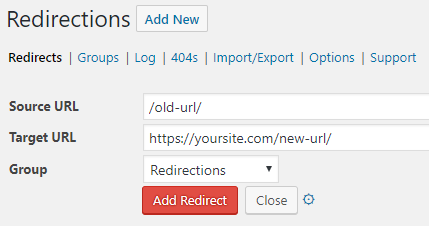
In the Source URL field, enter the relative URL (without the https://yoursite.com part) of your page or post returning a 404 error.
In the Target URL area, enter the full URL (including https://yoursite.com) where you want to redirect the broken URL.
Under the dropdown in Group, choose Redirections, and click the Add Redirect button.
Repeat this process for all your 404 pages, and you’re good to go.
10. Clearing your WordPress cache
Caching your WordPress site is one of the simplest ways to improve performance for your site visitors.
What is caching? Simply put, caching is the process of creating static versions of your site content. Since static pages are rendered quickly in browsers, cached pages will increase your site performance.
In WordPress, fetching and rendering site content requires queries to and from a MySQL database, which slows down your site. Create static copies of your posts and pages, and serve that to your visitors instead.
While caching your website is important, you’ll need to clear your cache from time to time.
Caching plugins make it super easy to clear your cache. Below are instructions for a few of them.
WP Super Cache – Using this plugin, you can clear your cache by going to Settings > WP Super Cache in the left sidebar of your dashboard. Then, click the Delete Cache button in the Delete Cached Pages section.
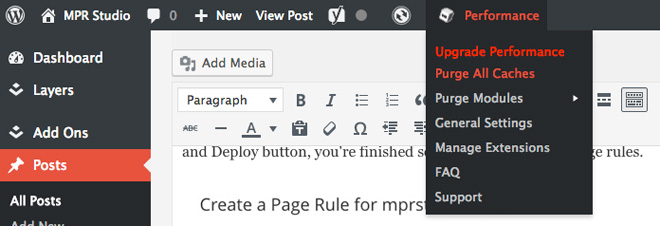
W3 Total Cache – Here, there are a couple options for clearing your cache. You can simply go to the Performance link at the top of your dashboard and select Purge All Caches. Alternatively, you can go to Performance in the left sidebar and click on Dashboard. On this page, you can click the empty all caches button at the top of the page.
WP Fastest Cache – With this plugin, simply click on WP Fastest Cache in the left sidebar of your dashboard. Go to the Delete Cache tab at the top of the settings page, then click the Delete Cache button near the bottom.
When you update pages or posts, you want to make sure that you clear your cache so visitors to your site are able to see the changes you made.
11. Deleting page and post drafts

Over time, trash may accumulate on your WordPress site. I’m specifically referring to page and post drafts that have never been published, and reside in your Trash.
In some cases, this unnecessary junk can slow down your website. It’s nice to try and keep your WordPress dashboard and site free of clutter.
From time to time, it’s a good idea to delete any unneeded pages or posts from your site’s trash.
To delete posts in your trash, go to Posts > All Posts in the left sidebar of your dashboard. If you see a Trash link at the top, then there is something in that area which you can delete. Click on the Trash link, followed by the Empty Trash button.
Deleting pages in your trash is the same, but you need to go to Pages > All Pages in the sidebar instead.
IMPORTANT: Before you permanently delete anything, make sure you definitely don’t need it. Once it’s gone, it’s kind of a pain to get it back. If you have a recent backup, you should be able to restore it, but why go through the hassle if you can check before you delete it.
12. Removing unused, old themes and plugins
Like I wrote about above, keeping your themes and plugins updated is super important. If you have themes and plugins installed but not activated on your site, there’s really no reason NOT to get rid of them.
Delete them, and if you decide you want to use them in the future, simply download them again.
In addition to removing unused themes and plugins, you should also refrain from using those which haven’t been updated relatively recently.
Not only can they be vulnerable to attacks, but they may also be incompatible with newer versions of WordPress core (you’re using the latest version, right?).

You can see when a plugin was last updated by going to Plugins > Installed Plugins. Then click on the View Details link under the plugin you’d like to check.
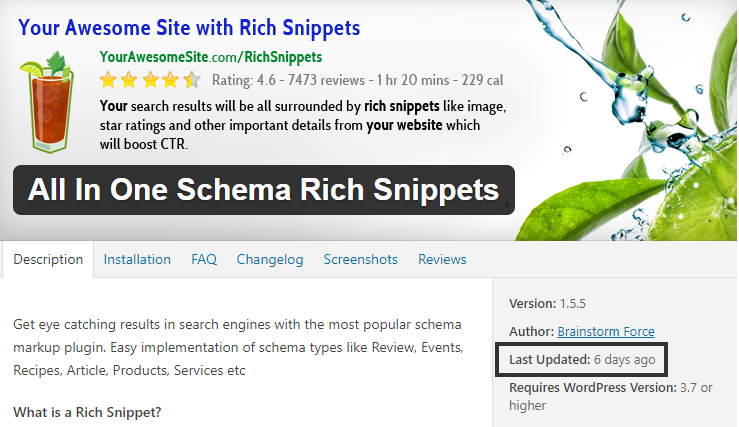
Then, you can see when the plugin was last updated. Keep your site secure by deleting unused themes and plugins, and avoiding those which have not been updated recently.
13. Cleaning up your media library

If your site has been online for a while, you probably have a rather large amount of images in your media library.
It’s likely that you’re not using all of these images, and they’re just taking up space on your hosting server.
In addition to removing unused media files, you should ensure that the images that are being used on your site are fully optimized.
You can use one of the following plugins:
- EWWW Image Optimizer
- Smush Image Compression and Optimization
- kraken.io
- Compress JPEG & PNG images
Or an online tool BEFORE you upload your images:
- ImageResize.org
- TinyPNG
- compressor.io
- ResizeMyImg
Check out my guide to optimizing your website images for SEO for more information on preparing your images for the web.
14. Auditing your old content

Over time, blog posts that you once wrote may need to be updated to remain current. While it can be a time-consuming task, it’s worth it to truly optimize your old stuff, and breathe new life into it.
Here’s an example: Let’s say you wrote a tutorial about using a particular plugin, and it has been overhauled completely in the latest version. Going through your old post, you can update screenshots and add any info about new features.
When going through your old posts, you should consider the following:
- Is it still accurate? Do text, images and sources need to be updated in order to reflect current WordPress, theme or plugin version?
- How is it ranking? Is your performing well for keywords that you want it to rank for? If not, you should think about how you can improve it. This could include updating the page title and writing a more compelling meta description, among other things.
- Are there new internal links I could add? Since you wrote that old blog post, you’ve likely created a bunch of new content that would also provide value to your readers. Think about adding internal links to those new posts wherever they fit naturally.
If you’re displaying the date in your meta descriptions on Google, revising an old post will show people that it’s been updated recently. This has been proven to lead to higher Click Through Rates (CTR), as people want current information.
Conclusion
Are you overwhelmed yet? Don’t be. While this list is pretty long, these tasks will become second nature to you once you get used to working with WordPress.
Can you think of any WordPress maintenance tasks that I left out? Let me know in the comments, and feel free to ask questions too. I’ll do my best to help you out.
If you found this post helpful, please share it and spread the word!
Want more content like this? Sign up for my newsletter to receive helpful WordPress Tutorials, Tips and Tricks.

