
If you’re a blogger, figuring out how to optimize your blog posts for SEO can seem a little overwhelming. This post is meant to be a guide you by providing you with a checklist you can go over before you publish a new piece of content.
While the best time to optimize a blog post for SEO is when you’re writing it, you can always go back and improve old posts as well.
Optimizing your blog posts will help you get more traffic to your website. In this post, you will learn effective tips to give your content the best possible chance to perform well in organic search.
If you’re looking for quality shared hosting for your WordPress website, we highly recommend A2 Hosting. They offer unlimited SSD space, free automatic site backups, hosting optimized for speed and 24/7/365 guru technical support.
- What is SEO and why does it matter?
- Tip #1: Research keywords and plan your content
- Tip #2: Use semantic keywords
- Tip #3: Use well-crafted titles for your post
- Tip #4: Write a custom meta description for your post
- Tip #5: Add Schema Markup to your posts
- Tip #6: Make sure to add internal links
- Tip #7: Focus on readability
- Tip #8: Include images and videos in your posts
- Tip #9: Update your permalink structure
- Tip #10: Create quality, comprehensive blog posts
- Tip #11: Make use of categories and tags to organize your content
- Tip #12: Building links (off-site optimization)
- Tip #13: Choose a theme optimized for SEO and speed
- Tip #14: Select quality web hosting
- Conclusion
What is SEO and why does it matter?
SEO stands for Search Engine Optimization, and it is the process of getting free, organic traffic from natural results on search engines (does anyone use anything besides Google?).
When you search for something on the internet, you likely turn to Google. If you want to build exposure and traffic to your site, you must make sure that it shows up (preferably at or near the top) in search results.
By optimizing your website and individual pieces of content, you will have greater visibility and the best chance to increase quality traffic to your site. A site which ranks highly in search appears more trustworthy and credible.
Since you created a WordPress website, you’re already in a great position to properly optimize your site for search engines. There are some great plugins – Yoast SEO and Schema Pro come to mind – which can help you optimally configure your site and content.
Tip #1: Research keywords and plan your content
Many new bloggers just guess when it comes to topics to write about. If you research keywords related to your niche, you can find out exactly what your readers are searching for.
Keyword research will help you discover specific topics that your users are interested in. With this knowledge, you can then effectively plan your content strategy by writing posts that people are searching for.
There are a number of keyword research tools you can use, including following:
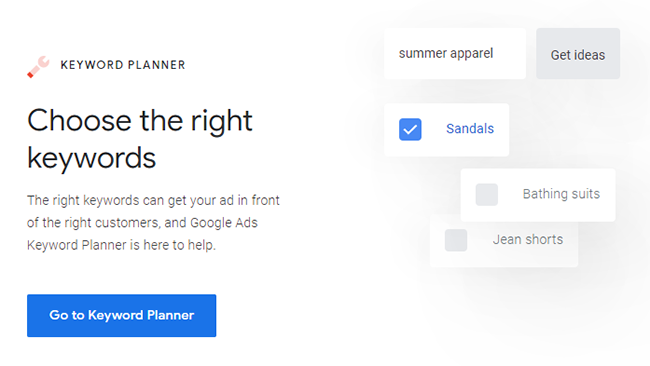
- Google Keyword Planner – This is a great free tool, but you’ll need a Google Ads account to use it. If you don’t have one, you can set one up easily in a few minutes.
- SEMRush and Ahrefs (both paid) – These tools offer in-depth keyword information, competitor analysis, keyword position tracking and many other useful features.
Tip #2: Use semantic keywords
Once you’ve chosen a great keyword with high monthly search volume and relatively low competition, you should look for other related Latent Semantic Indexing (LSI) keywords.
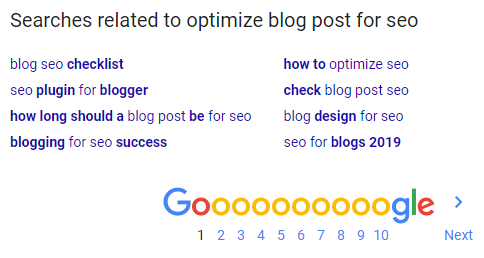
The quickest and easiest way to find LSI keywords is to simply enter your focus keyword in Google and scroll all the way down to the bottom, where you’ll see them under related searches.
Try to incorporate as many of these keywords as possible in a natural fashion. This will help make your content comprehensive in Google’s eyes.
Tip #3: Use well-crafted titles for your post
Blog post titles are extremely important for SEO, so make sure you take some time to optimize them. I highly recommend using 2 different titles – one on the post itself (also known as an H1 heading) and another one for the page title (which you can set by editing the Yoast SEO snippet).
By using two different titles, you can use slightly different keywords which helps to further optimize your post. One thing you never want to do is stuff keywords, either in your page/post titles or content. ALWAYS write your content with humans in mind, and DON’T try to game the search engines.
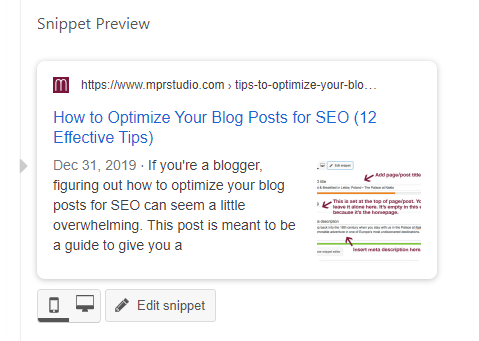
The SEO title you set in Yoast is the single most important on-page element, and it’s wise to try and use your target keyword/s as close to the beginning as possible, while still keeping it natural.
As seen in the screenshot above, Yoast even provides colored bars below both the SEO title and meta description. When they’re green, you know that the length of these two items is ideal.
Tip #4: Write a custom meta description for your post
A meta description is an HTML tag that you can add to posts and pages. It is a short excerpt which describes the page content for both search engines and other crawlers.
Writing a quality meta description helps you explain what your post is about, and encourages users to click on it in the search results.
Try to include your focus keyword at least once and put it as close as you can to the beginning. Also, keep in mind that the character limit for a meta description is 155 characters. If you write more than than, it will get cut off, which is not ideal.
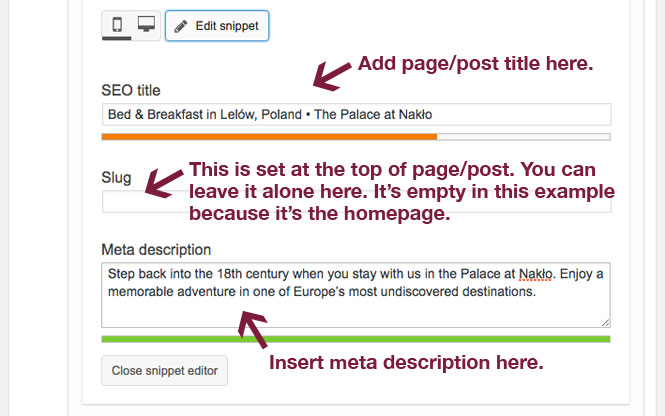
Adding a meta description is really easy with the Yoast SEO plugin. Simply scroll down to the Snippet Preview in the Yoast SEO section below your post editor.
Then, click on the Edit snippet button. This will let you adjust both the SEO title and meta description.
Once you set both the title and meta description, make sure you save your changes by clicking update.
Tip #5: Add Schema Markup to your posts
Since your main objective is making sure that search engines are able to fully index your site’s content, you want to give them as much information as possible. While WordPress is an SEO-friendly platform right out of the box, there are a number of ways to further enhance it.
Adding Schema Markup (also referred to as Structured Data) to your website can improve both your search rankings and CTR (Click-Through Rates).
So, what is schema markup? It is extra code (semantic vocabulary) that you put on your site to help search engines understand the context of your content so that they can return more informative results.
To add schema markup to your WordPress site, you can use any of the following plugins:
- Schema (free)
- All In One Rich Snippets (free)
- Schema Pro (paid, and worth every penny!)
For more details on adding schema markup to your WordPress site, check out my step-by-step Schema Markup guide.
Tip #6: Make sure to add internal links
After you’ve been blogging for a while, you will have a decent amount of content that you’d like your visitors to read. By adding internal links throughout your content, you’re making it easy for readers to see relevant posts on your site.
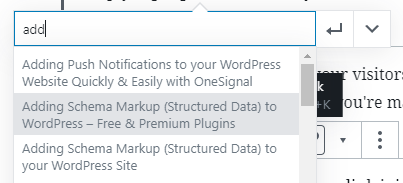
In addition, it lets you pass link juice to your older articles. In WordPress it’s super easy to search for old, relevant posts from within the post editor. Simply highlight the text that you wan to make a link, then hit the link button.
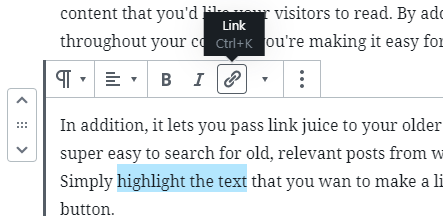
Then, a pop-up will appear. Start typing and you’ll see a list of your posts that you can choose to link to. Select the post you want, and then click the return arrow.
Not only does internal linking make it easy for your readers to discover relevant content, but it improves on-page SEO as well and will ensure that your older pieces continue to garner new links.
In addition to internally linking to your old posts from newer articles, it’s also wise to go back to older posts and add links to your newer content.
Tip #7: Focus on readability
When you’re creating written content, it’s vital that you make it as easy to read and digest as possible. Most people scan an article quickly to decide if they want to stay and check it out, or look elsewhere.
Posts that are easy to read often rank higher than their hard-to-read counterparts. Here are a few things you can do to improve readability:
- Use proper grammar, punctuation and spelling – Proofread your content and fix any mistakes. You can write your posts initially in Grammarly to check for issues as you type.
- Write shorter sentences – Keep things short and concise, and don’t feel as though you need to use complicated words.
- Don’t make paragraphs too long – As a general rule, try to keep your paragraphs to a maximum of 5-6 lines tall (on desktop view). Big blocks of text make people think “do I really have to read all that?”
- Make use of subheadings – Break up and properly organize your content by using subheadings.
- Bold important stuff – In body text, bold items that deserve extra attention (e.g. specific instructions or things you want to stick out).
- Use bulleted or numbered lists – When possible, use some lists to break up the monotony of plain paragraphs.
- Pepper your content with images – Use a bunch of web-optimized images throughout your posts.
Tip #8: Include images and videos in your posts
Search engines like engaging content, so make your posts interesting with the help of both images and embedded videos.
Images
To break the monotony of text content, add a variety of images throughout. Make your content even more interesting by using multiple types of images, including photos, illustrations, screenshots and animated GIFs.
When finding images for your site, don’t just copy them from other sites, as this is illegal and you could get in trouble. You can use your own pictures, or an online tool like Canva to create all sorts of graphics. When it comes to royalty-free images, there are a number free sites you can use.
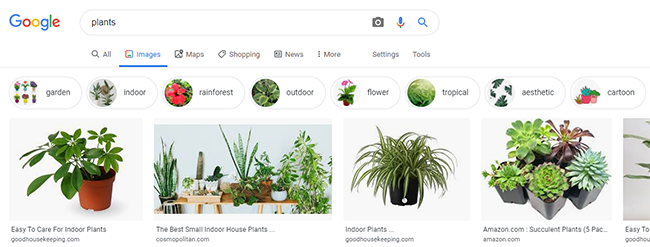
Another thing I’ve found helpful when searching for free images is Google Image Search. Simply enter your search term and hit Images in the upper right-hand corner.
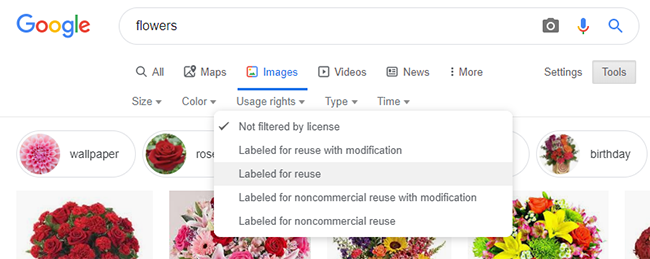
Then, click on Tools, followed by Usage rights and select Labeled for reuse or Labeled for reuse with modification if you intend to alter it.
Videos
Videos engage users even more than images, and can help you increase user dwell time (amount of time they spend on your site). You can convert your blog posts into video versions, and then embed those on your site from YouTube. Alternatively, you could find a video that discusses the topic in your blog post and use that.

DON’T DO THIS: Make sure you don’t upload videos directly on your WordPress site because it will greatly slow it down and ruin user experience. Instead, simply embed them from a service like YouTube or Vimeo.
Tip #9: Update your permalink structure
Permalinks are the URLs for your site’s pages and posts that come after the domain name (e.g. website.com/this-is-a-permalink/). You can easily update the structure under Settings > Permalinks in the left sidebar of your WordPress dashboard.
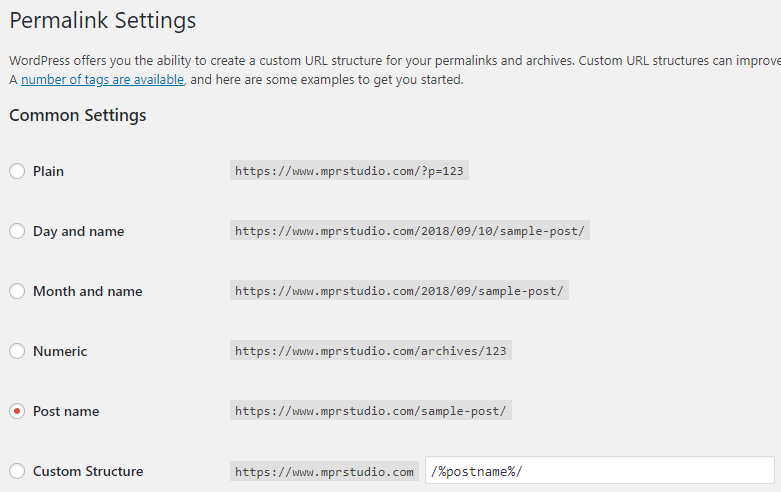
I use and recommend the Post name structure, but you may want to use one which contains the date if you have a news site.
Permalinks serve many purposes, including:
- Giving your readers and search engines an idea what your page or post is about from the URL, without actually looking at the content.
- Providing a permanent, unique link location for your readers and search engines.
Tip #10: Create quality, comprehensive blog posts
Google loves super-detailed content! Finding and using semantic keywords in your posts will help you make them comprehensive.
By including a number of terms that people search for in a single post, you’re making it super informative and useful to your visitors. Make sure you use headings and subheadings that include your primary keyword as well as the related LSI keywords.
You can find more related terms for your content by typing your keyword in Google Image Search. Then, check out the other terms at the top of the page above the image results.
IMPORTANT: Whatever you do, make sure that you add all of your keywords in a natural fashion, and NEVER stuff them randomly in your content.
Tip #11: Make use of categories and tags to organize your content
As you create more and more content, it’s vital that you keep it organized. This is not only helpful for your readers, but for Google as well. A great way to segregate and tidy up your content is by making use of both categories and tags in WordPress.
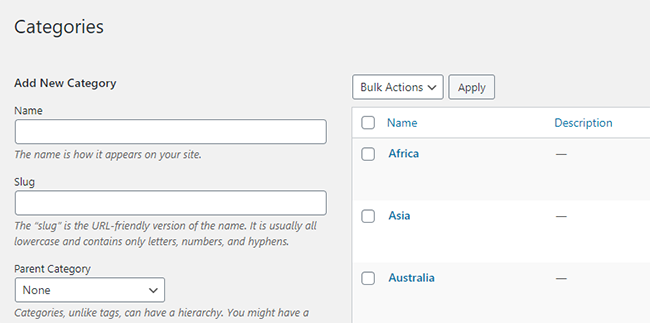
Categories are good for broad topics, as they help identify what your blog is about. They help readers find related content on your site, and are hierarchical so you can have both parent categories and sub-categories as well.
A good example of a category on my site would be tutorials. Pretty much all of my posts are how-to guides, so it makes sense.
When it comes to a WordPress post, you are required to choose a category for it. If you don’t specify a category for your post, then it will be automatically filed under “uncategorized,” which looks pretty stupid. You’re better off renaming it to something that can be used for a lot of your posts (e.g. general, editorial, etc.).
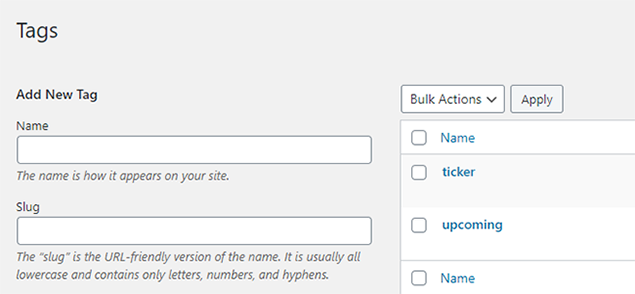
Tags, on the other hand are meant to cover specific details of your post. You can think of them as your site’s index words, and you should use them as micro-categories for your content.
Let’s say you wrote an article about musical instruments, you could use tags for all the types mentioned (e.g. cello, guitar, flute, etc.).
Tip #12: Building links (off-site optimization)
Link building is an often talked about SEO topic, and a super important one. In terms of ranking at the top of the SERPs (Search Engine Results Pages), inbound, dofollow links to your content are like votes telling Google that your website is high-quality and deserves to rank highly.
Now that you know why links are important, you may be asking yourself how to obtain them. There are a number of ways to get them, including the following:
- Organic links – These are links that you receive naturally simply because your content is stellar. It’s a big plus if you can get backlinks from high-authority sites that are well-known.
- Whitehat links – These include legitimate links from outreach to webmasters or those from guest posts. When sending cold emails to ask for links, it’s important that you give them a good reason to link to you.
DON’T DO THIS: Getting low-quality, blackhat links is a waste of your time, and there is no reason to do it. If someone reaches out to you and offers you tons of links for a low price, ignore them. Getting crappy links from weak sites will likely negatively affect your site’s SEO performance.
Tip #13: Choose a theme optimized for SEO and speed
While this is more a general tip which applies to your whole site, using a theme optimized for SEO and speed will have an impact when it comes to optimizing your individual posts as well.
Certain themes are poorly-coded and bloated. Make sure you select a lean theme which is totally optimized. Website performance is vital, and you CANNOT AFFORD to have a slow, clunky site.
People simply will not wait for a slow site to load, but will search elsewhere instead. A slow website equals higher bounce rates, which is an indicator to Google that your content IS NOT what people are looking for.
I have recently started using Astra theme, and I highly recommend it. There is a free version, as well as a bunch of paid add-ons.
Tip #14: Select quality web hosting
As with the previous tip, this one is also about overall website performance. Certain hosts are absolute trash, and should be avoided at all costs.
There are a number of things to consider when choosing a web host, including the following:
Web host reputation – Before choosing a host, do your homework and browse through multiple reviews online. Narrow your choices down to 3 or so. PLEASE BEWARE that some people recommend Bluehost and other EIG-owned hosting companies because they pay generous affiliate commissions. They all suck, so stay far away from them.
Quality of customer/technical support – There are all kinds of levels of customer support, ranging from horrendous to amazing. When choosing a hosting provider, make sure that they’ll be able to help if you run into a problem.
FREE SSDs (Solid State Drives) – SSDs offer much faster read/write speeds than HDDs (Hard Disk Drives), which results in your site being delivered faster. A number of hosts offer FREE SSDs as part of their hosting service, while others charge for them.
Number of sites supported – Many plans let you host multiple websites on one account, while others only give you space for one. Make sure you choose carefully and read through all the plan details to select the one that best suits your needs.
Website backups – Since your website security is of utmost importance, you want to make sure you’re backing up your site regularly. Some hosts offer free backups, which is super helpful. If your host doesn’t offer free backups, you can use BackWPup to backup your site.
Developer access – Check to ensure that the plan you choose gives you and/or your web developer all the tools needed to easily build and maintain your site, including: cPanel login from anywhere; access to hosting technical info; FTP access and new account setup; SSH access; Softaculous application installer; Ruby, PHP, MySQL and PostgreSQL; and email account creation and management.
I have heard good things about A2 Hosting (shared), and Cloudways (cloud hosting).
Conclusion
Hopefully this tutorial has provided you with insight that you can use to make your content even better, as well as much more visible in search results.
Optimizing your blog posts for SEO might seem like a lot of work, but it’s definitely worth it. Feel free to use this guide as a checklist for every piece of content you publish.
Can you think of anything that I missed? Leave a comment below and let me now.
If you found this post helpful, please share it and spread the word!
Want more like this? Sign up for my newsletter to receive helpful WordPress Tutorials, Tips and Tricks.

