One of the reasons that self-hosted WordPress is so great is the amount of plugins that you can use to add all kinds of functionality to your site. From contact forms to CTAs to security and beyond, there are plugins that let you add countless features to your WordPress website.
There are currently more than 56,000 free plugins available in the WordPress.org plugin directory. In addition, there are numerous premium plugins that can be purchased from third-party vendors.
If you’re looking for quality shared hosting for your WordPress website, we highly recommend A2 Hosting. They offer unlimited SSD space, free automatic site backups, hosting optimized for speed and 24/7/365 guru technical support.
Things to consider before installing a plugin
While there are plugins to help you do nearly anything you would want with your site, there are a few things you should consider before you install and activate a plugin.
Is the plugin currently supported?
- Last updated: Make sure that the plugin you want to install has been updated relatively recently. This is a sign that it’s being maintained and that the developer is working on it.
- Active installations: If a plugin has a lot of active installations, it indicates that it is popular and can likely be trusted.
- Rating: See how many and what kind of ratings the plugin has.
- Compatible: Check to make sure the plugin is compatible the version of WordPress installed on your site.
Does the plugin do what I need?
Prior to installing a plugin, it’s a good idea to read over the plugin documentation to learn how to use and configure it. If you’re testing a few different plugins for a specific functionality, make sure to only keep one of them activated at a time.
Install one plugin at a time
As a rule, it’s best to install and activate one plugin at a time, so you can set it up and test it individually. If the plugin causes a conflict or undesirable result on your site, you’ll be able to quickly identify and remove it.
Am I using too many plugins?
It’s smart to check your plugins from time to time, then deactivate and delete the ones you’re no longer using. To ensure optimal site performance, you only want to keep plugins that are activated.
In some cases, you may have 2 plugins that have overlapping features. While you likely won’t have these features enabled in both plugins, it is a good idea to choose the better of the 2 plugins and deactivate and delete the other one.
How to install a WordPress plugin
There are three ways to install a WordPress plugin, including:
- Installing a free plugin in the WordPress dashboard.
- Installing a premium plugin via upload in the WordPress dashboard.
- Installing a plugin manually via FTP or File Manager.
Installing a free plugin in the WordPress dashboard
This is the easiest way to install a WordPress plugin, but can only be used with free plugins that are in the WordPress plugin repository.
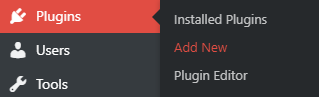
First, go to Plugins > Add New in left sidebar of your WordPress dashboard.
On the next page, type the name of the plugin you’re looking for or the desired functionality (contact form, etc.).
This will bring you to a screen displaying the results of your search.
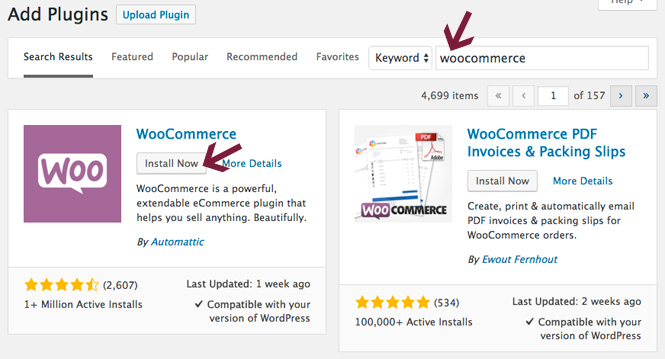
Click the Install Now button. Once installed, the button text will change to Activate.
Click the button again to turn on the plugin so you can start using it on your WordPress website.
Once you’ve installed and activated your chosen plugin, you will need to configure it. The settings will vary depending on the plugin you’re using.
Installing a premium plugin via upload in the WordPress dashboard
Premium plugins are not listed in the WordPress plugin directory, so you cannot install them using the first method above.
To install a premium plugin, first go to Plugins > Add New in the left sidebar of your WordPress dashboard.
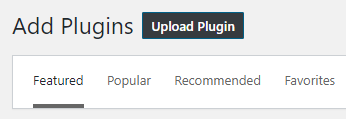
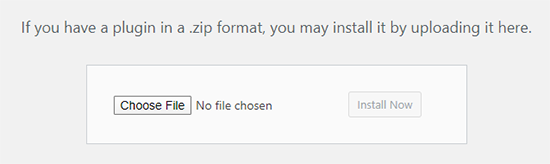
On the top of the next screen, click the Upload Plugin button.
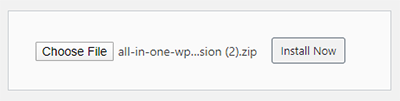
Then, you will see a upload box. Simply click the Choose File button and locate the plugin zip file you downloaded to your computer earlier.
Once you’ve located and chosen the file, click the Install Now button.
Let the installer do its thing, and then hit the Activate Plugin button on the success screen.
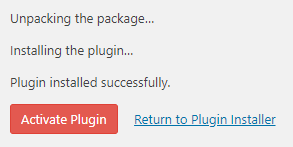
Once activated, configure the plugin settings as per your needs.
Installing a plugin manually via FTP or File Manager
In some cases, your WordPress hosting provider may have certain restrictions in place that could prevent you from uploading a plugin in your WordPress dashboard.
If this is true for you, you’ll have to upload the plugin manually using FTP or File Manager in your web hosting cPanel.
While this method is slightly more complicated, it’s still very do-able.
As in the 2nd method mentioned above, you will need to download the plugin onto your computer first.
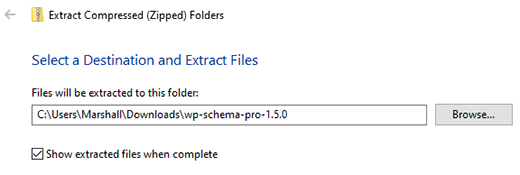
Then, you will need to extract the .zip file, which will create a folder with the same name. This unzipped folder is the one you will need to upload.
Uploading via FTP – In order to upload the plugin to your WordPress site via FTP, you’ll need the following login credentials:
- Host
- User
- Password
You can get this info from your host. Once you log in, you’ll need to go to the /wp-content/plugins/ directory where you will upload the uncompressed folder.

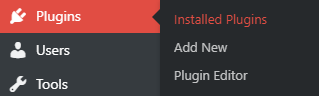
Once you’ve uploaded the folder to the plugins directory, you should go to your WordPress dashboard and click on Plugins > Installed Plugins in the left sidebar.
You will see the plugin that you added, and can activate it easily by clicking the link below its name. Then, you can configure the plugin settings.

Uploading via File Manager – In addition to uploading a new plugin via ftp, you can also do it using File Manager within your web host’s cPanel.
Again, you will download the plugin .zip file onto your computer. Using cPanel, we will extract the zipped folder once it’s uploaded, and not on your computer.
Then, navigate to File Manager within your hosting cPanel.

Go to your /wp-content/plugins/ folder and then click on the Upload icon near the top.

On the next screen, click the Choose File button.
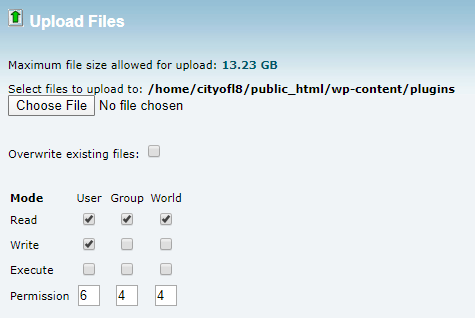
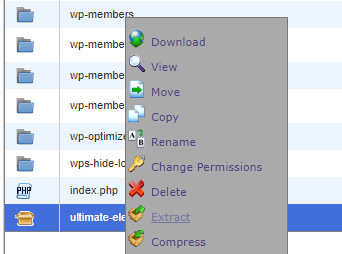
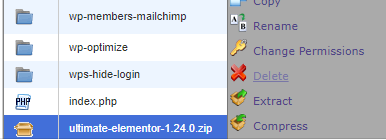
Locate the zip folder, and wait for it to upload. Then, go back to the Plugins folder and right-click on the folder you just uploaded.
Then, select Extract from the menu.
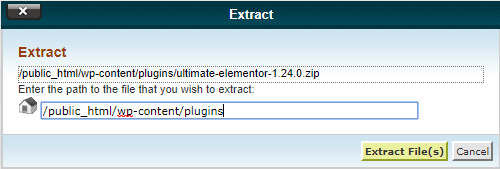
Click on the Reload icon to refresh the view of your Plugins folder, then see if it extracted the folder successfully. Last but not least, delete the original zip file you uploaded.
Then navigate to Plugins > Installed Plugins in your WordPress dashboard sidebar.
Last but not least, click the Activate link under the plugin name and adjust the plugin settings to fit your needs.
Frequently Asked Questions about installing WordPress plugins
If you’re a beginner just starting out with self-hosted WordPress, you surely have a few questions about installing plugins. Below, we list some answers to some of the more common ones.
1. How should I find the best WordPress plugins for my website?
As we mentioned at the beginning of this post, you should look for the following to help you make your decision:
– When was it last updated?
– How many active installations are there?
– Does it have high ratings?
– Is it compatible with the newest version of WordPress?
2. How many plugins should I install on my WordPress site?
The bottom line is you shouldn’t just go nuts and install a bunch of plugins willy-nilly. Simply think of the functionality that you want on your site, and choose plugins that help you achieve what you’re looking for.
3. How do I uninstall a WordPress plugin?
Certain plugins (e.g. W3 Total Cache) may add extra files and folders to your site that you’ll also want to get rid of. Typically, a google search for “uninstall W3 Total Cache completely” will give you instructions for removing any unneeded files related to a plugin. Obviously, you’d want to replace the “W3 Total Cache” part with whatever plugin you’re deleting.
4. Should I remove inactive plugins?
While keeping deactivated plugins doesn’t negatively affect your site performance, it can be detrimental to your site’s security because these files could be infected or have malware installed on them.
5. Are there any must-have WordPress plugins that I should install on my site automatically?
Security – To keep your site safe, I highly recommend Wordfence Security. You can use either the free version or opt for the premium version if you’d like better protection. I use the free version on all of my sites and use quality hosting, which is also important when it comes to site security.
Caching – For optimal site performance, you should use a caching plugin which takes dynamic content and creates static HTML for it. This reduces server load, and helps your pages load much more quickly. Among the popular options are: W3 Total Cache, WP Super Cache, and WP Rocket.
Site Backups – You should be backing up your website regularly as a precautionary measure. While some hosts offer automated, daily backups, you may still want to make your own backups just in case. I highly recommend and use BackWPup to back up my WordPress sites on a regular basis.
Conclusion
There are a wide array of amazing free and premium plugins that you can use on your WordPress site to add all kinds of functionality. It’s one of the many reasons it’s such a fantastic CMS for nearly any kind of website.
Hopefully, this tutorial has shown you how to easily add new plugins to your website. If you have suggestions for me to make this guide more comprehensive, please let me know in the comments.
If you found this post helpful, please share it and spread the word!
Want more like this? Sign up for my newsletter to receive helpful WordPress Tutorials, Tips and Tricks.

