Do you have a Joomla website that you’d like to migrate to WordPress? Joomla is a solid CMS with a number of features, but it’s nowhere near as good as self-hosted WordPress (imho). If you’re looking to move your site from Joomla to WordPress for whatever reason, this guide will help you.
With WordPress, you will have a much wider variety of both themes and plugins, as well as the ability to add pretty much any kind of website functionality you’d like.
WordPress can be used to create nearly any kind of site you can imagine, and the development possibilities are pretty much endless.
Please Note: Migrating your site from one CMS to another IS NOT simply a matter of moving over the content. It is essentially building a brand new website from scratch.
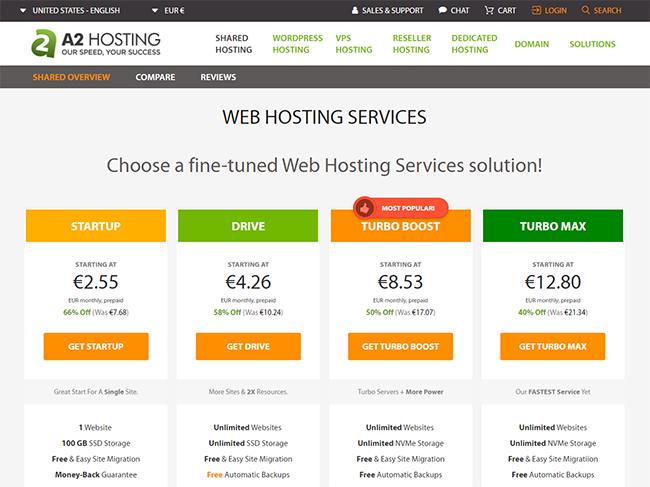
If you’re looking for quality shared hosting for your WordPress website, we highly recommend A2 Hosting. They offer unlimited SSD space, free automatic site backups, hosting optimized for speed and 24/7/365 guru technical support.
Pre-migration steps
Before you start the migration process, you’ll need to take care of a few things.
Web hosting
You obviously already have hosting for your Joomla site, but you may want to switch to a new web host that specializes in WordPress. If your current service is crappy, then it’s definitely worth it to move.
Hosting is very important for your site’s performance, so don’t choose the cheapest host possible. I’ve heard that A2 Hosting provides solid shared hosting service, so check them out.
UPDATE: While I used to use and recommend SiteGround, they are ABSOLUTE GARBAGE now. Their support has gotten worse (sometimes they totally disable online chat support), prices keep going up and there are mysterious CPU overages ever since they moved to Site Tools. I was well under my allowed resources on my cloud hosting plan, and got 500 Internal Server errors all the time after the switch.
Setting up a temporary domain

Once you have your hosting all figured out, you will want to set up a temporary domain (e.g. dev . yoursite . com). This will be used as a place where you can install WordPress and move your content from your Joomla site (which is still live) for the time being.
Get in touch with your host and ask them to set up a temporary domain for you, or simply google “set up a temporary domain on + your host name.” After you migrate all your content, you will move your URL from this temporary one to your real domain (e.g. yourniftysite.com).
Making a list of your current URLs
It’s important to optimize your permalinks so they’re SEO-friendly. They should be short and accurately explain what the page or post is about (e.g. www.mprstudio.com/free-wordpress-setup). Create a list of your current Joomla URLs just in case you want to alter them for your WordPress site.
This will make it easy to setup redirects later, so people who visit URLs on your old site will be redirected the equivalent on your new site.
Please note: If your site didn’t receive a decent amount of traffic or have a lot of backlinks, I wouldn’t even worry about setting up redirects.
Installing WordPress

Once you have a temporary domain, you are ready to setup WordPress. I will provide you with a great resource to help you move WordPress from a temporary domain to your main URL after the migration is complete.
Joomla to WordPress site migration
Now that you’ve installed WordPress, you’re ready to get started with the actual migration. For this tutorial, we’ll be using the free version of FG Joomla to WordPress, but there is a premium version as well. You can see the differences between the two here.
Step #1: Installing FG Joomla to WordPress
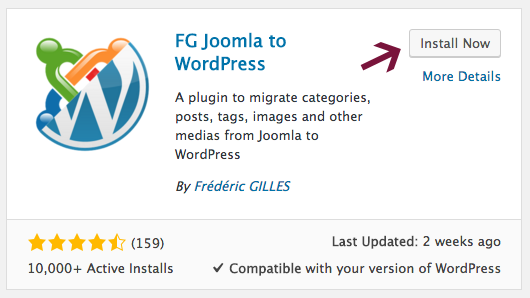
First, go to Plugins > Add New and search for FG Joomla to WordPress. Click on Install Now and wait until it’s done; then click Activate.
This plugin is very helpful, and should make moving your content pretty straightforward.
Whenever you use plugins (or online tools) to help with site migrations, problems can occur. It’s possible that you’ll have to move some of your content manually, or even fix a couple things post-migration.
Step #2: Getting your Joomla database details
After installing the plugin, you’ll need to grab your Joomla database details, which you will use to import data into WordPress.
You are probably already familiar with Joomla’s control panel, but we’ll show you where to get the info you need anyway.
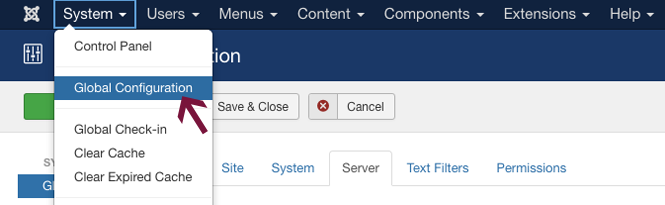
First, go to System and click Global Configuration.

Once there, click on the Server tab.
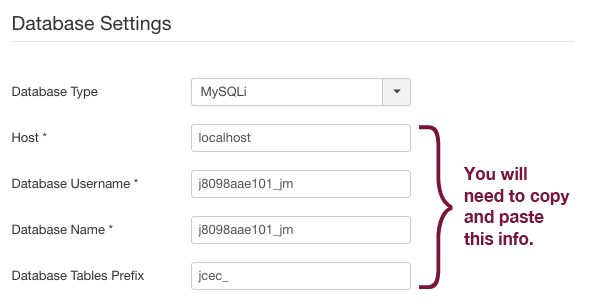
At the top right of this pane, you’ll see Database Settings.
Simply leave this tab open with these details so you can copy and paste them when you import everything into WordPress. You can also copy and paste them into a text file if you’d like.
You will need the host, database username, database name and database tables prefix values for the next step.
Step #3: Importing Joomla content to WordPress
Migrating from Joomla to WordPress is much easier than from Weebly, Wix or Squarespace. You’re ready to actually start moving your content.
Go to your WordPress dashboard and click on Tools > Import in the left sidebar.

There are a number of import tools included with WordPress by default, but none for Joomla. This is why we installed the FG Joomla to WordPress plugin in Step #1.

Look for Joomla (FG) in the table and click Run Importer below it.
This will take you to a page with a number of options to set for your migration.
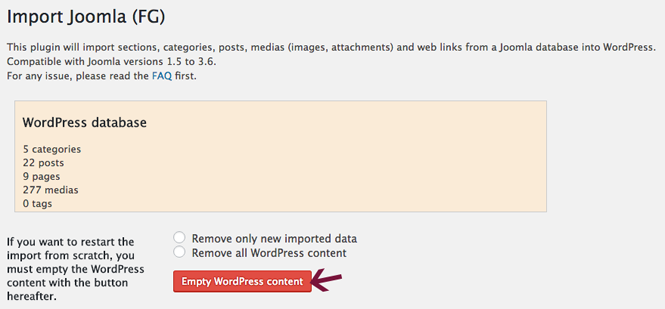
Near the top of this screen, you’ll see an Empty WordPress content button. If you have created any pages, posts, attachments, menus, categories, tags, custom posts or taxonomies, users and comments clicking the button will delete them.
Also, just keep the default WordPress theme for now. You can add more and change your theme once the migration process is finished.
For the migration to work correctly, it’s ideal to have a totally blank installation. If for some weird reason you already added some content to your site, make sure you back it up before you click Empty WordPress content.
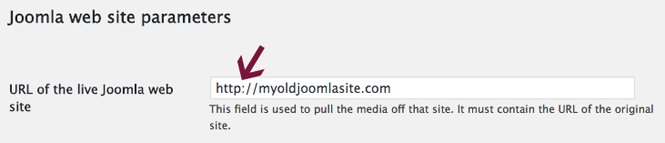
Under Joomla web site parameters, enter the URL of your live Joomla website. This is used to pull any media off of your current site.
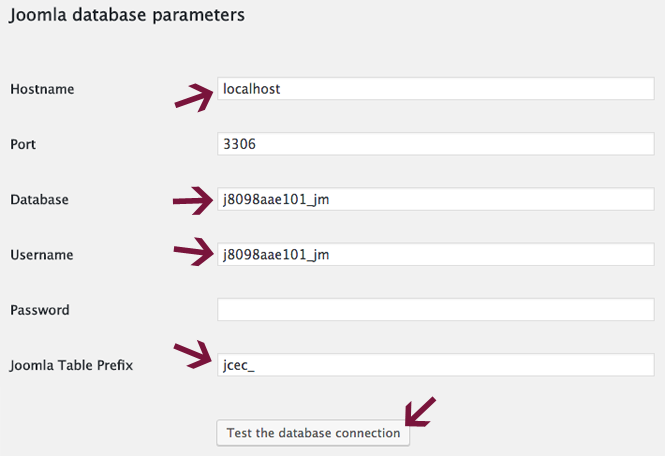
In the Joomla database parameters section, you will need to paste the database information that you copied in Step #2.
- Hostname
- Database
- Username
- Joomla Table Prefix
After you’ve entered the details, click on Test the database connection to make sure it’s working properly.
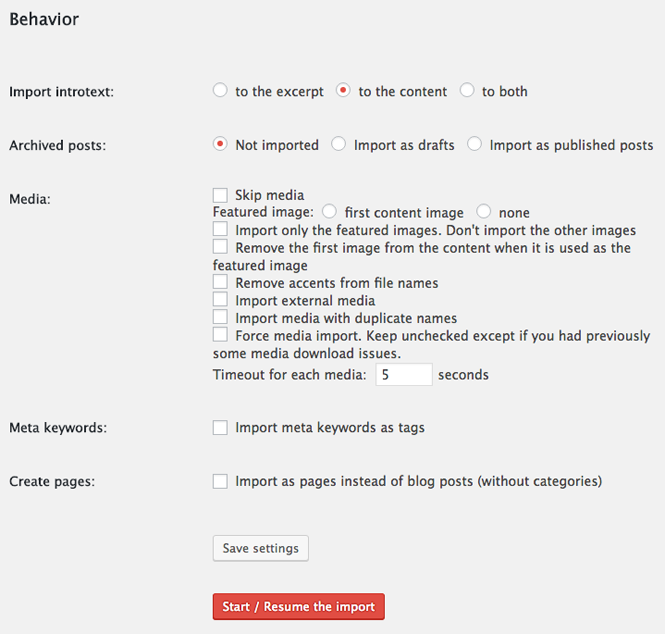
In the Behavior section, you can specify which items you’d like to import in addition to your Joomla pages and posts.
Import intro text and Archived Posts
You can just leave the defaults for the first two items. I’m guessing you don’t need to import your old archived Joomla posts.
Media
When it comes to importing your media items, you have a wide variety of options. You can even choose to skip the media import altogether, which will help speed up the migration process.
Option 1: Manual
I recommend manually downloading all images and other media from Joomla so you can properly optimize your images before uploading them to your new site.
You can save your media items by dragging them to a folder on your computer, or using Save Image As by right clicking on PC or control clicking on Apple.
Once you have all the images on your computer, you should size them to fit your new theme, give them descriptive filenames (e.g descriptive-filename.jpg) and make sure they are all optimized for the web.
Option 2: Automated
If your site is huge and contains tons of media items, you may want to skip the whole manual option and simply import all your media items using FG Joomla to WordPress. Then you can use one of the following image optimization plugins to reduce the size of your image files:
Meta keywords
In the Meta keywords section below Media, you can select whether you’d like to import keywords from Joomla to use as tags in WordPress. Properly using tags is a good way to help organize your content.
You can also leave this unchecked and create new tags manually after you migrate.
The very last option lets you import your old Joomla posts as pages on your new site. I don’t know why you’d want to do this, but I don’t know a lot of things. Update: I learned from the plugin author Frédéric Gilles that users of the FG Joomla to WordPress plugin had requested this feature, so that’s why it exists (I knew there was a logical explanation!).
Finally, select the Start / Resume the import button let the plugin do its thing.
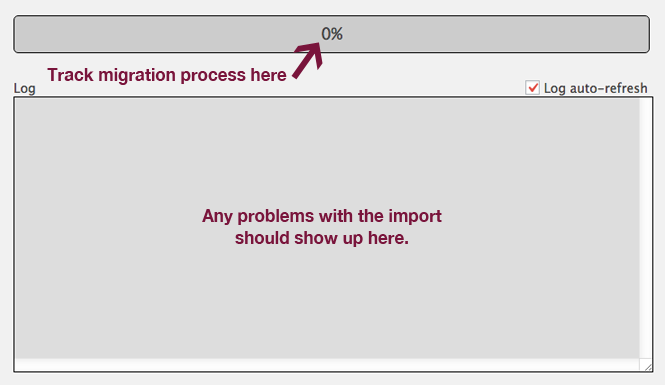
You can track the migration progress in the bar, and see any problems with the import in the box below.
Tip: To have more control over everything, you can leave most options unchecked and set things up manually instead.
In many cases, it’s best to see how all your content looks on your new WordPress site once you choose a theme. Every site is different, and you’ll want to adjust everything to fit the particular layout you choose.
You’re all done with the migration, yippee!!! Don’t get too excited, you still have to fix a few things.
Post-migration steps
Now that you’ve moved all of your content over, you’re ready to proceed with the post-migration steps.
Choosing a theme
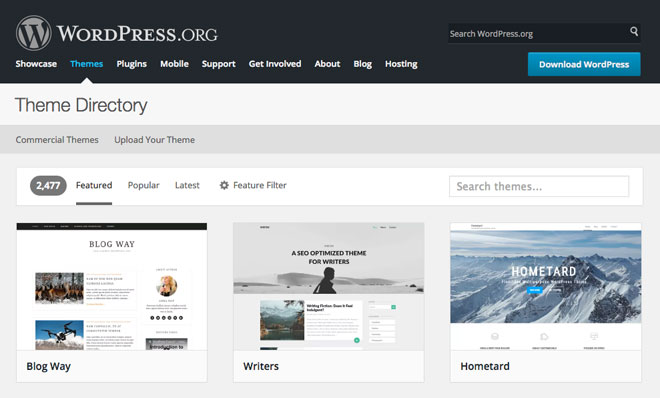
Now that you’ve successfully switched platforms, you need to select a new theme for your site. While you cannot use the same template as your Joomla site unless you hire a developer to create a custom theme, you can surely find something similar which will work for you.
I recommend choosing a fresh theme for your new site. There are thousands of them available for self-hosted WordPress, including those for free in the WordPress Theme Directory and premium ones from a number of different online marketplaces.
When selecting a theme, you want to make sure that it is one which was created with quality in mind. There are a bunch of poorly-coded, bloated themes which you want to stay away from. Using them will hinder your site’s performance, so make sure to choose a top-notch one from the start.
Read reviews and check ratings of any theme you wish to use. You should be able to decipher whether it’s one you want to install or not.
Creating menus
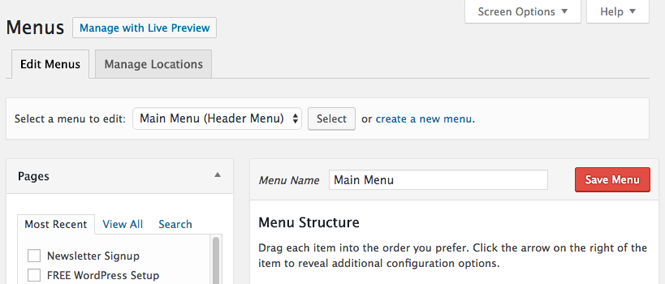
After migrating all your content you will need to recreate a number of items, including any menus you were using. Having a well-structured main menu is crucial as it lets your visitors easily find what they’re looking for.
It’s very easy to create a new menu in WordPress. Go to Appearance > Menus, and enter a name for your menu and click the Save Menu button. Next, add any pages, posts, custom links, and anything else to it.
Once you’ve created your new menu, you can specify where it appears on your site. Themes tend to use different names for the Main Menu, and may call it Top Menu, Header Menu or something else entirely.
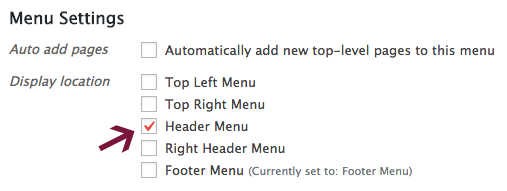
Select where you want to display your menu by checking the appropriate box in Menu Settings (below the Menu Structure area seen above) or in the Menu Locations tab (see below).
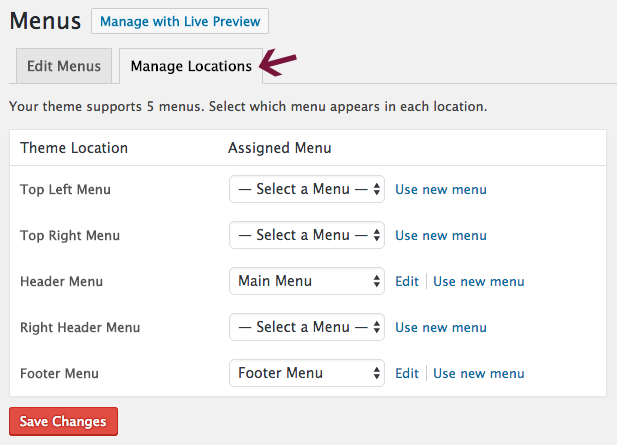
After you choose where to display your menu, don’t forget to click Save Changes. Now, go preview your site to make sure the menu is where you want it.
Every theme has different menu locations, so play around with your menus until you get them just right.
Setting up contact forms
It’s likely that you’ll need to set up some contact forms on your new site. They make it easy for people to contact you, and you can add all kinds of functionality to them.
I use and recommend Contact Form 7 on all of my sites. You can configure autoresponders for all of your forms, and even connect them to Mailchimp (with the help of an add-on plugin) to automatically add subscribers to your email lists.
Here are some alternative contact form plugins you can use instead:
- Ninja Forms
- WP Forms
- Gravity Forms
- Contact Form by BestWebSoft
Once you create and add contact forms to your page, it’s a good idea to check that they’re working properly. Fill them out with test information and make sure you receive submitted forms.
Adding widgets
What the hell is a widget? I thought you’d never ask.
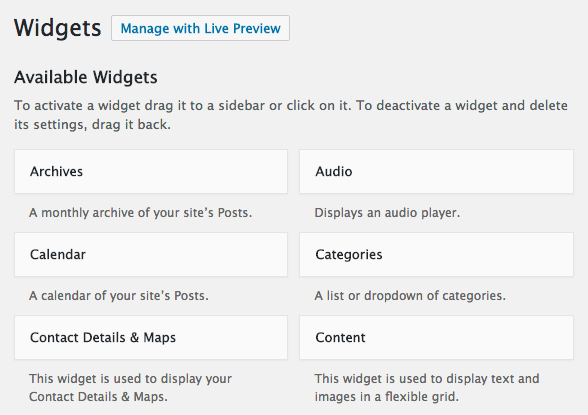
A widget is a content block which can be placed in your website’s sidebar and footer, among other places. They can be added and removed in Appearance > Widgets, and in the Customize area as well with some themes.
Among the widgets you can add to your site are the following:
Archives – displays a monthly archive of your site’s Posts.
Audio – adds an audio player.
Calendar – shows your site’s Posts visually in a calendar.
Categories – adds a list or dropdown of categories.
Contact Details & Maps – displays contact details and a map.
Content – shows text and/or images in a flexible grid.
Custom HTML – adds HTML code.
Custom Menu – adds a custom menu.
Image – inserts an image.
Meta – shows Login, RSS and WordPress.org links.
Pages – displays a list of your website’s Pages.
Posts – shows your site Posts in a flexible grid.
Recent Comments – displays your site’s most recent comments.
Recent Posts – displays a list of your most recent Posts.
RSS – a list of entries from an RSS or Atom feed.
Search – a simple search form for your site.
Tag Cloud – shows your most used tags.
Text – used to display text or HTML.
Video – displays a video from your media library or a video hosting site (e.g. YouTube, Vimeo, etc.).
In addition to the widgets mentioned above, some themes have their own custom widgets as well.
Once you activate your desired theme and choose the functionality you want your site to have, you can add widgets that match your specific needs.
Adding image galleries
Were you using photo galleries on your Joomla site? If your answer is yes, you’ll need to recreate them.
While WordPress supports galleries natively, they don’t work very well and are not user-friendly.
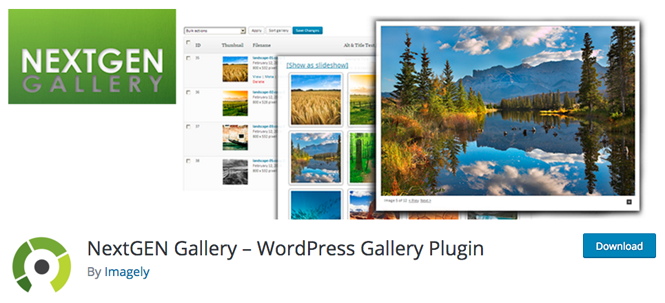
A number of themes have gallery functionality built-in, but you may need to use a plugin.
There are a number of great free gallery plugins, including the one I’ve always used – NextGEN Gallery.
As an alternative, you can give FooGallery a try. I have heard great things about it, and am going to test it out on one of my sites.
Installing must-have plugins
One of the reasons WordPress is so amazing is the amount of plugins you can use to add all kinds of functionality to your site.
When starting your WordPress site, there are a few that you should install right away, including the following:
- Wordfence – Protect your site from malicious activity with this great security plugin.
- W3 Total Cache – Speed up your site by caching dynamic pages to create static ones.
- Yoast SEO – Optimize your site for SEO with this killer plugin.
- BackWPup – Create partial and complete site backups for free with this super-helpful plugin.
Wanna learn more about these plugins and their features? Read this post for a detailed explanation of them.
Keep in mind: When you’re adding plugins, don’t just go all willy-nilly and install a boatload of them. Simply choose the ones you need and install those.
Before installing a plugin, read some reviews about it and check to see when it was last updated. It’s best to use plugins that are actively maintained.
Updating your permalinks
Since you’re optimizing your new site, it’s important to make sure that the permalink structure you’re using is short and concise.

You may or may not have been using a good structure on your old site. If you were, just stick to the same structure. If not, I suggest improving it from here on out.
In the pre-migration steps at the beginning of this post, I told you to make a list of your Joomla site URLs. This only comes into play if your old site received a good amount of traffic and/or had a lot of backlinks to it.
If your site received a lot of visitors, and you plan on changing your permalink structure, you will want to set up redirects to your new site URLs.
To do this, you’ll use the Redirection plugin.
If your old site sucked and had very little traffic, don’t even worry about redirects. Just focus on attracting quality visitors to your new and improved WordPress site.
Moving from development to live site
Since you created a temporary domain to move all your content over, you’ll now have to move everything to your permanent domain.
If you switched to a new web hosting service, you’ll need to update your DNS settings with your domain name registrar. If you don’t know how to do this, simply google “update DNS + name of your registrar.”
Once propagation is complete, you’ll be able to start creating your live site.
You will need to do the following:
- Update DNS if you switched hosts.
- Backup your development site.
- Export your development MySQL database tables.
- Upload your WordPress development site.
- Create a MySQL database for your new site, and make note of all details, including database name, username and password. You will need them later.
- Edit your wp.config file to reflect your new MySQL database details.
- Import your development MySQL database tables into your new database.
Neil Patel wrote an excellent piece about moving your WordPress site to a new domain, which I’ve used to move multiple sites.
Redirecting old URLs (if need be)
Since you wrote down all your old URLs, you can now redirect them to their equivalent on your WordPress site.
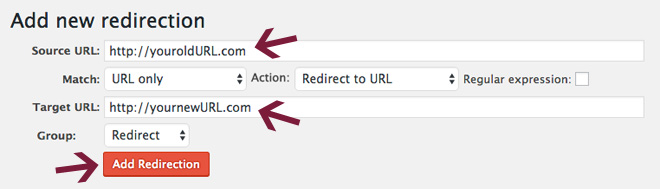
Download and activate the Redirection plugin, then do the following:
- Enter an old page/post URL in the Source URL box.
- Put the new page/post URL in the Target URL area.
- Click on Add Redirection.
- Repeat as needed with every page or post you wish to redirect.
Checking and fixing your internal links
If you updated your permalink structure during your move from Joomla to WordPress, it’s important that you take a look at your site’s internal links.
Go through all posts and pages and edit any links to other content on your site.
If you’d rather not go through every page and post manually, the Broken Link Checker plugin can give you a hand. Install and activate it, then let it do its thing.
It will search for broken links in your site’s pages, posts, comments and other content.
If Broken Link Checker finds any broken links, it will show them in two places:
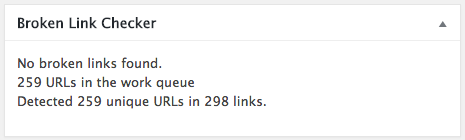
In a Broken Link Checker widget on your WordPress dashboard
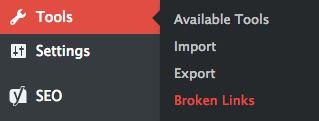
and under Tools > Broken Links.
This plugin even lets you update broken links through its interface instead of having to navigate to the source to make changes.
You can keep the Broken Link Checker plugin even after you fix all your links, but you may want to deactivate it and just turn it on to check for broken links every once in a while (like once per month or something).
In my Wix to WordPress migration post, I recommended keeping this plugin activated, but should have specified that you should turn it off when not using it.
You can also completely uninstall it after you check and fix all your links and use an online tool such as Online Broken Link Checker periodically instead.
Plugins that perform ongoing scans tend to really slow down your site, as Tom Dupuis of Online Media Masters mentions in his post about 35 plugins that slow down your site. He writes awesome in-depth WordPress site optimization tutorials, so check out his blog.
Making sure everything works
After your new WordPress site is up and running, you’ll want to make sure that everything is running properly.
Few moves go totally smoothly. Your site should load fine with all your content, but there are likely a few things you still need to check or fix. Go through all pages and posts, and check for any problems.
Will I have to re-design my website when I move from Joomla to self-hosted WordPress?
Should I set up redirects from my old Joomla posts and pages to their new WordPress equivalents?
What WordPress plugins do you recommend for my new site?
How about hosting? Which web host should I choose for my WordPress website?
Conclusion
Moving your site from on CMS to another is quite a monotonous task, but well worth it. Hopefully the resources in this guide helped you move your site from Joomla to WordPress without pulling ALL your hair out.
Did I miss anything? Is there something you care to add? I tried to make this article as thorough as possible, but please let me know how it could be improved.
Are you having problems with your site migration? Please leave me a detailed comment below, and I will try to help out as best I can… but I cannot guarantee to fix your problem.
If you’re looking to move your site from other platforms to self-hosted WordPress, check out these other migration guides:
- Squarespace to WordPress
- Weebly to WordPress
- Blogger to WordPress
- Drupal to WordPress
- WordPress.com to self-hosted WordPress
- Medium to WordPress
- Tumblr to WordPress
- Wix to WordPress
If you found this post helpful, please share it and spread the word!
Want more like this? Sign up for my newsletter to receive helpful WordPress Tutorials, Tips and Tricks.


Thank you for your tutorial. Great article.
I have a question, if I already build my WP site(1 yr data), can i migrate joomla(2018-2020’s data) to current WP without empty my current data in WP ?
What happen if I choose the option, “remove only new imported data” ? can this plugin just add joomla’s data to my current WP database without delete my current data?
You should be able to migrate your Joomla data without emptying your WP database, yes.
i have problem when migrate joomla to wordpress using FG joomla to wordpress premium..can you help me with this error message:
Warning: set_time_limit() has been disabled for security reasons in /home/situs/wp51/wp-content/plugins/fg-joomla-to-wordpress-premium/admin/class-fg-joomla-to-wordpress-admin.php on line 268 Fatal error: Maximum execution time of 30 seconds exceeded in /home/situs/wp51/wp-includes/class-wp-image-editor-gd.php on line 189
There has been a critical error on your website.
thanks for your help before
With FG Joomla to WordPress Premium, you can reach out to the plugin author for support.
How does localhost work when your database is behind a CPanel and uses localhost, but your WordPress is on a completely different host?
Hi Clement. Thanks for your question, but unfortunately I am not sure. Have you tried googling it?
Great article! Just wondering if this can also be achieved by using hosts.cx? I am not able to setup a temporary domain otherwise
Thanks!
I’m not sure because I’ve never used hosts.cx. You can give it a try and see if it works.
Does a Joomla migration move the content over or just copy it? Basically, will my current Joomla site still be live or do I have to make the necessary domain changes to point to my WordPress site right away (hence the suggestion for maintenance mode)?
Hi Hannah. First, you’re moving the content to the temporary domain (dev.yoursite.com) where you install WordPress. Your Joomla site will remain live until you point your DNS to your new WordPress site. Then, follow the steps under “Moving from development to live site” to finalize your site on the proper URL (yoursite.com). Hope that helps!
If you have more questions, feel free to leave them or shoot me a message on my contact page. Good luck!
Since I will be using the same domain name for the new WordPress site as is currently displaying my Joomla site, do I have to manually delete the Joomla installation before I can run my WordPress site at “yoursite.com”?
Not necessarily. I think your best bet would be to ask your web host. Directory structure can vary from host to host, and they’ll be able to guide you. Generally, you can choose the directory (folder) where you want to install WordPress.
Thank you for this very complete tutorial.
I just wanted to add that the Premium version can automatically redirect the URLs from Joomla to WordPress, without the need to set them manually with another plugin.
https://www.fredericgilles.net/fg-joomla-to-wordpress/
It also imports the Joomla menus and the users.
And if you use extra plugins on Joomla like K2, Virtuemart, EasyBlog, sh404sef, …, you can import these data as well to WordPress using an add-on: https://www.fredericgilles.net/fg-joomla-to-wordpress/add-ons/
Glad you liked it, and thanks for the additional information.
Glad you like it, and thanks for the additional information!