Do you have a Medium blog which you want to move to WordPress? While Medium is a pretty good platform for blogging, self-hosted WordPress offers much more in terms of both design and functionality. In this post, I will walk you through the process of migrating your blog from Medium to WordPress.
Please Note: Migrating your website from one CMS to another IS NOT simply a matter of moving over the content. It is essentially building a brand new site from scratch.
If you’re looking for quality shared hosting for your WordPress website, we highly recommend A2 Hosting. They offer unlimited SSD space, free automatic site backups, hosting optimized for speed and 24/7/365 guru technical support.
- Why move from Medium to WordPress?
- Pre-migration steps
- Exporting your content from Medium
- Importing your Medium content to WordPress
- Troubleshooting
- Setting up redirects
- Choosing a WordPress theme
- Creating navigation menus
- Setting up widgets
- Adding a contact form
- Installing must-have plugins
- Optimizing your permalinks
- Finding and repairing broken internal links
- Making sure your site works properly
- Frequently Asked Questions
- Conclusion
Why move from Medium to WordPress?
WordPress is by far the most popular CMS, and for good reason. It is easy to use, offers unlimited options in terms of both design and functionality, and can be used to create pretty much any kind of website, including:
- a blog
- an online shop
- a membership site
- a community forum
- an online course
- a podcast site
- and much more
Please note: We are referring to self-hosted WordPress, not WordPress.com, which is a hosted solution. You can learn all about the differences between the two platforms in our WordPress.org vs. WordPress.com comparison.
Medium is a popular blogging platform, but it’s nowhere nearly as flexible as WordPress. You don’t have complete control of your website and content, and will have limitations when it comes to monetizing your site as well.
This step-by-step tutorial will show you everything you need to consider when moving your content from Medium to WordPress.
Pre-migration steps
Before you start moving your content over, you’ll need to take care of a few things.
Registering a domain name
If you are NOT using a custom domain on Medium (e.g. https://medium.com/@mprstudio), you will need to register a domain name for your new WordPress site.
As far as domain name registrars are concerned, NameCheap and GoDaddy will work just fine.
In the event that you are using a custom domain on Medium, you’ll just need to update your DNS to point to your new WordPress site.
Purchasing web hosting
Since WordPress is self-hosted, you’ll need to get web hosting. A web host provides you with space on a computer server which is connected to the internet.
Since you’re just starting your site, shared hosting will suit you just fine. You can always upgrade your hosting later if your site traffic grows.
While I have never used A2 Hosting, I have heard good things about them. If you’re just starting out, give their shared hosting a try.
Update: I used to be a big fan of SiteGround, but they truly suck now so do yourself a favor and AVOID THEM! They moved everyone to Site Tools from cPanel, and ever since then things have fallen apart. Support has gotten worse, their prices keep going up, and there are constant 500 internal server errors even if you have enough resources on your hosting server.
I used to be an affiliate for SiteGround, but simply refuse to recommend a crappy product.
IMPORTANT: Whatever you do, DO NOT listen to the knuckleheads who recommend BlueHost. While they used to offer great hosting, they are total garbage now. Do yourself a favor and stay away from ALL hosting companies owned by EIG.
Installing WordPress
Now that you have a domain name and hosting account, you’re ready to install WordPress. Most quality hosts offer a 1-click installation in cPanel. Keep reading for step-by-step instructions.

Under WordPress Tools within cPanel, click on the WordPress Installer to get started.

Next, click the Install tab.

Then, select the protocol for your site:
- http://
- http://www
- https://
- https://www
Let’s Encrypt offers free SSL certificates, so it’s best to choose one of the https options.
Pro tip: Making your site secure will provide you with a slight ranking boost in Google search results. This means that if there are two identical sites in terms of quality and SEO, the one with SSL will outrank the one without.
After you choose your protocol, select your domain from the dropdown list.
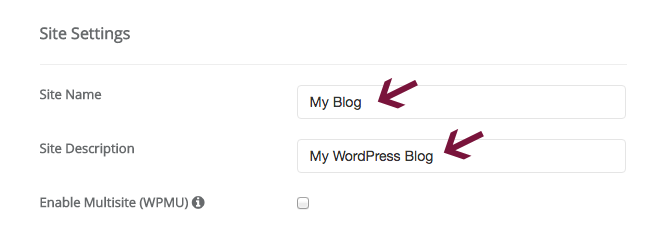
In Site Settings, enter your site name and description. Don’t worry about making it perfect now because you can easily change it after you’ve installed WordPress.
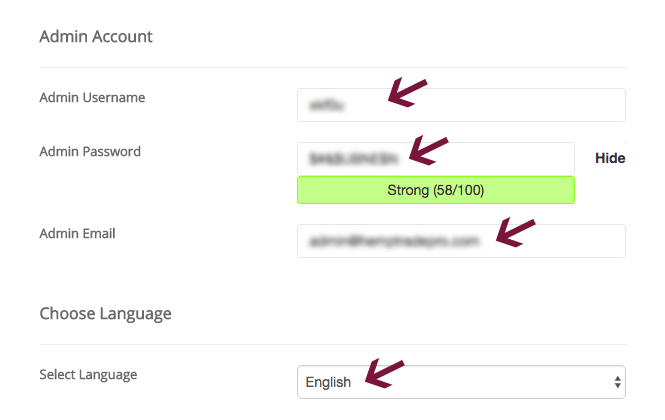
In the Admin Account field, enter an Admin Username. Don’t use admin as your username and make it somewhat complicated. Softaculous will automatically create a username and password for you, but feel free to change them if you want.
Under Admin Email, enter the email address where you will receive notifications related to your site. You can also use this email address to reset your password if you forget it or cannot log in.
Next, choose the language for your installation and disregard the other stuff.
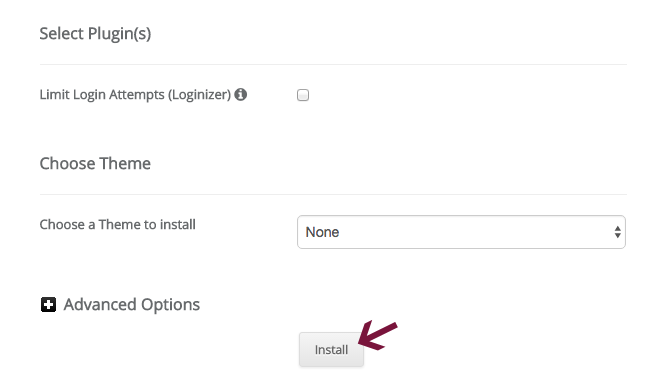
Finally, click the Install button and be patient.
For more detailed instructions on setting up WordPress, check out our comprehensive WordPress setup guide.
Don’t feel comfortable installing WordPress yourself? You can sign up for our FREE WordPress Setup and we’ll take care of it for you (conditions apply).
Exporting your content from Medium
Moving your posts from Medium to WordPress is easy with the help of the Medium to WordPress Importer tool. It will help you take all your content from Medium and export it to a file which is compatible with WordPress.
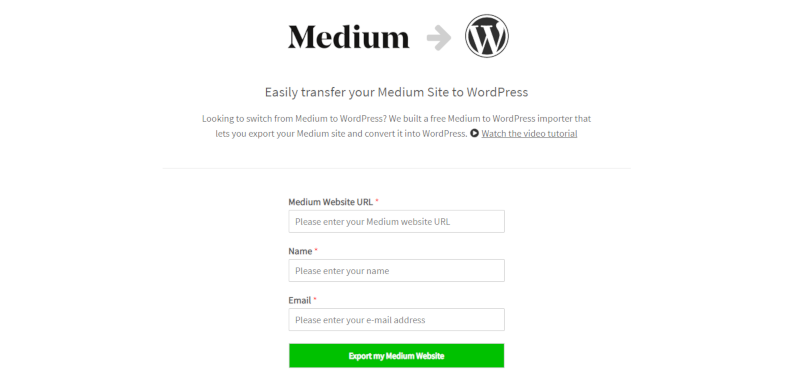
First, go to the Medium to WordPress Importer website. The process to export your file varies depending on whether you’re using a custom domain or not.
Custom domain – If you are using a custom domain (e.g. http://mysite.com or similar), simply enter your Medium URL, name and email address. Then, click the Export my Medium Website button.
Medium (non-custom) domain – In the event that you’re not using a custom domain on Medium, the tool will ask you to upload your Medium export file.
To get the export file from Medium, do the following:
- Log in to your Medium account and select your profile photo in the upper right-hand corner. In the dropdown menu, click on Settings.
- This will bring you to the settings page. Look for the Download your information area and click the Download .zip button.
- On the next page, click the Export button and Medium will gather your content and send you a link via email.
- Click the link in the email from Medium, and download your export file.
Once you’ve downloaded the Medium export file to your computer, you’re ready to go back to the Medium to WordPress Importer site.
Enter your Medium URL, upload the export file, enter your name and email address. Then, click on the Export my Medium Website button.
The Medium to WordPress Importer tool will now prepare your export file. Once it’s ready, you will see a success message and a download button.
Click the button and download your WordPress-compatible Medium export file. Save it somewhere on your computer where you can easily find it. You’ll need it in the next step to import your content to WordPress.
Importing your Medium content to WordPress
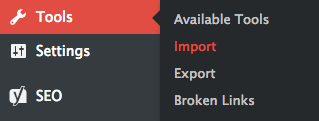
You are now ready to import your Medium content to WordPress. Log in to your WordPress dashboard and go to Tools > Import in the left sidebar.
There are a number of different import tools available in this section, but you want to use the WordPress one at the bottom. Locate it, and click the Install Now link below it.

Once the plugin is installed, click the Run Importer link which will take you to the WordPress importer page.

Here, you want to click the Choose File button, then locate the Medium export file that you converted with the Medium to WordPress Importer tool. Once you’ve selected the correct file, click on the Upload file and import button.

Then, the importer will ask you to assign authors for the imported content. You can either import the author from Medium, create a new author or assign your content to an existing WordPress user.
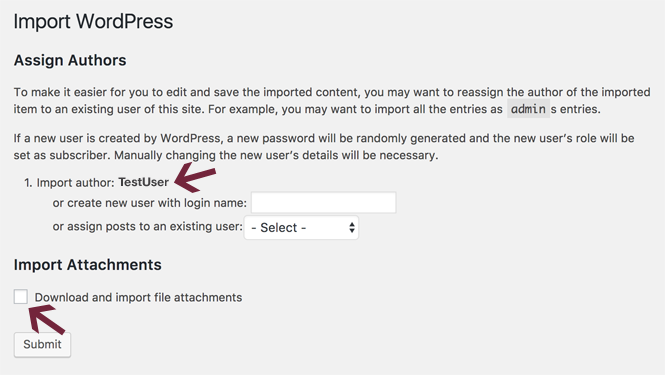
Pro Tip: It’s easiest to simply assign your posts to your main administrator account you created when you installed WordPress.
In the Import Attachments section, make sure you have checked the box next to Download and import file attachments.
Once you set these options, click the Submit button and be patient while the importer does its thing.
When the import process is finished, you’ll see a success message.
Now, you can go to your dashboard and check to make sure all posts have been properly imported.
Troubleshooting
What if the import stops? – If for some reason the import process stops, you can simply try it again. The WordPress Importer will not import duplicate content, as it can detect what is already there.
What if my images didn’t import? – While the WordPress Importer plugin attempts to import your Medium images during the import process, it doesn’t always work perfectly.
You can check by going to Media > Library in the left-hand sidebar of your dashboard. See if all the images from Medium are in your WordPress media library.
If there are any missing images, you’ll need to try and import them again. Go to Plugins > Add New, and search for Auto Upload Images. Once you find it, install and activate it.
The plugin will help you fetch and insert external images in any posts which are missing them.
Setting up redirects
Were you using a custom domain on your Medium blog? If so, then you can set up redirects to your new site. This is a good idea as it ensures that people who click on links to your old Medium posts will land on the equivalent content on your WordPress site.
Please note: If you were using a medium.com domain on your old site, then you WILL NOT be able to use redirects.
In order to set up redirects from your custom Medium domain to your new WordPress site, follow the steps below:
- Copy all of your Medium post URLs and save them in a text document.
- Install the Redirection plugin on your new WordPress site.
- Go to Tools > Redirection and click Add New at the top.
- In Source URL, add your old Medium URL.
- Under Target URL, enter your new WordPress URL.
- Choose Redirections in the Group dropdown menu.
- Click the Add Redirect button.
Repeat the above process for all of your old Medium posts until each of them properly redirect to your new WordPress site.
Choosing a WordPress theme
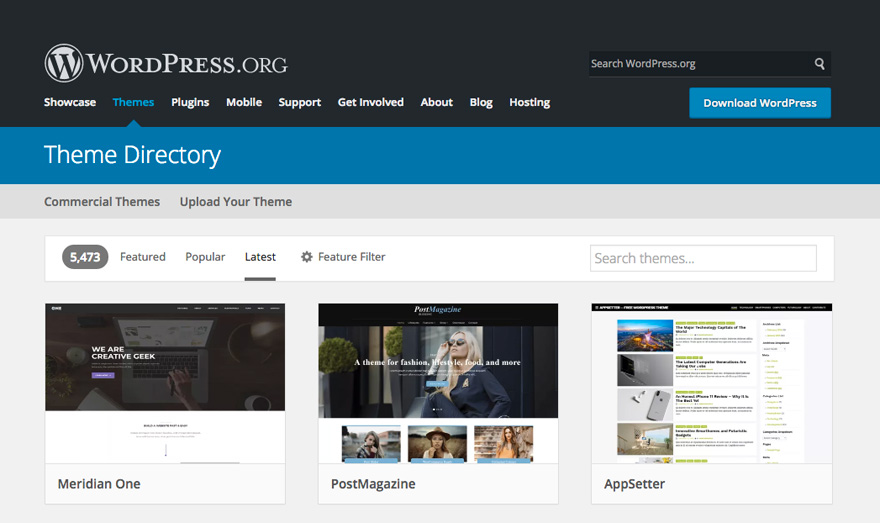
Now that you’ve moved your site to WordPress, you have tons of options regarding its appearance. Check out my guide to choosing a WordPress theme for some helpful tips when selecting a design for your site.
The WordPress Theme Directory has over 6,500 free themes to choose from, and there are countless themes available through other vendors as well, including:
- StudioPress (I use their Genesis framework and Genesis Sample theme on this site).
- Themeforest
- Colorlib
- Elegant Themes (creators of the popular Divi theme)
- themefuse
- Themezilla
Once you’ve found a theme you like, you’re ready to install it. If you’re using one from the Theme Directory, go to Appearance > Themes, then click the Add New button at the top of the page.
Navigate to the theme you want and click Install.
If you’re using a theme from another vendor, then you’ll need to upload it. Again, go to Appearance > Themes and click Add New. At the top of the page, you’ll see an Upload Theme button.
Click the button, locate the theme file on your computer and click the Install Now button.
Creating navigation menus
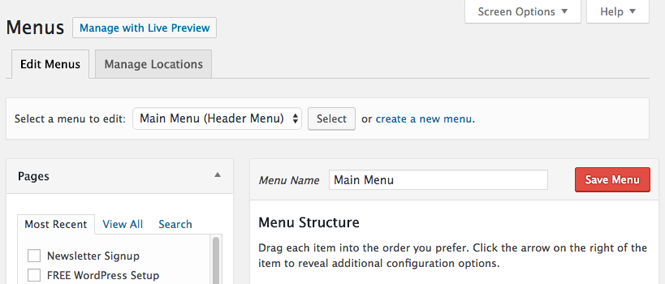
Now that you’ve chosen your theme, it’s time to create a navigation menu. It’s important that you make it easy for your visitors to navigate through your site with a well-organized main menu.
To create a menu, head over to Appearance > Menus. Give your new menu a name and click Create Menu. Then, add whichever pages, posts, categories, custom links, and other items you want to it.
With your new menu successfully created, you can now specify where you want to display it. Themes use various names for the Main Menu, including Header Menu or Top Menu.
Click on the Manage Locations tab at the top of the page. Here, you should select your new menu from the dropdown list next to Header Menu and click Save Changes.
Once you’ve finished adding your menu and choosing the proper location for it, take a look at your site and adjust it if need be.
Setting up widgets
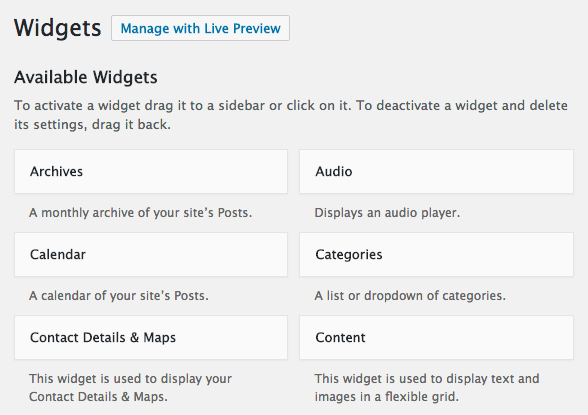
Widgets are blocks of content on your site. They can be added in your sidebar and footer, among other areas. Different themes feature widgets in various locations.
You can easily add or remove widgets by going to Appearance > Widgets in the sidebar of your WordPress dashboard. Certain themes also let you adjust widgets within the Appearance > Customize area as well.
The following are some of the widgets you can add to your site:
- Archives – displays a monthly archive of your site’s posts.
- Audio – adds an audio player.
- Calendar – shows your site’s posts visually in a calendar.
- Categories – a list or dropdown of categories.
- Contact Details & Maps – displays contact details as well as a map.
- Content – shows text and/or images in a flexible grid.
- Custom HTML – lets you add HTML code.
- Custom Menu – adds a custom menu of your choice.
- Image – displays an image you choose.
- Meta – shows Login, RSS and WordPress.org site links.
- Pages – displays a list of your site’s pages.
- Posts – shows your blog posts in a flexible grid.
- Recent Comments – displays recent comments on your site.
- Recent Posts – shows a list of your site’s recent posts.
- RSS – displays entries from an RSS or Atom feed.
- Search – insert a search form.
- Tag Cloud – shows your most used tags.
- Text – used to display text or HTML.
- Video – insert a video from your media library or a video hosting site such as YouTube or Vimeo.
In addition to the widgets listed above, certain themes include custom ones as well. Upon activating your chosen theme, spend some time to think about the functionality you want on your site. Then, add widgets to match your specific needs.
Adding a contact form
There are a number of free contact form plugins that you can use on your new WordPress site to make it easy for people to get in touch with you.
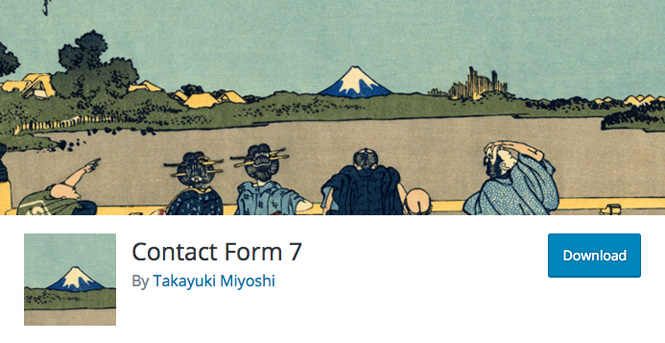
I use Contact Form 7 on my sites, and it works great. You can configure an autoresponder with it, and connect it to MailChimp (or other email newsletter software) so people can easily opt in to your mailing list.
Note: I recently learned that Contact Form 7 javascript is loaded on every page of a website (even those without forms), and this can negatively affect site performance. You can selectively enable it ONLY on pages with forms using the instructions in this guide.
In addition to Contact Form 7, you can choose from the following plugins:
Installing must-have plugins
One of the reasons WordPress is so awesome is the amount of great plugins you can use on your site. These include ones for SEO, site speed, security and much more.
Right off the bat, you can install the following plugins on all new WordPress sites:
- Yoast SEO – Optimize your site’s on-page SEO, create a sitemap and much more.
- W3 Total Cache – Caching plugin which helps you speed up your site.
- Wordfence Security – Helps protect your site against malicious activity.
- BackWPup – Backup plugin which lets you schedule partial and complete site backups.
You can learn more about these plugins in my essential WordPress plugins post.
There are tons of plugins to choose from, and it can be tough to decide which ones to use. As a rule, it’s not a good idea to go nuts and install tons of them. Instead, you should only use the ones that you truly need.
Before installing and activating a plugin, you should check when it was last updated and read some reviews about it.
Optimizing your permalinks
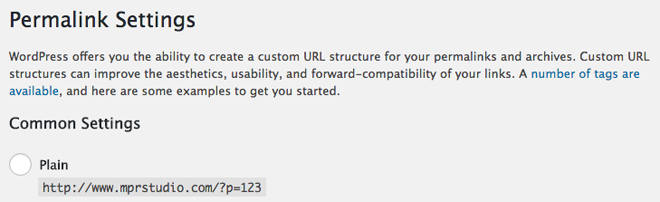
When you build your new WordPress site, you want to make sure that you’re using best practices. This includes using an optimized URL structure (e.g. mycoolsite.com/about/).
In the majority of cases, using the Post name structure will work well for your site. Some news websites choose to use the date in URLs, including those that are updated very frequently.
If you were not using a custom domain on your Medium blog used (e.g. https://medium.com/@mprstudio/…), your new permalinks will be different.
To change your permalink structure, do the following:
- Head over to Permalink Settings
- Choose Post name (or another structure if you want)
- Click Save Changes
If you were using a custom domain on Medium, it’s possible that your new WordPress permalink structure could be the same.
Finding and repairing broken internal links
After migrating your site, you should check all of your internal links. This includes links to both posts and media items. You are using a different permalink structure and the location of your images has changed on your new WordPress site, so you will have some broken links within your content.
Make sure you go through all your posts and update any links that need to be fixed. If you have a lot of posts or simply don’t want to go through everything manually, you can use the Broken Link Checker plugin instead. Once you install and activate the plugin, it will look for links in all your site content, and let you know which ones need to be fixed.
When it finds a broken link, it will display them in two different places:
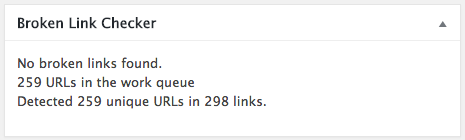
In the Broken Link Checker area within your WordPress dashboard.
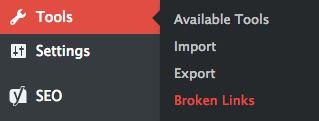
Under Tools > Broken Links.
This plugin is super helpful, and it lets you update links within its settings so you don’t have to navigate to each post to make changes. This is a big time-saver, especially if you have a ton of content.
Important: Once you find and fix all of your broken links, you should deactivate and delete the Broken Link Checker plugin. It uses a good amount of server resources, which can negatively affect your site’s performance.
Making sure your site works properly
After you’ve moved all your content over and gone through the other steps, you should check out the following items to make sure everything works as it should:
- Navigation menu
- Contact form
- Internal and external links
- Links to media items
Frequently Asked Questions
Will I have to choose a new site design when I move from Medium to self-hosted WordPress?
Should I set up redirects from my old Medium posts to their new WordPress equivalents?
What WordPress plugins do you recommend for my new site?
How about hosting? Which web host should I choose for my WordPress website?
Conclusion
Moving your site from Medium to self-hosted WordPress may seem like a complicated task, but it doesn’t have to be. Hopefully, this guide has given you clear, step-by-step instructions to migrate all of your content quickly and easily.
Did I miss anything? If you need help with the migration process
or have any suggestions to improve this guide, please feel free to leave them in the comments below.
If you’re looking to move your website from other platforms to self-hosted WordPress, check out all my migration guides below:
- Weebly to WordPress
- Squarespace to WordPress
- Blogger to WordPress
- Joomla to WordPress
- Drupal to WordPress
- WordPress.com to self-hosted WordPress
- Wix to WordPress
- Tumblr to WordPress
If you found this post helpful, please share it and spread the word!
Want more like this? Sign up for my newsletter to receive helpful WordPress Tutorials, Tips and Tricks.


A custom domain.
Thanks for your thorough tutorial. I’m trying to redirect my Medium posts to my blog and it’s not working. I tried using the Redirect plugin as well as Yoast Premium plugin. Not working :(
Hi Gustavo. Were you using a custom domain or one which included medium.com in the url (e.g. yoursite.medium.com)?